# Advanced instrumentation
Source: https://getkoala.com/docs/admin-guides/advanced-instrumentation
Setting up an advanced instrumentation will help you get the most out of Koala!
# Product analytics overview
Most customers start by instrumenting their public site properties, including their homepage, technical docs, and blog. However, a lot more can be unlocked with Koala with a full instrumentation. There are two critical pieces to a full instrumentation:
* Sending **product analytics** from your app
* Sending important **account-level traits** from your database or warehouse
This will turn an instrumentation that looks like this:
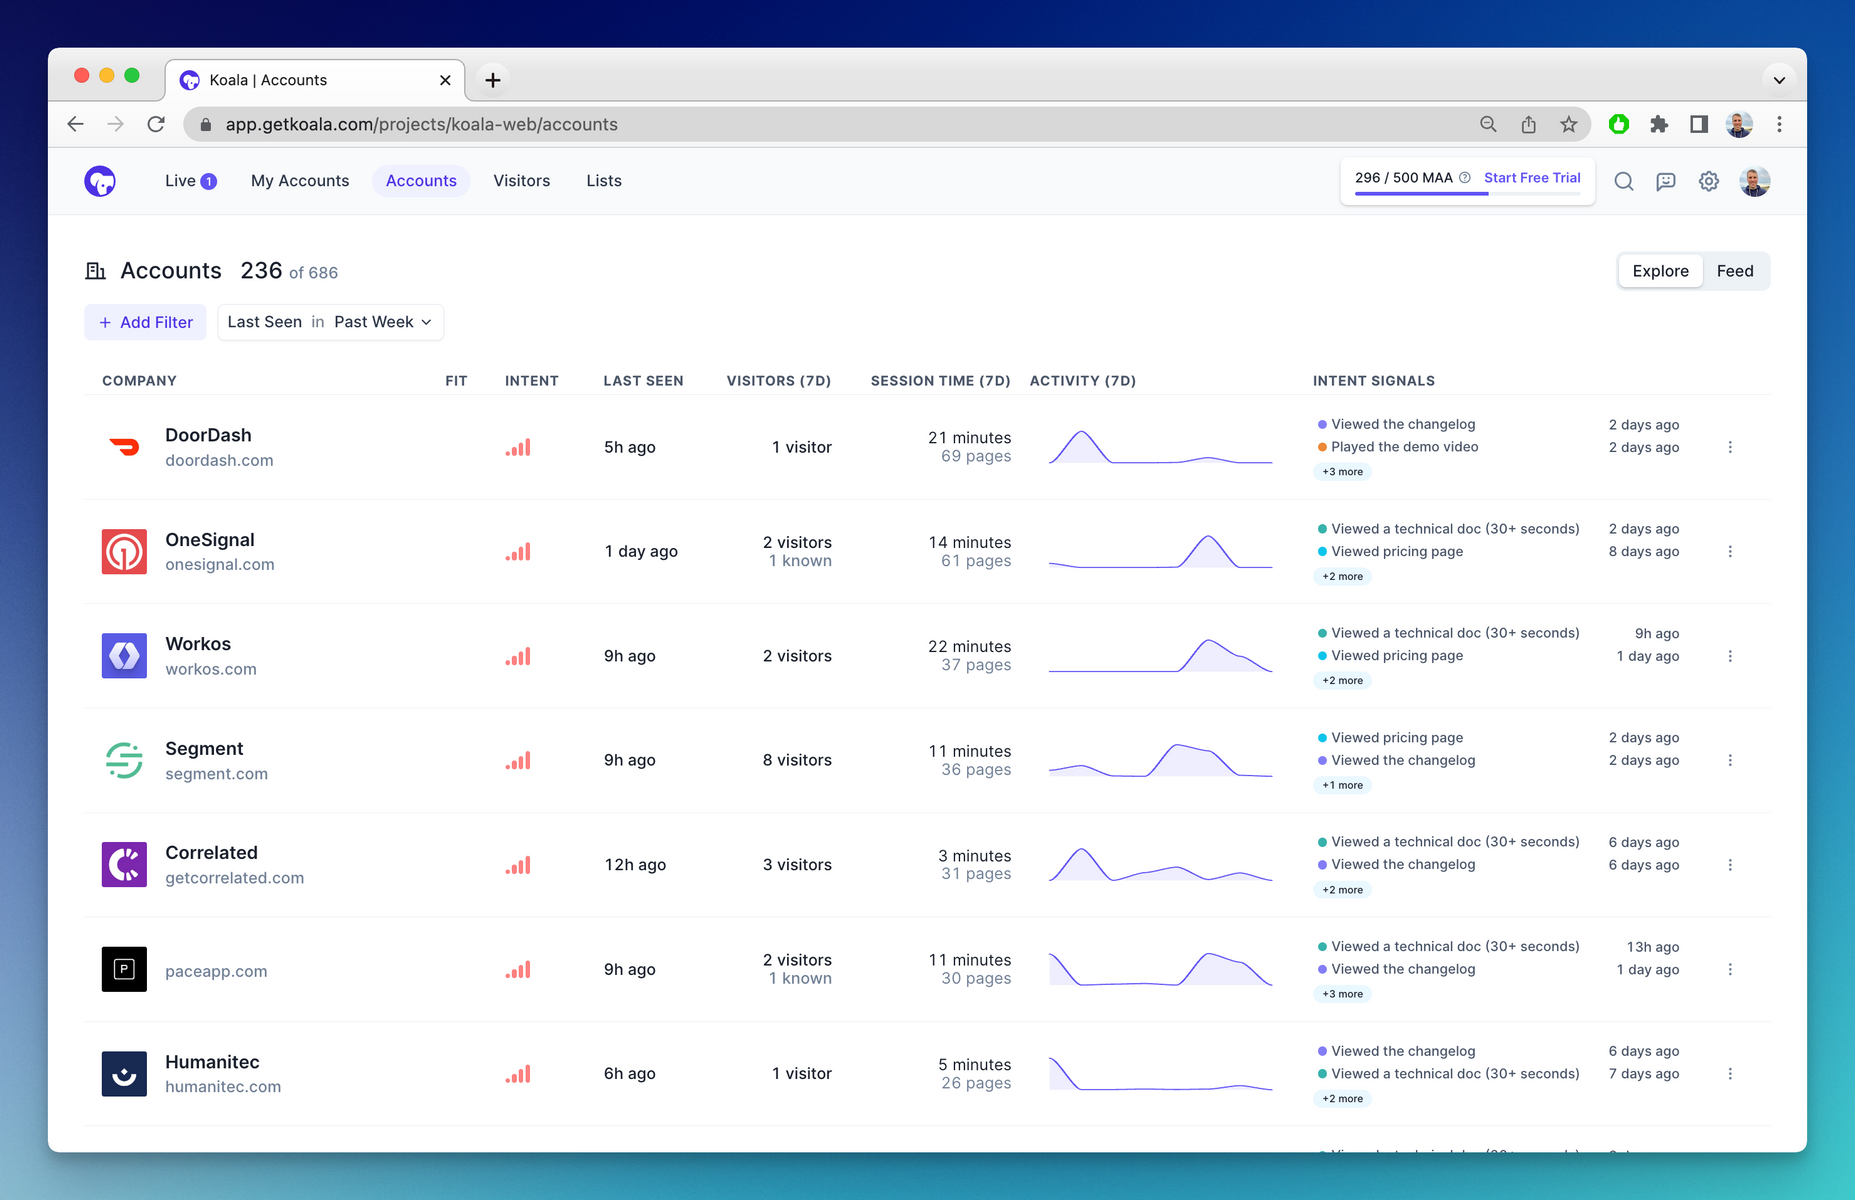
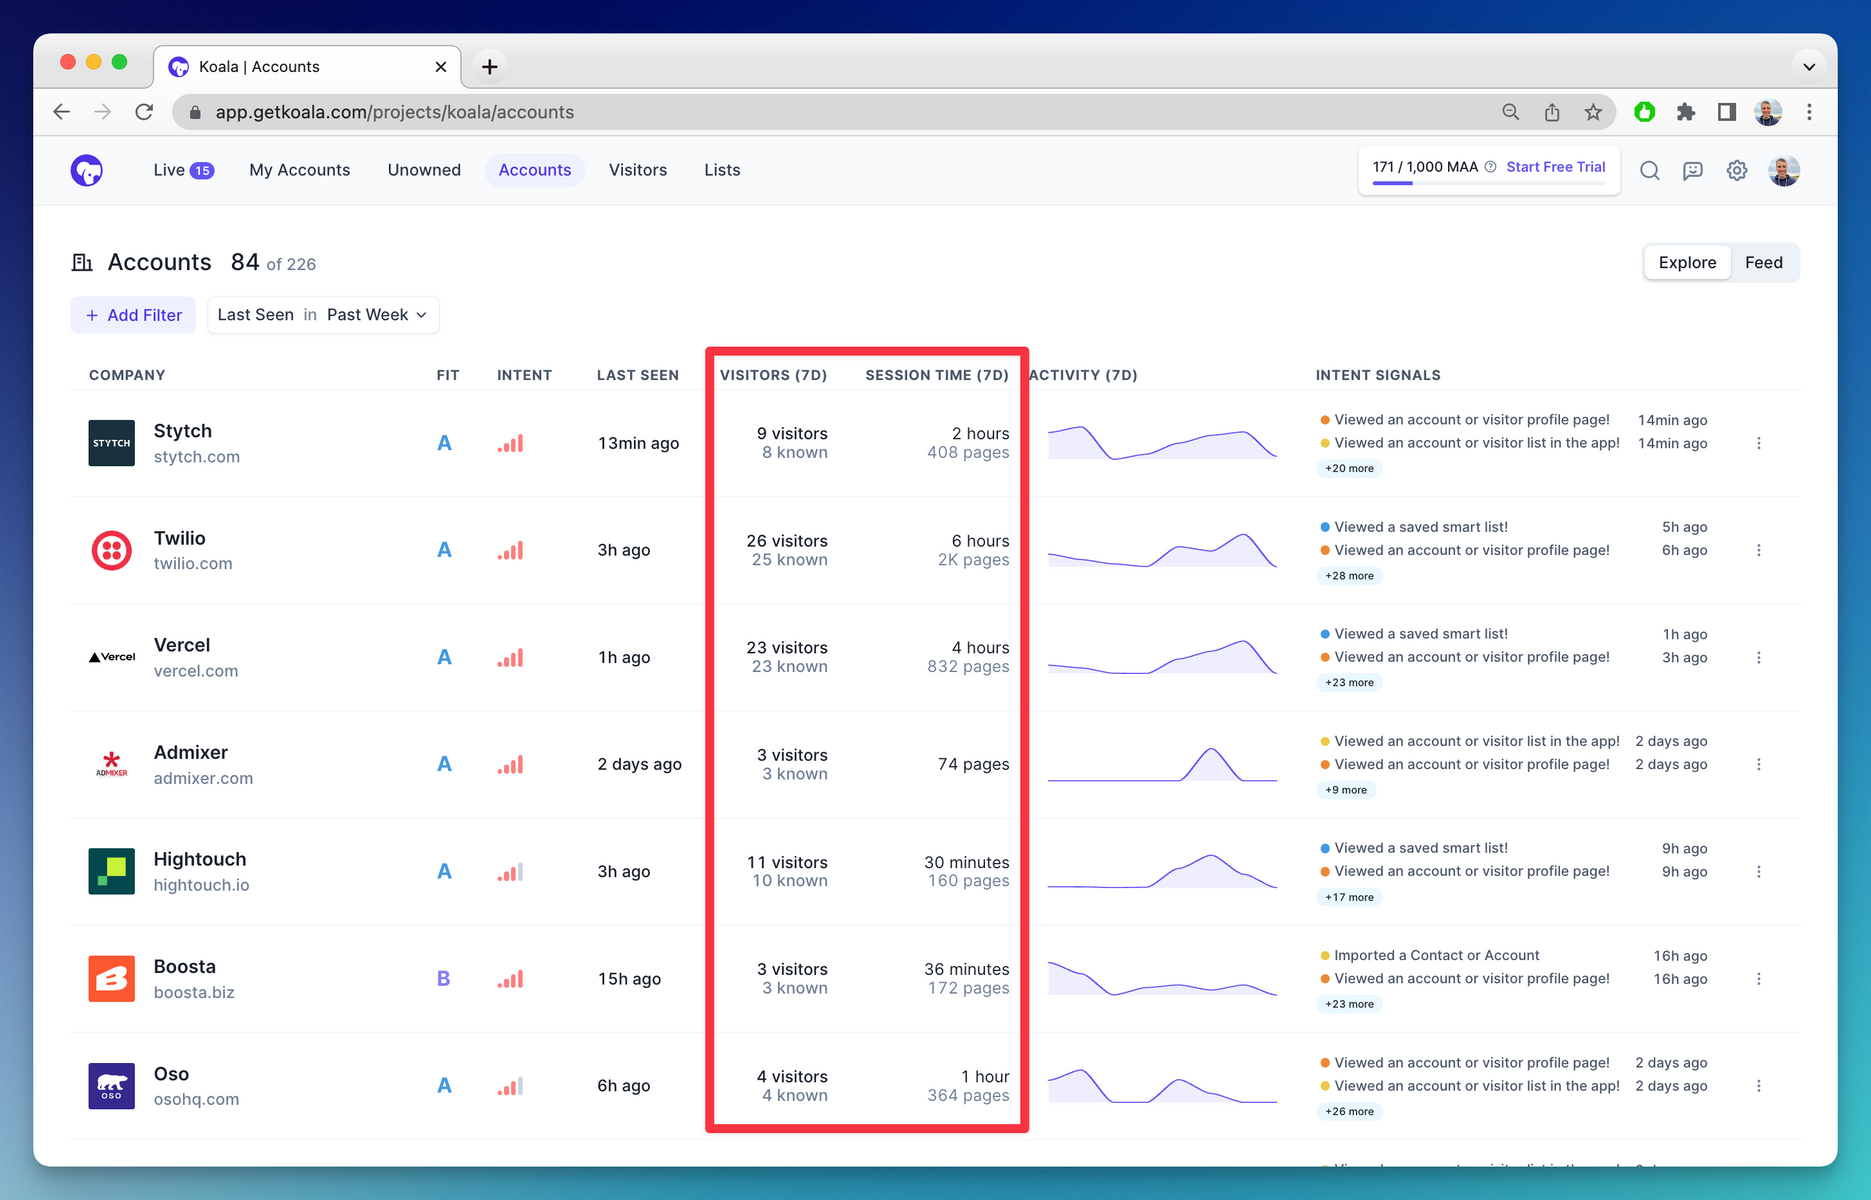
...into a workspace that looks like this:
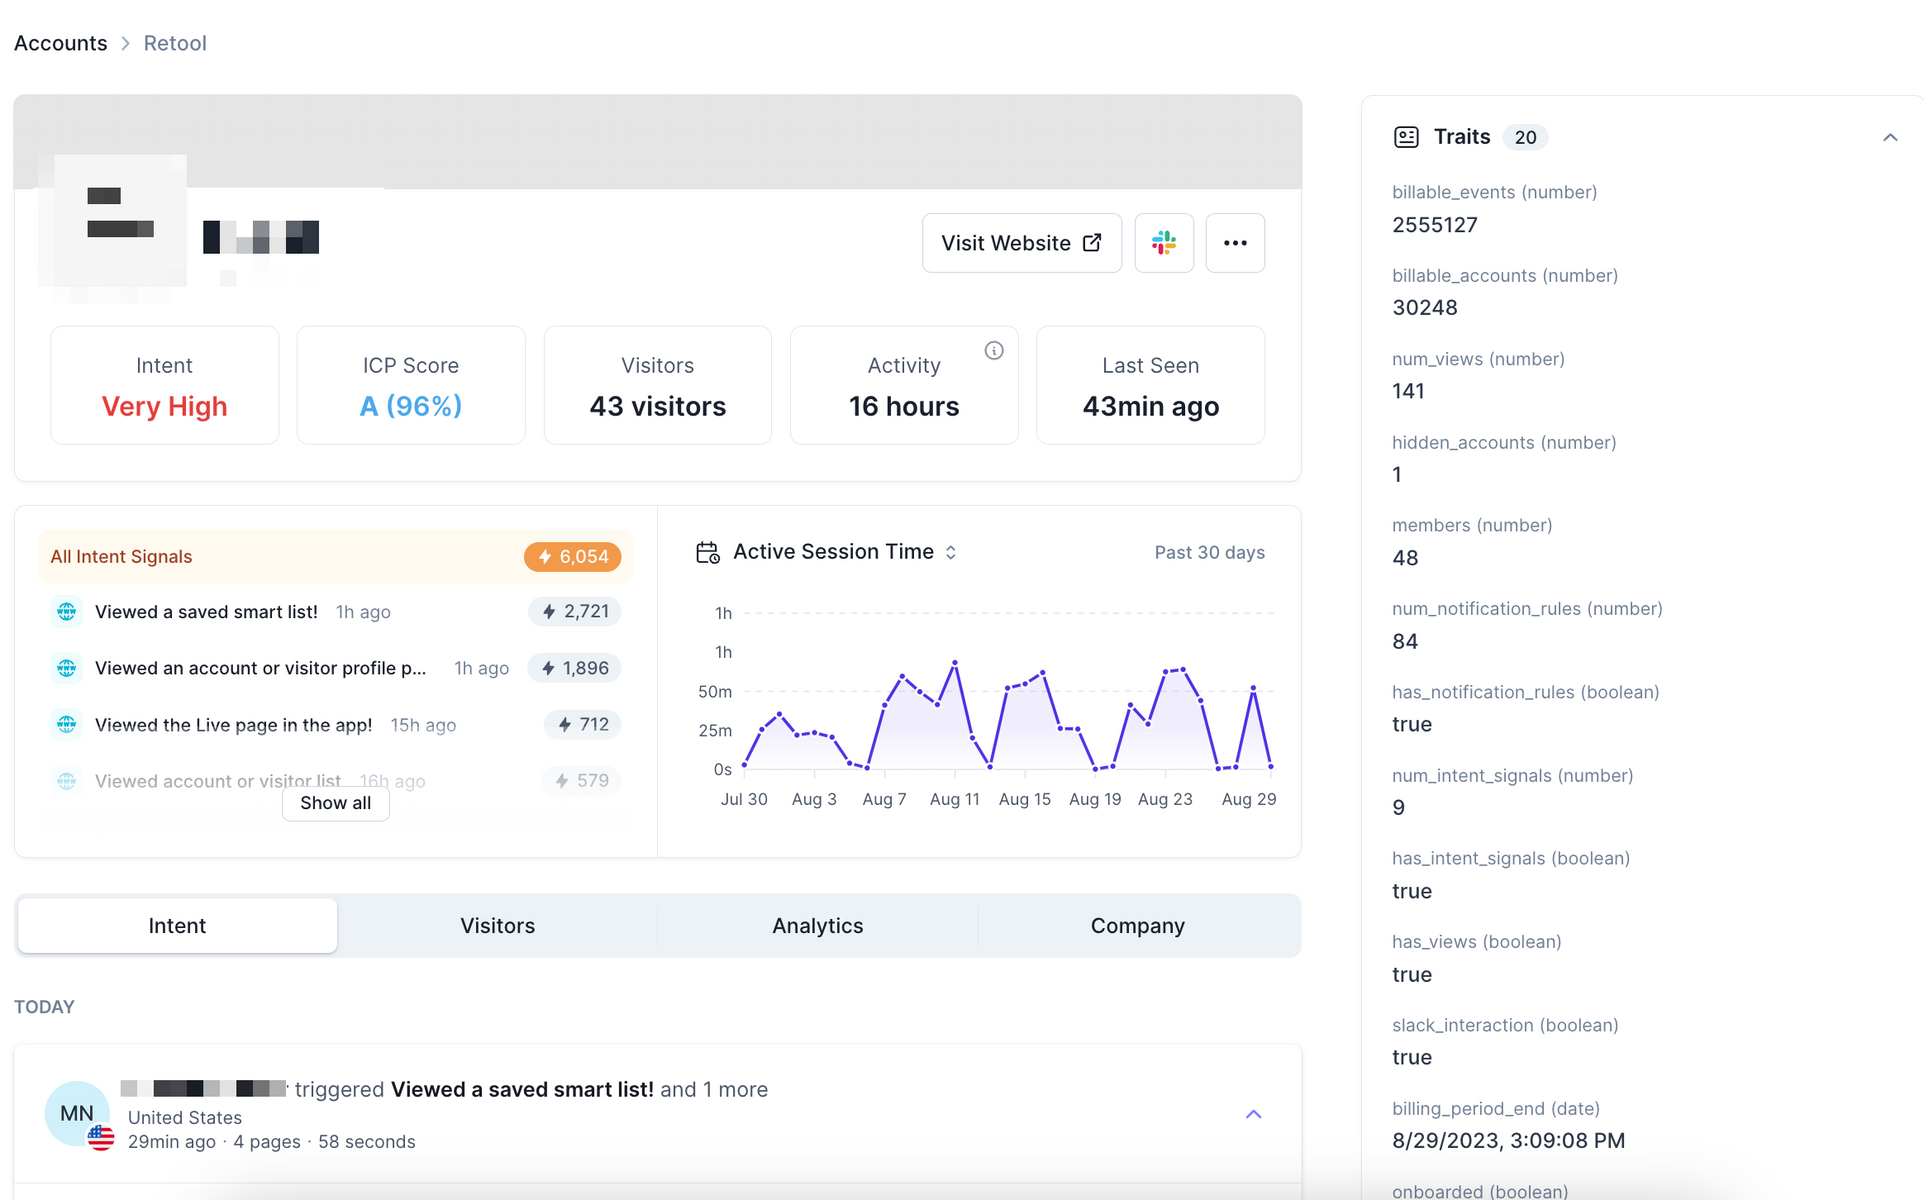
...with account level traits that look like this (right):
# Setting up product analytics
Typically, this is a task that a **full-stack engineering team** will need to spend **2-4 hrs** on, depending on how mature the product analytics stack is and what tools you're already using.
Koala has similar semantics to most product analytics tools (e.g., Segment, Rudderstack, Heap, Amplitude, Mixpanel, Posthog, etc.). The main difference with Koala and some tools is that Koala does a few things automatically on the client-side, including accurate tracking of session time and automatic pageview detecting (single-page apps supported!). Thus, we recommend installing Koala client-side (we try to keep the SDK as thin as possible — it is about 20kb). However, if you prefer to only install server-side, we have documentation on the server-side API.
Below is a quick guide on how to take an existing analytics tool and use it with Koala. In cases where you must implement `track` and `identify` yourself, please see our developer guides on how to send <a href="/docs/sdk/identify">client-side (recommended)</a> or <a href="/docs/developer-guides/server-side"> server-side (advanced)</a>.
### Segment
<AccordionGroup>
<Accordion title="Can I do a codeless install? ✅">
Yes! You can read more <a href="/docs/integrations/segment">here</a>.
</Accordion>
<Accordion title="Will I automatically get `track` and `identify` calls? ✅">
They will be automatically picked up!
</Accordion>
</AccordionGroup>
### Google Tag Manager
<AccordionGroup>
<Accordion title="Can I do a codeless install? ✅ ">
Yes! You can read more <a href="/docs/integrations/google-tag-manager">here</a>.
</Accordion>
<Accordion title="Will I automatically get `track` and `identify` calls? 🟡 ">
You'll likely need to do a manual implementation of `ko.track` and `ko.identify`, since Google Tag Manager doesn't traditionally have these calls being made.
</Accordion>
</AccordionGroup>
### Rudderstack
<AccordionGroup>
<Accordion title="Can I do a codeless install? ❌">
No, it's required that you install the Koala SDK directly on your website or app.
</Accordion>
<Accordion title="Will I automatically get `track` and `identify` calls? ✅">
They will be automatically picked up once the Koala SDK is manually installed!
</Accordion>
</AccordionGroup>
### Heap, Amplitude, Mixpanel, Posthog, and others
<AccordionGroup>
<Accordion title="Can I do a codeless install? ❌">
No integration support, so you'll need to install the Koala SDK directly.
</Accordion>
<Accordion title="Will I automatically get `track` and `identify` calls? ❌">
You'll need add `ko.track` and `ko.identify`. We recommend searching through your codebase for your exisiting tracking and adding new `ko` tracking.
</Accordion>
<Accordion title="Can you add add an integration for me? ✅">
If you have a large analytics implementation and would like us to support this, please email [support@getkoala.com](mailto:support@getkoala.com) and we'll prioritize it as quickly as we can. These integrations are typically fast for us to build, but we need a willing and experienced test partner (that's where you come in!).
</Accordion>
</AccordionGroup>
The most important things to ensure a successful implementation are as follows:
* ensuring that the Koala pixel is on every page
* ensuring that `identify()` (with an email address!) happens upon sign-up and login
* ensuring that key events that map to buying intent are instrumented and sent to Koala
<Note>
If you are interested in this but need help with this, please get in touch with [support@getkoala.com](mailto:support@getkoala.com). We have lots of experience getting product analytics stacks spun up and happy to lend our expertise!
</Note>
# Setting up account traits
In order to set triggers on your main consumption metric (e.g., bandwidth used if you're Vercel, # of licenses consumed if you're Salesforce, or number of API calls if you're a usage-based developer tool), you'll want to send those consumption metrics to Koala. We'll track the history of the consumption metric and allow you to alert when user-defined thresholds are reached.
There are two primary architectures for doing this:
* Sending data directly to Koala's API
* Using Reverse ETL (Hightouch, Census, etc.)
## Sending data directly to Koala's API
You can send account traits directly to Koala. This can be done directly on the website, as you do with your other analytics tracking. Alternatively, this can be run in a nightly asynchronous script (e.g., if you have a nightly script that computes billing consumption and sends alerts, that would be a good place to add these calls).
The following script includes a sample identify call that can be issued at any time where user data is available.
```javascript
/**
* Identify calls can be issued at any time, on any page where the koala
* pixel is instrumented.
*/
// email is how koala ties this user to a specific contact
ko.identify(email, {
// You can send any javascript object here.
// Each field will be associated as a user trait
...userObjectTraits,
$account: {
group_id: 'your-unique-grouping-id',
// You can send any javascript object here.
// Each field will be associated as an Account Trait
...accountObjectTraits
}
})
// Example:
ko.identify('tido@getkoala.com', {
// These are user specific traits
vip_user: true,
finished_onboarding: true,
invited_teammate: true,
// These are company specific traits
$account: {
name: 'Koala',
domain: 'getkoala.com',
group_id: 'your-unique-grouping-id'
pricing_plan: 'enterprise',
is_trialing: true,
trial_end_at: '2023-03-03',
num_team_members: 4
}
})
```
## Using Reverse ETL
You can use a Reverse ETL tool to pull data directly from your data warehouse into Koala. Check out our <a href="/docs/integrations/hightouch">Hightouch</a> and <a href="/docs/integrations/census">Census</a> integrations.
# Advanced Intent Signals
Source: https://getkoala.com/docs/admin-guides/advanced-intent-signals
Once you've gotten the hang of basic intent signals, we recommend setting up these advanced intent signals to find your very hottest leads!
This guide is meant to be inspiration for finding the hottest intent you have!
<Note>
Both the <a href="/get-started/quick-start">basic instrumentation</a> and <a href="/admin-guides/advanced-instrumentation">advanced instrumentation</a> are required before you can do some of these. But we do believe that these advanced intent signals can be nirvana for sales reps!
</Note>
## Aha moment reached
Pick an 'aha' moment in your app, and send an event when that aha moment happens. Try to pick an event that is the first time your customer really sees value. Send the event to Koala using ko.track().
If you have a lot of users in the workspace and "hobby" usage is overwhelming, you can use an account list to filter out (1) existing paid customers, (2) companies that are so small they won't buy, (3) schools/universities, and (4) personal use cases.
## Habit moment reached
Pick an 'habit' moment. This could be a one-time event that happens in the app (in which you'd use an architecture as described with the 'Aha' moment, above), but chances are it may be something you realize when you're looking at how active they've been over time. If the latter is the case, you may want to use an account trait to model this habit moment.
If you have a lot of users in the workspace and "hobby" usage is overwhelming, you can use an account list to filter out (1) existing paid customers, (2) companies that are so small they won't buy, (3) schools/universities, and (4) personal use cases.
## Workspace membership crosses threshold
Pick a threshold of users that you believe signifies that the account is ripe for a sales call. This will depend on your product, but typically we find that a threshold of 3-10 users is a good starting point for most products. You can set up an account trait that lists the number of users in the app.
One tip as you set up this intent signal: your users are likely not your buyer. You can tell each of your users about how active the account is, ask them to meet, and then ask them in that meeting for access to the buyer to give them the pitch. It's often not wise to directly try to sell to your end-users, but this is a very powerful way to understand which bigger accounts might be ready for a sales conversation.
## Consumption metric crosses threshold
Many products have consumption metrics — for Snowflake, it's about how much data is stored and how much compute is needed; for Vercel, it's about how much bandwidth is consumed; for many developer apps, it's about how many API calls happen. If you have a consumption metric, it's wise to take a nightly snapshot of that consumption metric using an account trait and send that data to Koala.
The very strongest intent signal in a business is when free and pro plan limits start to be crossed. Koala makes it easy to experiment with which threshold is right and ensure that all reps are always aware of consumption metrics getting crossed.
## Pro account shows interest in tech docs
Some of the best buying intent lurks in your technical docs. Technical docs are one of the best ways to learn about how a product deeply works, and one of the best signs that someone is interested in learning more is when they spend significant time on docs. Not every single tech doc is going to be relevant or exciting, but you may well have ones that show intent in your sales-led offerings.
To get a bit meta for a second, for us: that's larger sales teams, advanced instrumentation, and advanced intent signals. Don't be surprised if you get an email from us if you spend too long reading this 👀.
# First intent signals
Source: https://getkoala.com/docs/admin-guides/first-intent-signals
This guide walks you through our most common starting intent signals
Excited about the idea of sending intent signals to your sales team, but have no idea how to get started? Not seeing your intent signals firing as expected? This guide is for you!
## Anatomy of an intent signal
Before we dig into our suggestions, we want to give you a bit of technical foundation for what is actually happening with an intent signal. Here is what is happening:
* a prospect or customer takes some action on your marketing site, blog, or technical docs
* Koala asks: *does this action "match" an intent signal that has been configured?*
* if yes: deliver that notification to the correct rep
* if no: store the activity in the core platform, but don't highlight it to the Sales team
When you set up an intent signal, you're effectively telling Koala what types of activity are worth highlighting to your Sales team. There are several types of behavior you can highlight, but for the purposes of this guide, we'll be focused on the simplest type of intent signals — signals that are triggered from a pageview.
### Configuration
An intent signal based on a pageview typically consists of two things:
* What URL(s) should trigger the intent signal?
* How much time spent on the page is needed?
**What the configuration looks like**

**What the matching marketing page looks like**
**A note on timing**
| Timing | What is it? | When to use? |
| ----------- | ------------------ | ---------------------------------------------------------- |
| 5+ seconds | short page view | Recommend making this minimum threshold for intent signals |
| 30+ seconds | short-form content | Good for 1-pager type content or shorter tech docs |
| 2+ minutes | long-form content | Good for longer blog posts or very long tech docs |
Koala's session times (while accurate) sometimes are “less” than most people expect to see because we filter out all non-active time. If in doubt, use your phone as a stopwatch and sit on the page for *X* seconds and see what makes sense!
## Recommended first intent signals
With that foundation established, let's get into the playbook! For each of these intent signals, you'll want to:
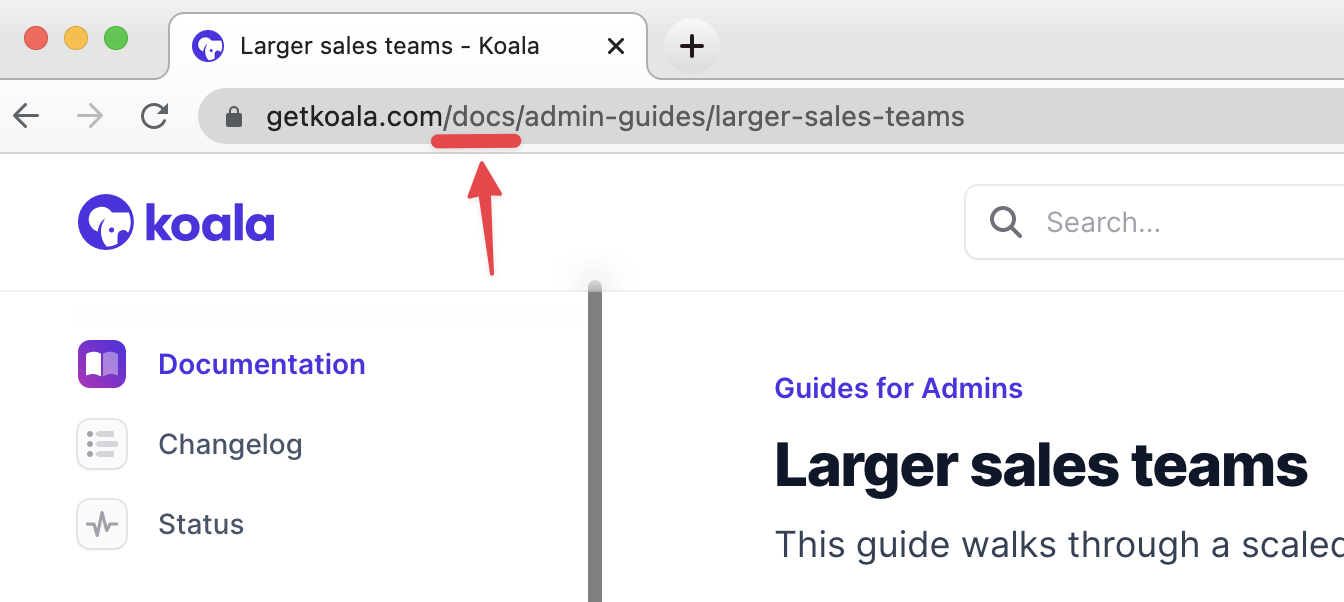
* navigate to the page
* look at what the URL bar says
* encode the URL into the Koala builder (see screenshot above for an example)
In this guide, we've included common naming practices we see, but **this will only work if it exactly matches your URLs**!
**Pricing page**
* **Why?** This shows pretty explicit buying intent
* **URL:** URL contains `/pricing` or `/plans`
* **Timing:** session time `greater than 5 seconds`
**Us vs. competitor**
* **Why?** Someone researching you vs. a competitor is often a great sign that they are seriously evaluating a vendor
* **URL:** sometimes people have this on their blog, sometimes a dedicated landing page
* **Timing:** session time `greater than 5 seconds`
**Technical docs**
<Note>
Check out our integrations with <a href="/docs/integrations/readme">ReadMe</a> and <a href="/docs/integrations/mintlify">Mintlify</a> if you use either as a docs provider!
</Note>
* **Why?** This is some of the best intent; it shows that someone is fairly deep in the consideration process as they are consuming deeper technical material about your product. Some customers restrict docs to just pages covering Paid/Business/Enterprise features, which are some of the best intent signals you'll find! A simple setup is suggested below, but you can restrict to particular docs pages if you'd like.
* **URL:** contains `/docs` or `docs.acmecorp.com`
* **Timing:** session time `greater than 30 seconds` (or `greater than 2 minutes`, depending on the length of your docs)
**Blog**
* **Why?** A full content read shows consideration
* **URL:** URL contains `/blog`
* **Timing:** session time `greater than 2 minutes`
**Case study**
* **Why?** Reading a case study often shows someone making a business case internally
* **URL:** Look for URL commonalities on your case studies; no standard pattern here
* **Timing:** session time `greater than 30 seconds`
**Product pages**
* **Why?** Reading a product splash page often signifies that someone is digging deeper into how the product works and can be a good time for a Sales rep to offer a demo with a product expert
* **URL:** Look for URL commonalities on your case studies; no standard pattern here
* **Timing:** session time `greater than 30 seconds`
**Solution pages**
* **Why?** Reading a solution splash page often signifies that someone is looking for a top-to-bottom solution (and tends to be an indicator of a bit more of a sales-led buying journey)
* **URL:** Look for URL commonalities on your case studies; no standard pattern here
* **Timing:** session time `greater than 30 seconds`
# How to drive more known users
Source: https://getkoala.com/docs/admin-guides/how-to-drive-more-known-users
If you are seeing a lot of anonymous profiles and would like to drive more known usage, this is the guide for you!
## Why all the anonymous visitors?
First, let's level-set on *why* you're seeing anonymous visitors. When a user first comes to your website, all you can know about them is a set of technical metadata about them — their IP address, what browser they are using, what website they came from, the exact URL they requested, etc.
Koala partners with two different providers to help you get a guess at who this visitor might be:
* Clearbit Reveal (the best-in-class IP -> company data) helps decode what company they are from. Clearbit Reveal is designed to respect the privacy of the end-user, so the most information you can get at this point is a guess at which company is mapped to the IP address of the user. Other tools have similar design.
* Cloudflare (the best-in-class IP -> geolocation decoder) helps give a guess at what City, State, Country they are from.
**Until the user opts to give you more information, this is the most you can know about the user with any tool out there — and this by design.** Once the user does opt in to giving their email, Koala will record that email address and the browser session will be associated with that user going forward — even if it wasn't a formal "log in".
## Koala-specific suggestions
Koala offers some unique ways to better understand intent signals from known users:
**Set up the advanced instrumentation.** When a user signs up or logs in to your app, they are identifying themselves, so you'll be able to know exactly who is doing what in your app. In addition to getting more known users, you'll also be able to see what those users are doing in your application, which can be quite helpful for <a href="/docs/admin-guides/find-the-hottest-intent">finding the hottest intent</a>!
<Note>
This guide has more information on setting up the
<a href="/docs/admin-guides/advanced-instrumentation">Advanced Instrumentation</a>.
</Note>
**ID Links.** When you send outbound emails, you can embed a special identification parameter that will allow you to know when that specific person clicks on your link. Koala will allow you to track more than just email opens and clicks, enabling you to see the true interest of your prospects and respond to their intent in real-time. You can read more about setting up ID Links <a href="/docs/identity-layer/identify-email-recipients">here</a>.
## Common marketing site tactics
In addition to these two unique ways, we're also including some common marketing tactics for driving email submissions directly on your website. Once the email submission happens, Koala is unique in that it will associate the full session that happened before and all the activities afterward until cookies are cleared — making the email that much more valuable!
**Email gate a product demo.** If you have a product demo, best practice is to gate this product demo behind an email submission. If the Koala pixel is installed wherever your demo is hosted, we can report on which pieces of the demo were most interesting to the customer, using the session time and pageviews to help you understand how to craft a message.
**Email gate your best content.** If you have a great piece of content that delivers lots of value on its own (e.g., an E-Book, Industry Survey, or set of recipes), you may want to consider gating all or some of the content. Often it's a good idea to give a sample of the high-quality content for free and then put the email gate in a little later.
**Host webinars.** If you host high-value webinars, you'll have a natural place to collect an email address — upon webinar registration! Make sure the Koala pixel is installed wherever these registrations happen.
**Offer a mailing list subscription.** If you have a great blog or other piece of content that repeats, this is another natural place to collect an email address! Make sure the Koala pixel is installed wherever subscriptions happen.
# Larger sales teams
Source: https://getkoala.com/docs/admin-guides/larger-sales-teams
This guide walks through a scaled rollout of Koala to larger sales teams.
Koala scales well to larger sales teams, but there's often a little extra organization required to ensure that everyone is getting timely, helpful, and not-too-noisy notification streams. This guide walks you through that setup, so that you can hit the ground running with a larger sales team. This guide is recommended for sales teams with different teams, whether those teams are split by segmentation, territory, or whatever else. We're also happy to help guide the setup if you reach out to: [support@getkoala.com](mailto:support@getkoala.com).
## Step 1: Set up intent signals
Step 1 is still the same regardless of team size — you'll want to set up intent signals. One thing that we find with larger teams is that it's often your top reps (AEs, SEs, BDRs, SDRs) that have the best idea about what a great intent signal could be, so be sure to source ideas from the crowd or teach some of your reps how to make them! There's nothing more empowering for a team than feeling like they have control and can iterate themselves — Koala makes this easy!
## Step 2: Plan your Slack channels
Step 2 is where things get a bit more interesting. I'm going to assume one sample GTM org structure, which is hopefully sufficiently complex that it explains all concepts:
* A **mid-market / commercial team** (covering AMER)
* An **enterprise team** (covering AMER)
* A **strategic team** (covering AMER)
* A **vertical EMEA team** (covering all segments)
* A **vertical APAC team** (covering all segments)
For each team, we recommend making two Slack channels: **a channel with owned accounts** and **a channel with unowned accounts**.
The channel with owned accounts should be set to alert the account owner every time an intent signal goes off, while also creating visibility for the team — managers, peers, and the supporting sales development functions.
The channel with unowned accounts should be given to the sales development team and any reps who are responsible for outbound. Typically, we recommend a "first to comment on the Slack notification" as the rules of engagement for this channel with the expectation that the rep works on the outbound right away (it will maximize your speed to lead for the customer), though if you'd like to set up a more formal round robin we can help set that up with CRM Automations.
## Step 3: Make audiences to support each channel
Next, you'll need to make audiences that explain which accounts should go into each channel. You can do this by going to the Accounts tab [https://app.getkoala.com/goto/accounts](https://app.getkoala.com/goto/accounts), and applying the filters that make sense for each channel.
Here's one example of an "owned" channel:

Here's how to ensure all intent signals from your "unowned" accounts are going to make it to reps:

And finally, here's how you can see the best traffic not already in your CRM:

Note for this last example that the employee range should match the segment you're sending to, but because the data isn't in Salesforce, we cannot leverage your CRM enrichment and instead fallback to live enrichment which may not perfectly match your segmentation. If this is an important issue, you can use a CRM Automation to ensure that the account gets imported and enriched consistently with all other accounts.
Other potential gotchas:
* You may want to filter to ensure that Stage Name != Closed Won, or more generally filter out anything where there is an open opportunity (especially for the Unowned channel)
* You may want to ensure you're filtering out accounts owned by other teams (e.g., Partnerships pipeline accounts)
## Step 4: Set up your channels
The hard work is done — now you just need to set up the Slack Alerts! You can do that here: [https://app.getkoala.com/goto/slack-alerts](https://app.getkoala.com/goto/slack-alerts)
Typically, we recommend sending all the intent signals (from Step 1) that you think reps will be interested in to the appropriate channels (from Step 2), using the filters you made (from Step 3). We recommend using the "@mention Account Owners in Slack" functionality, so that reps will be immediately alerted to intent signals happening. However, this is optional so you can test it in "dry run" mode to make sure the intent signals look good before turning it on!
In terms of naming, standard conventions would be:
* \#koala-intent-mm
* \#koala-intent-mm-unowned
* \#koala-intent-ent
* \#koala-intent-ent-unowned
That's the whole setup! We find it takes about an hour or two for initial setup, and then typically gets a lot better as you hone it over the course of a few business days. When you're ready to launch, encourage your reps to:
* check out the rep guides on account research and sending great sales messages (having this unprecedented access to data is a new paradigm and there's a bit of a learning curve, but it's worth it!)
* ensure that they are participating in the feedback loop about which intent signals are working / which deals are Koala influenced (they'll get a DM from Koala bot ,if relevant)
* keep setting up new intent signals
# SAML SSO
Source: https://getkoala.com/docs/admin-guides/saml-sso
How to setup your SAML SSO integration with Koala
Koala organizations on every plan can use Sign in with Google. Organizations on the Business plan can configure additional SAML providers. This guide will walk you through how to configure SAML SSO for Okta as an example, but the steps are similar for other SAML providers.
## Okta SAML SSO
To configure Okta SAML SSO, you must:
* Be in Admin mode in Okta.
* Have admin permissions in Koala and be on the Business plan.
Now to the steps:
1. Visit the Security settings of your Koala workspace, and switch on the SAML SSO toggle.
2. Go back to Okta and create a [custom SAML application in Okta](https://help.okta.com/oag/en-us/content/topics/access-gateway/add-app-saml-pass-thru-add-okta.htm).
3. In the SAML Settings form copy the `Single-sign on URL` and `Audience URI (SP Entity ID)` from Koala to the Okta form.
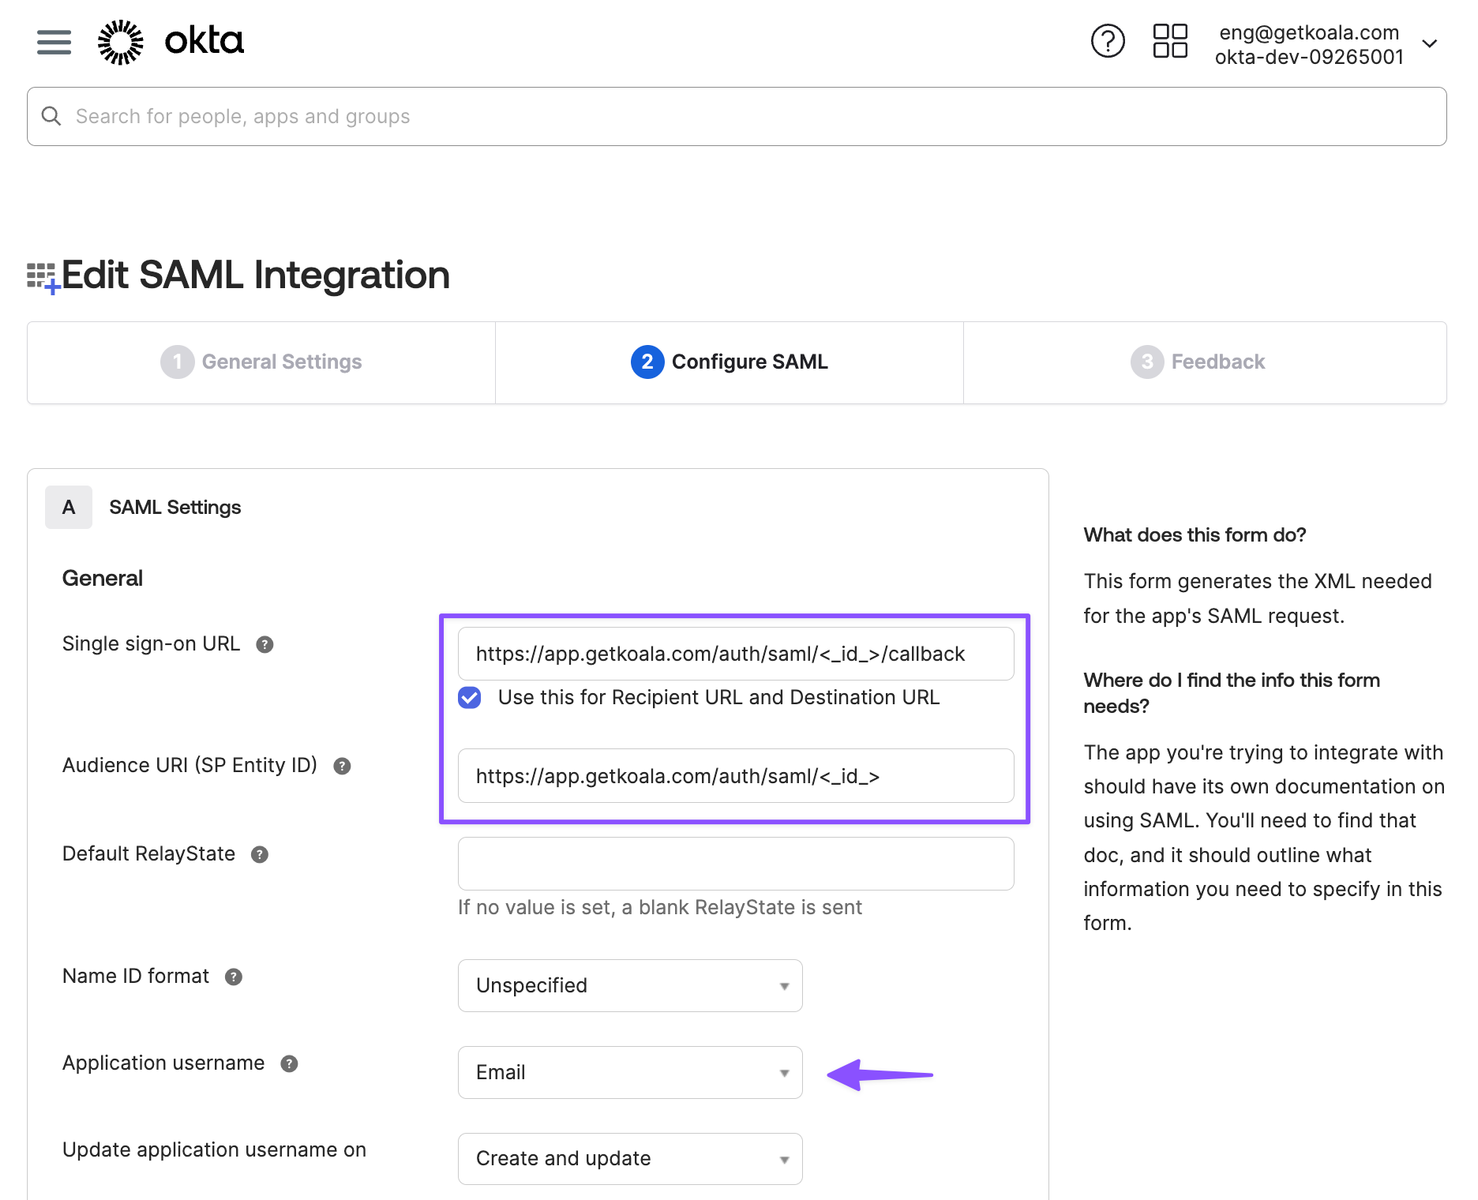
4. For the attribute mappings we don't require any specific attributes, but the Application Username should be set to `Email`.
5. Click continue until the App in Okta is created.
6. Assign the app to the users or groups that should have access to Koala.
7. Now with the app in Okta created, go to the **"Sign On" tab** and click on **"More Details"** link to get the `Single Sign-On URL` and `Certificate`.
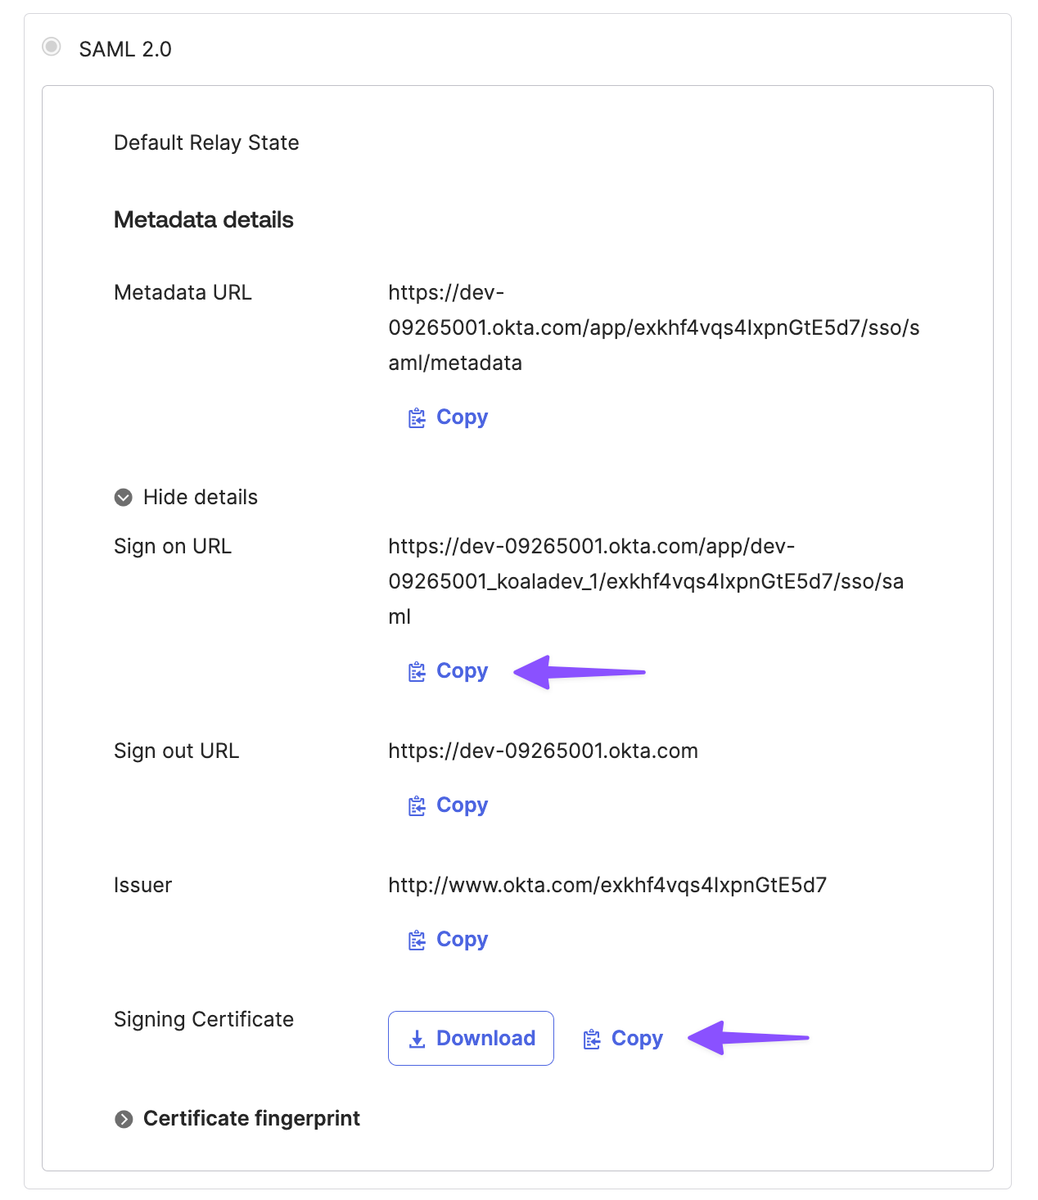
8. Go back to Koala and paste the Identity Provider `Single Sign-On URL` and the `X.509 Certificate` in the SAML SSO settings.
9. Click on Save and you are done.
<Note>
After saving the SAML SSO settings, you will be logged out and will need to log back in. You have to type in your email address to initiate the SAML SSO flow.
</Note>
## Notes
### Okta Group Assignments
When assigning Groups to the Okta App used on Koala's integration, make sure that the users assigned from that group are shown as "Group" type instead of "Individual". This *inconsistent scenario* could happen if a user that belongs to the group was previously assigned as an "individual", making the login process fail.
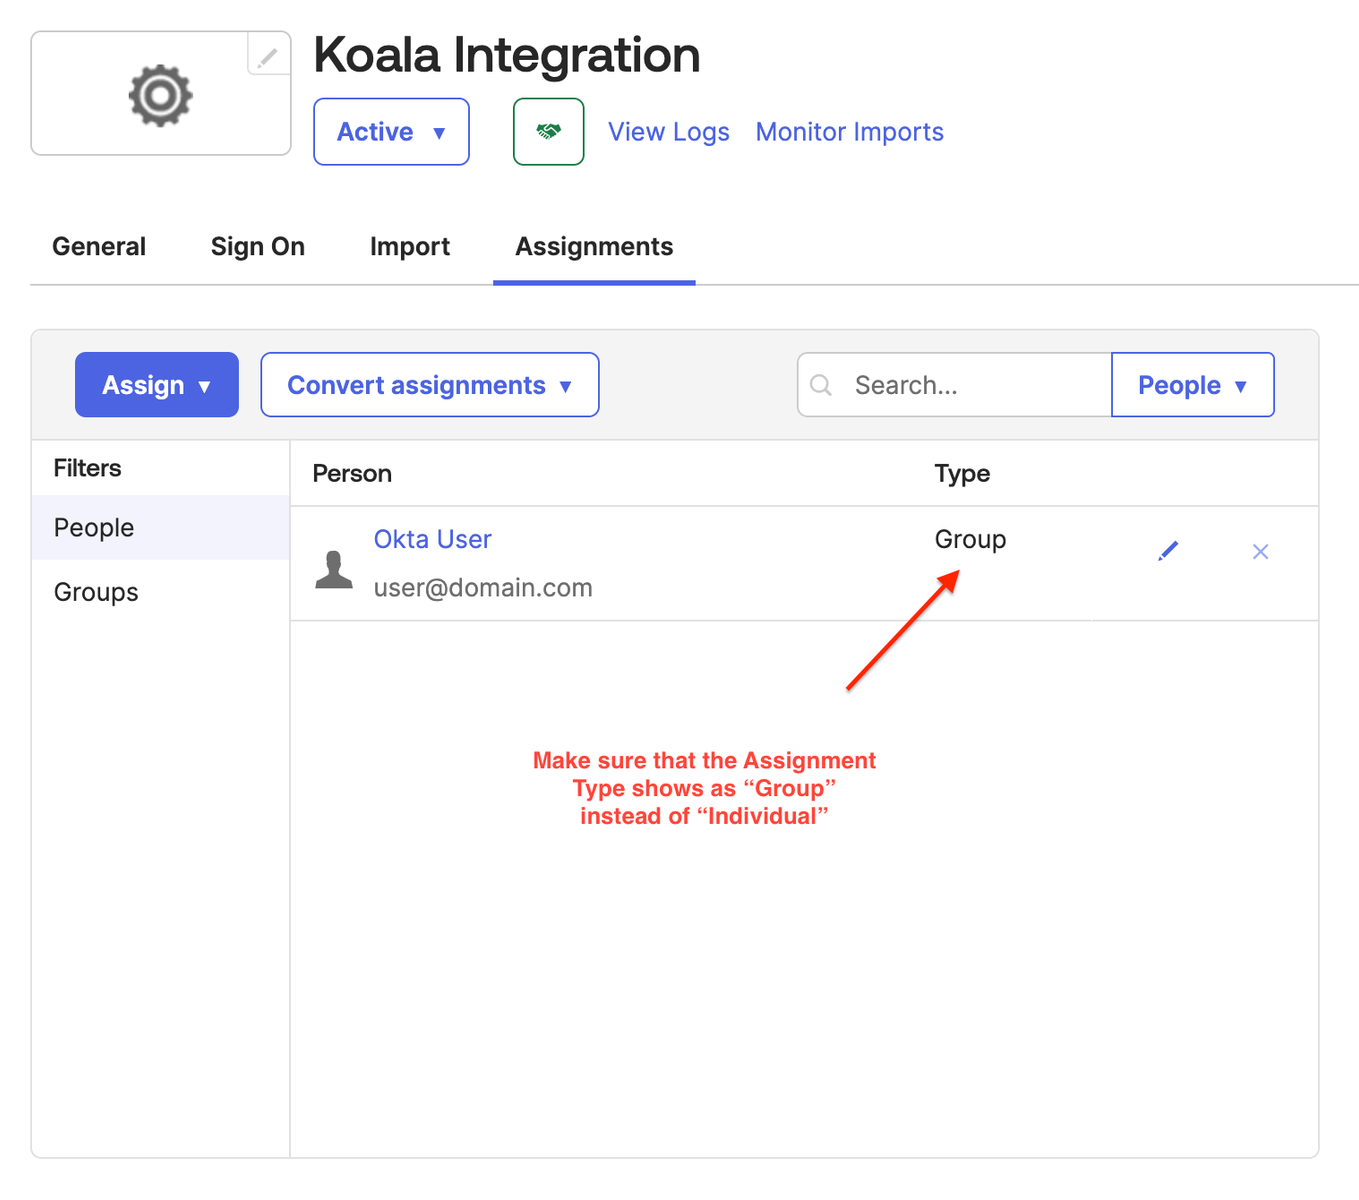
To fix this, remove all previously individually assigned users and then assign the Group you want to give access to. After that, all users in that group will be assigned to App and the type should be shown as "Group".
### Okta Attribute Statements
To correctly create and activate new users on Koala using Okta's info, you should configure the [Attribute Statements](https://help.okta.com/oie/en-us/content/topics/apps/aiw-saml-reference.htm?cshid=csh-attribute-statements-saml) on the Okta App used on integration following these steps:
1. Click on the App settings and go to the "General" tab;
2. Click on the **Edit** button on the **SAML Settings** section;
3. Click on **Next** button to go to **2. Configure SAML** step;
4. Locate the **Attribute Statement** section and add the following fields:
* `first_name` mapped to `user.firstName`
* `last_name` mapped to `user.lastName`
* `email` mapped to `user.email`
5. Click on the Next button and then on Finish to confirm the changes.
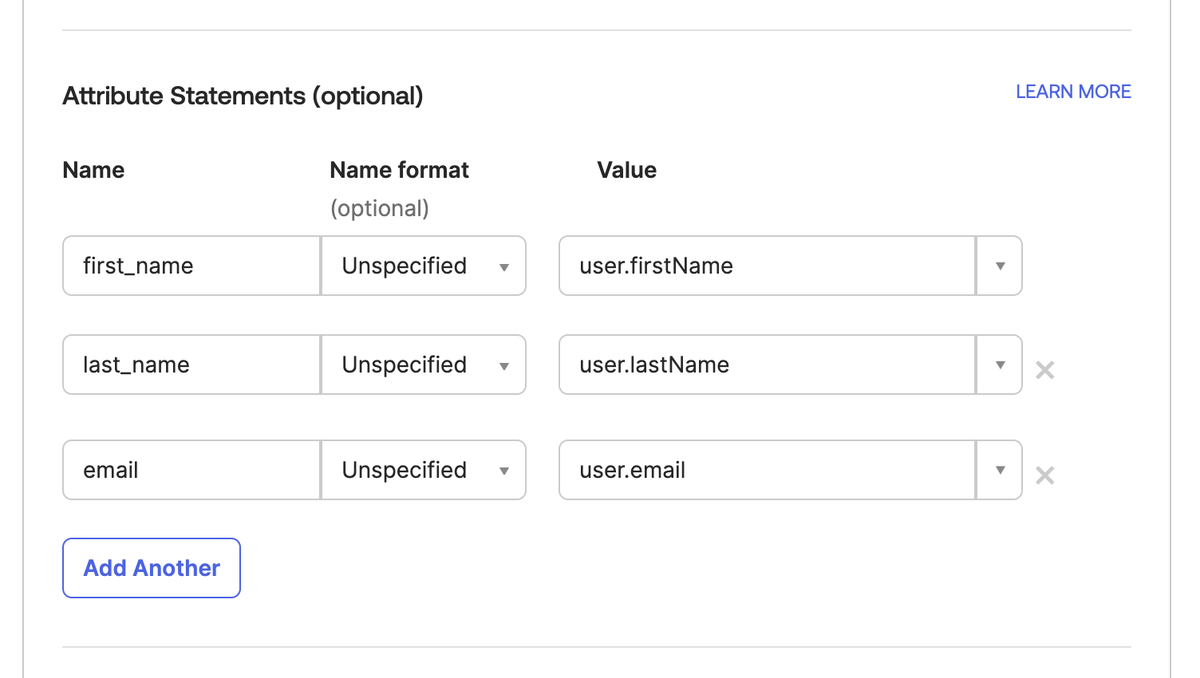
This way, when a newly invited user logs into Koala using Okta, their profile information will be correctly read from Okta.
# Actions
Source: https://getkoala.com/docs/automations/actions
Trigger workflows in your CRM, Sales Engagement Platform, or third party tools when a new intent signal is detected.
## What are Actions
Koala's Actions engine allows you to create custom workflows that are triggered by intent signals.
You can use these workflows to update your CRM, Sales Engagement Platform such as Outreach and Apollo,
or sync data into third party tools.
## What can you do with Actions?
The primary use case for Actions is triggering a third party tool in response to an intent signal.
Some examples of workflows include:
### Automatically importing Contacts and Companies
You can import net new Companies and Contacts to your Salesforce, HubSpot, Outreach, and Apollo, making sure
that your CRM is always up with the visitors and companies browsing your website.
In addition to importing new Companies and Contacts, you can also update existing records with new information as
it becomes available in the Koala Companies Database.
### Syncing intent data into your CRM
A common use case for Actions is syncing intent data into your CRM.
This can include updating a Contact or Company record with intent signals are they take place.
Advanced use cases include creating a new Intent Signals object that is related to a Contact or Company record in your CRM, which allow you
to architect your CRM to be aware of the intent signals that are being detected by Koala.
### Enriching your CRM with firmographic data
Similar to syncing intent data into your CRM, you can also enrich your CRM with firmographic data from Koala, such as industry, employee count, revenue, tech stack
and many other fields.
### Tracking prospects and companies in lists, campaigns, or sequences
You can add prospects and companies to lists, campaigns, or sequences in your CRM, and Sales Engagement Platform when they exhibit intent signals.
Examples include mapping intent signals to a Campaign in Salesforce, a list in Apollo or HubSpot.
### Creating Tasks based on intent signals
Create new tasks in your CRM or Sales Engagement Platform when intent signals are detected, so your sales team can follow up with prospects and companies that are showing intent.
### Triggering external workflows
You can also trigger an external workflow in an external tool, such as Zapier, Clay, Tray.io or any other tool that accepts webhooks.
Some of the most creative use cases for Actions involve triggering a workflow in a third party tool such as enriching a table with intent in Clay, or
triggering complex workflows in Tray.io.
## Create your first Action
1. Go to the [Actions](https://app.getkoala.com/goto/automations) page in the Koala app.
2. Select from one of the pre-built templates or create a new Action from scratch.
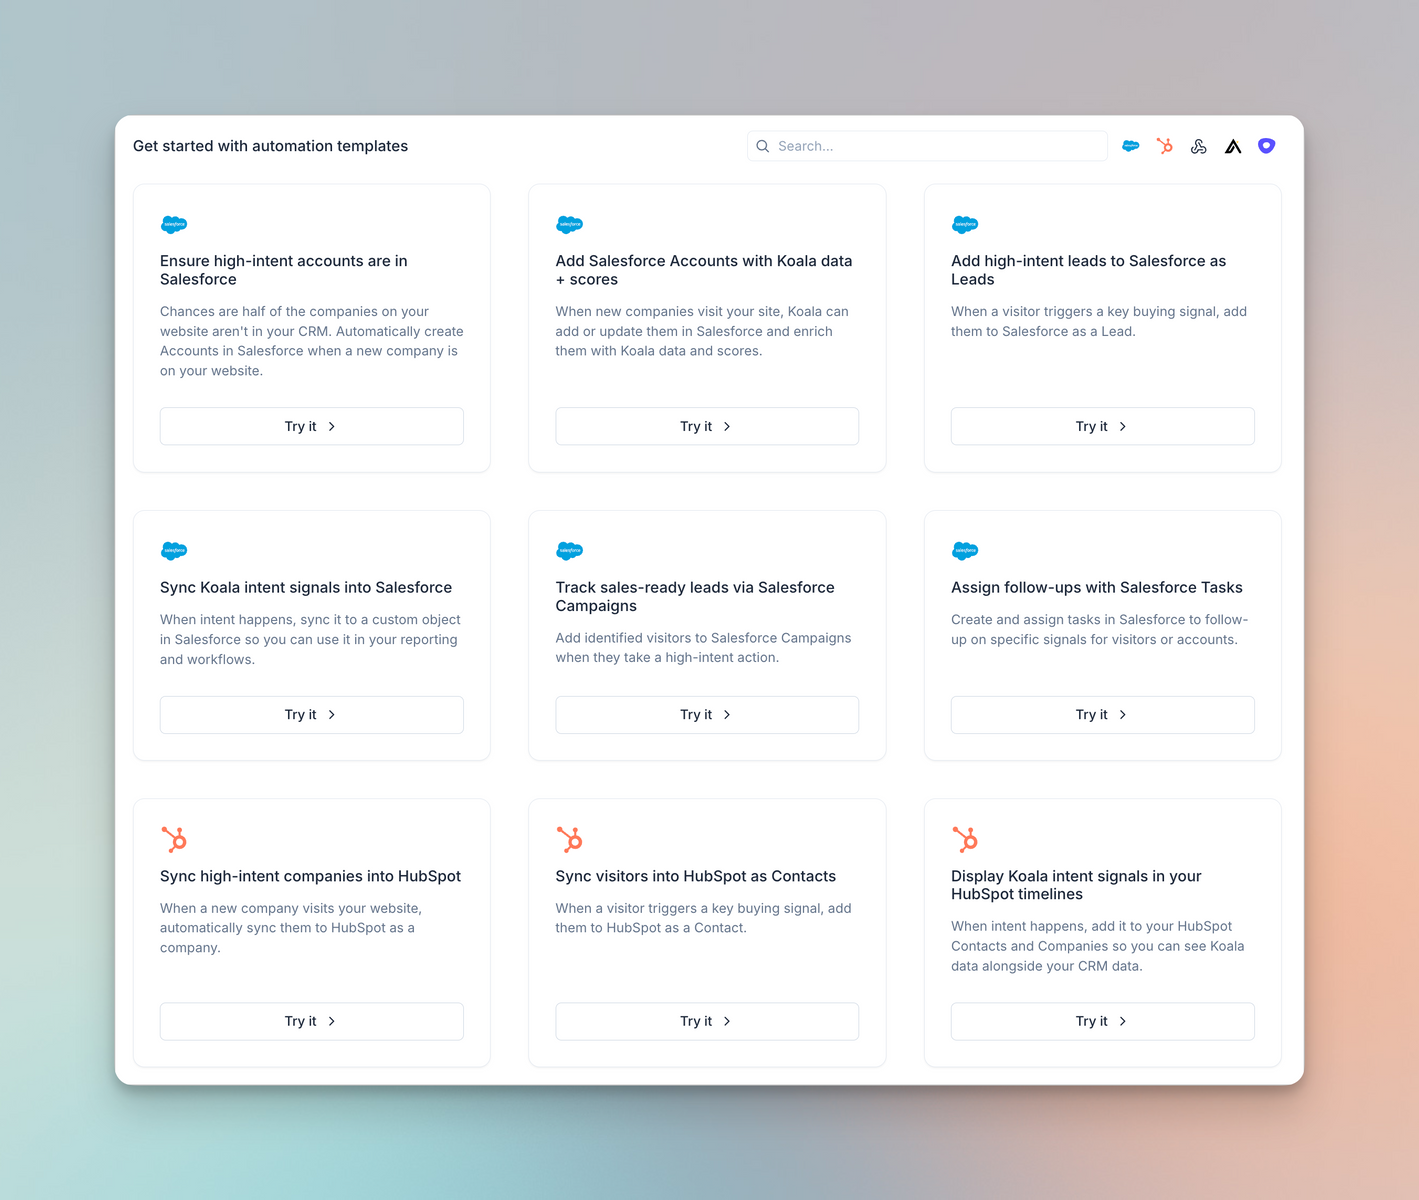
3. Choose an Intent Signal to act as a Trigger

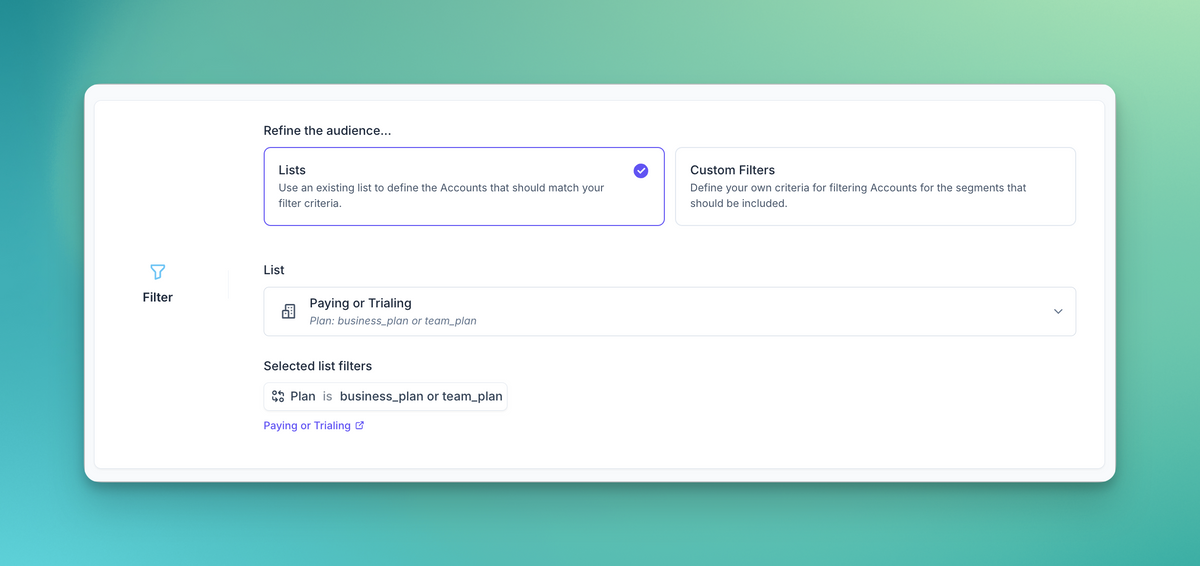
4. Choose an Audience for the Action. The action will be restricted to only Visitors and Accounts that match the given Audience.
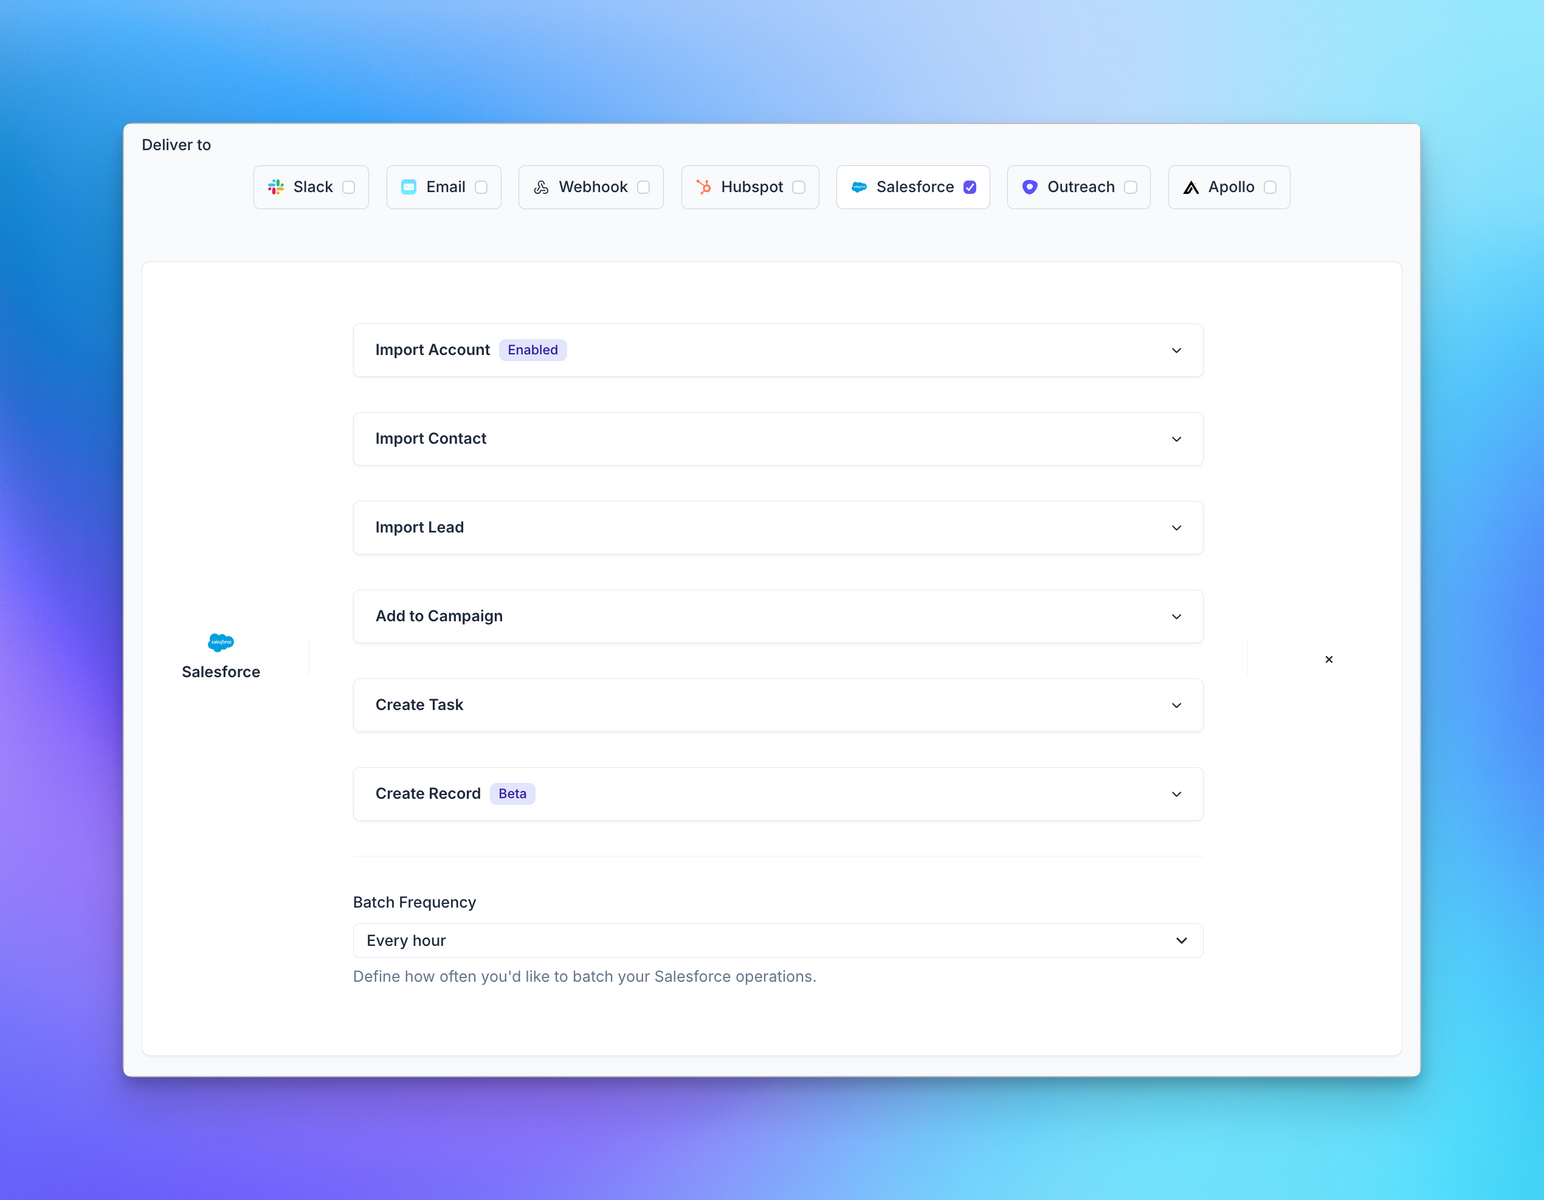
5. Choose one or more destinations for the Action.
## When to use Actions vs Auto Outbound
While both Actions and Auto Outbound have some overlap, they are used in different scenarios.
We have a [cheatsheet](/automations/intro#when-to-use-actions-vs-auto-outbound) that can help you decide when to use Actions vs Auto Outbound.
# Auto Outbound with Apollo
Source: https://getkoala.com/docs/automations/auto-outbound/apollo
Enroll your Auto Outbound Prospects in a List or Sequence
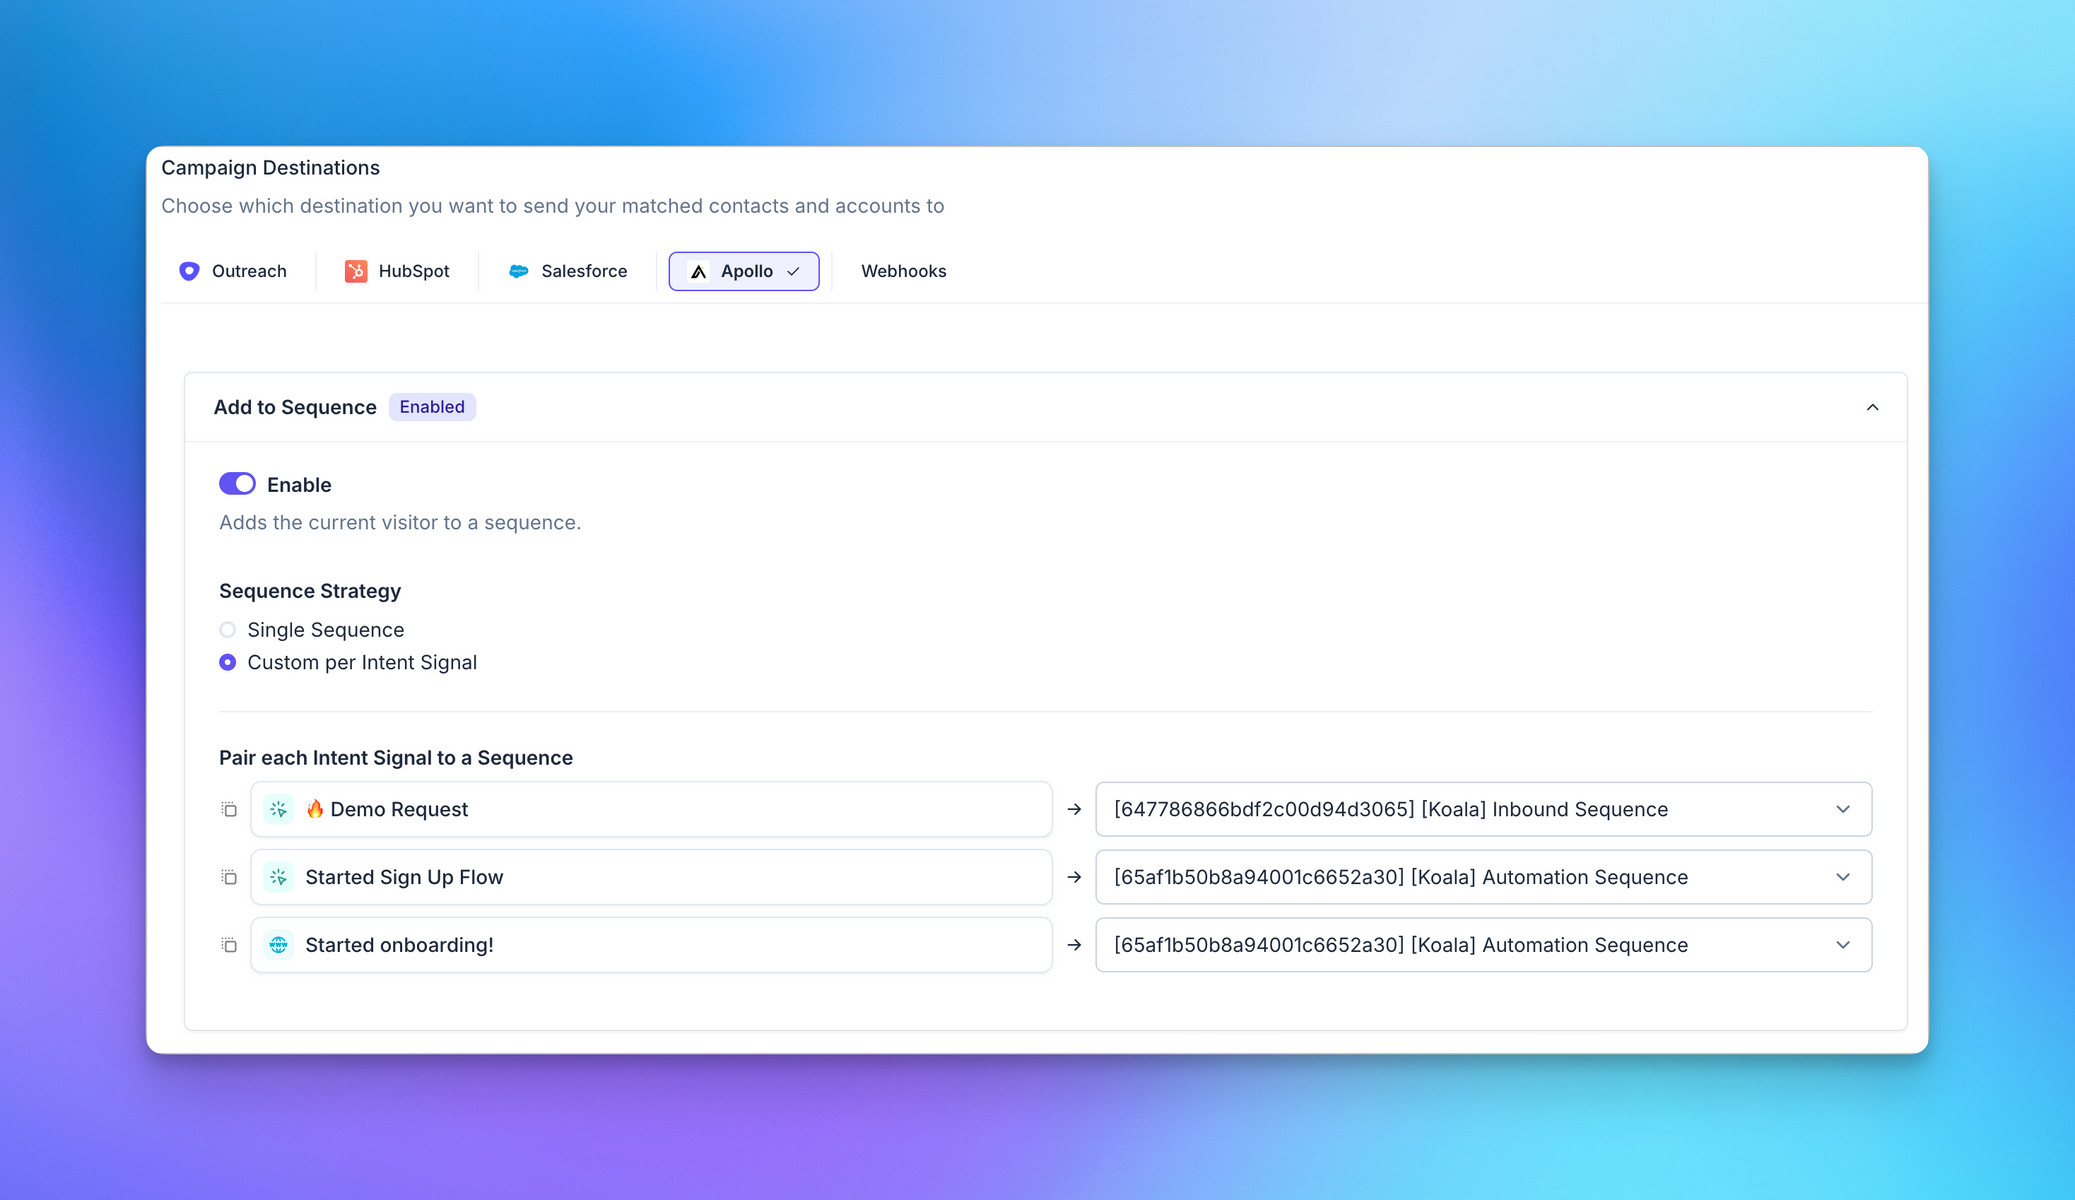
Auto Outbound works out of the box with Apollo Sequences and Lists. You can choose to enroll every prospect
into the same Sequence or List, or choose to map each individual Intent Signal to a specific Apollo Sequence.
## Recommended Setup
The recommended setup for Apollo includes mapping each Intent Signal to an individual Sequence, as that leads to higher
conversion rates due to higher relevancy in messaging.
### Mapping Intent to Sequences
Select the Intent Signal from the dropdown on the left, and map it to the relevant Sequence in Apollo
on the right.
We recommend naming your Sequences after the Intent Signal in Koala using the following naming convention:
`[Koala] <Intent Signal Name>`
<Note>
Following the above naming convention allows you to more easily track the performance of your Auto Outbound campaigns,
as well as indicates that sales reps shouldn't manually add prospects to these Sequences.
</Note>
### Adding Prospect to Lists
You can optionally choose to add the Prospect into an Account or Contact List in Apollo, which allows you trigger
different Plays based on the Prospect being part of a list.
Using lists should also allow for the same Prospect to be part of multiple lists depending on the Intent Signals they
performed.
## Auto-prospect companies showing high intent
Once you have it set up, as new anonymous visitors start triggering the intent signals you care most about, you can sync those companies into Apollo and automatically trigger a prospecting "Play."
1. Create a new automation in Koala
2. Select "Target type = Accounts". This means the automation is focused on the account or company behind the intent, rather than the anonymous person.
3. Select the intent signals or custom conditions you want to trigger this automation
4. Select "How often = No more than once per Account. Regardless of time frame."
Optionally, you can specify what audience you want to target based on any list in Koala, or using custom filters.
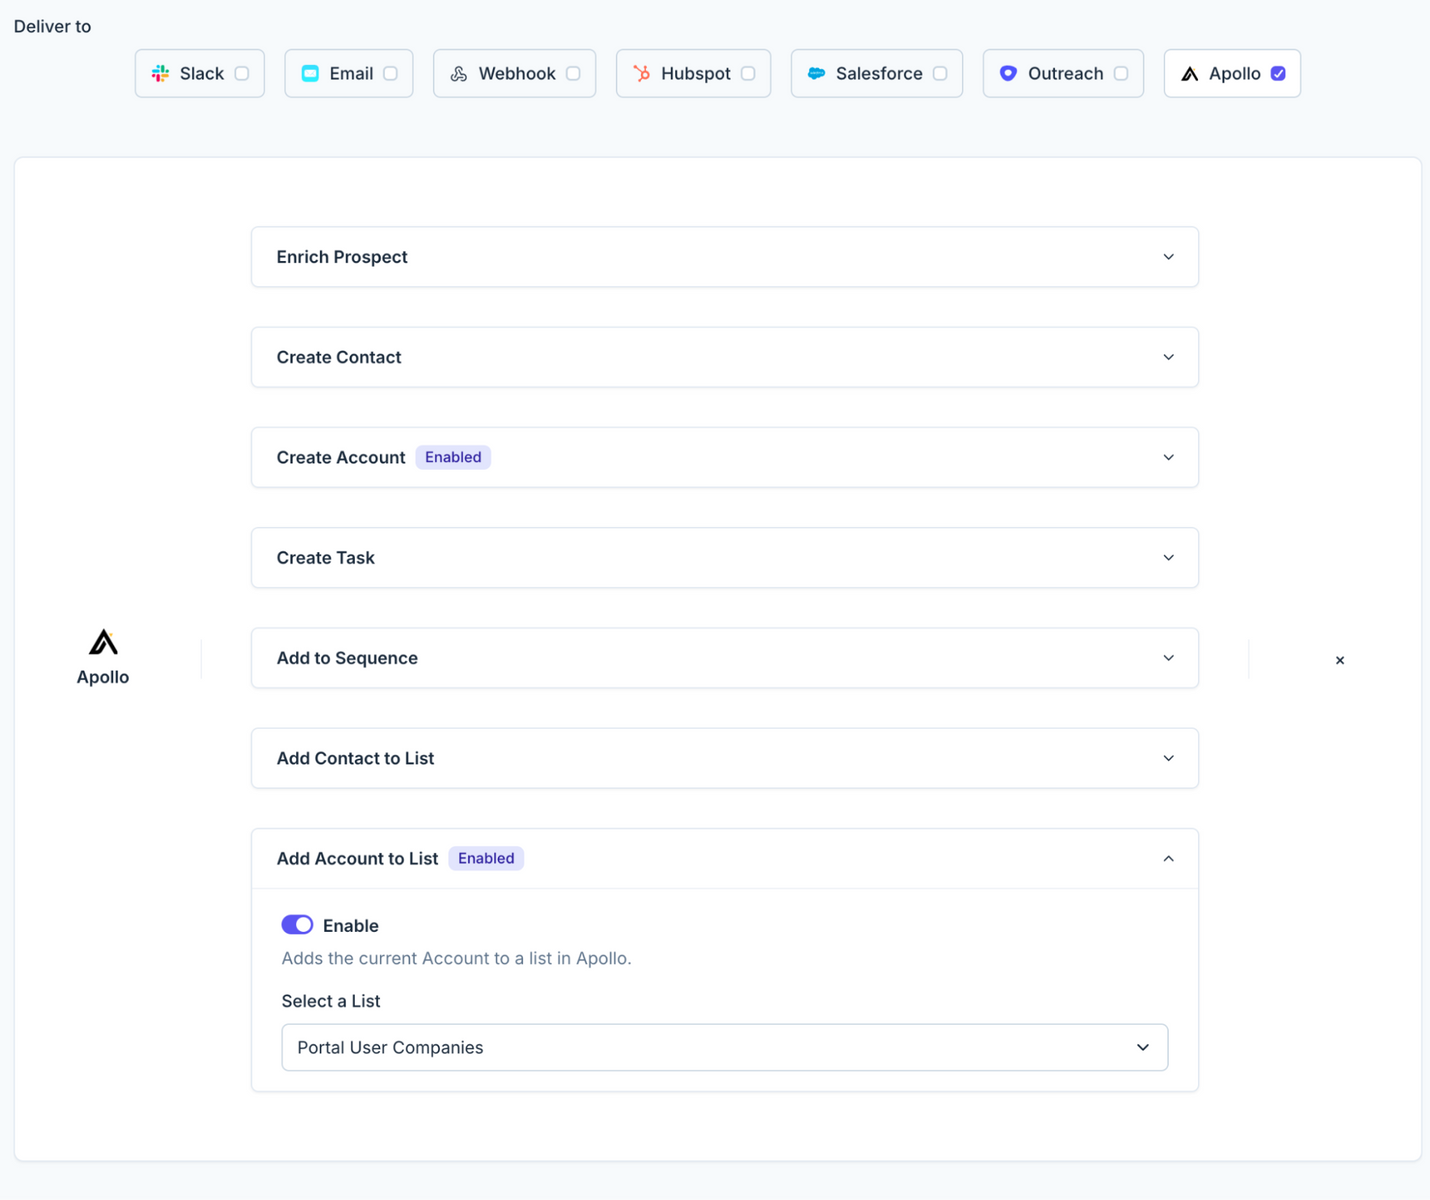
5. Select "Apollo" as the integration action
6. Enable "Create Account". This will make sure the account record exists in 7. Apollo, which is required for the rest of the flow.
7. Enable "Add Account to List" and pick a list you've created in Apollo. If you don't have an Apollo list yet, go into Apollo to create a new list for these companies/accounts. Note: we sync Apollo data periodically, but let us know if you can't find the list you are looking for!
Here's an example of the Automated Action in Koala:
Now that you've got the Koala automation set up, you'll start seeing accounts synced with your list in Apollo as the configured intent signals start happening.
In Apollo, you'll …
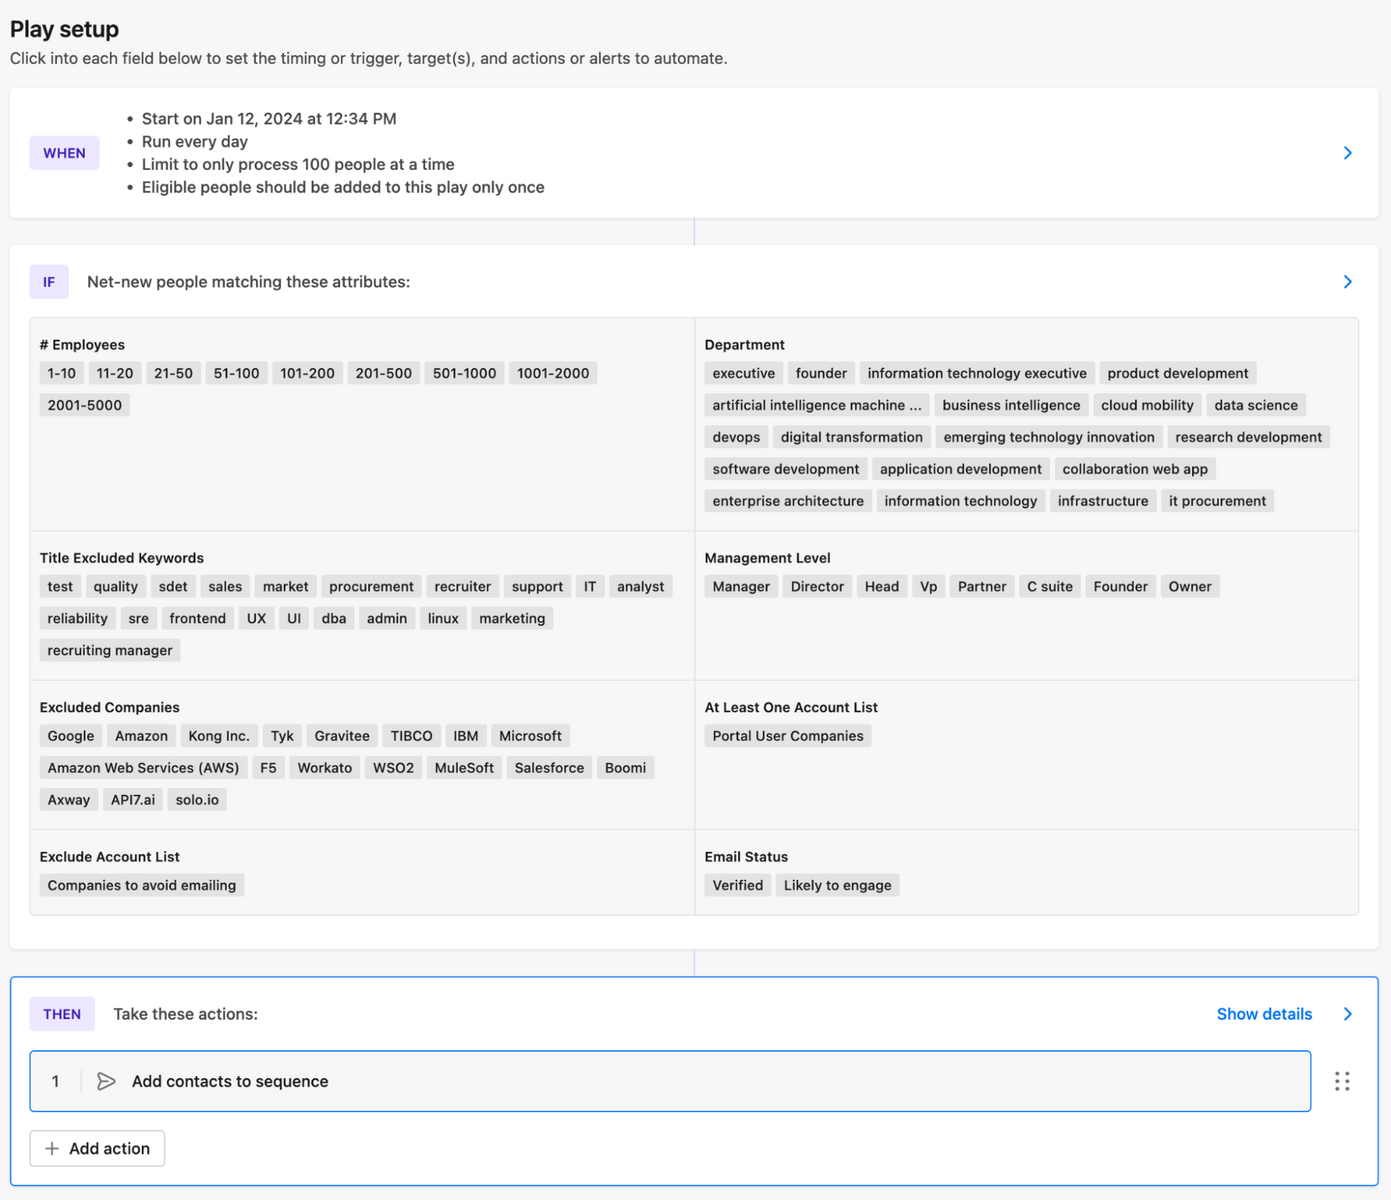
### Set up an Apollo Play
1. Set up a Play that is triggered every day (or whenever)
2. Specify the list we added companies to as a source – under "At Least One Account List" filter in the IF section
3. Pick "Add contacts to a sequence" as the action
# Auto Outbound with Clay
Source: https://getkoala.com/docs/automations/auto-outbound/clay
Extend Auto Outbound with Clay tables
Auto Outbound supports triggering complex enrichment and routing logic using Clay Tables.
Examples include:
* Enriching the prospect with additional data from LinkedIn, Clearbit, or other data providers
* Using OpenAI to summarize the contents of the Intent Signal
* Looking up more people at the same company to include in the Sequence
## Getting Started
This guide will walk you through integration your Auto Outbound campagin to a table in Clay
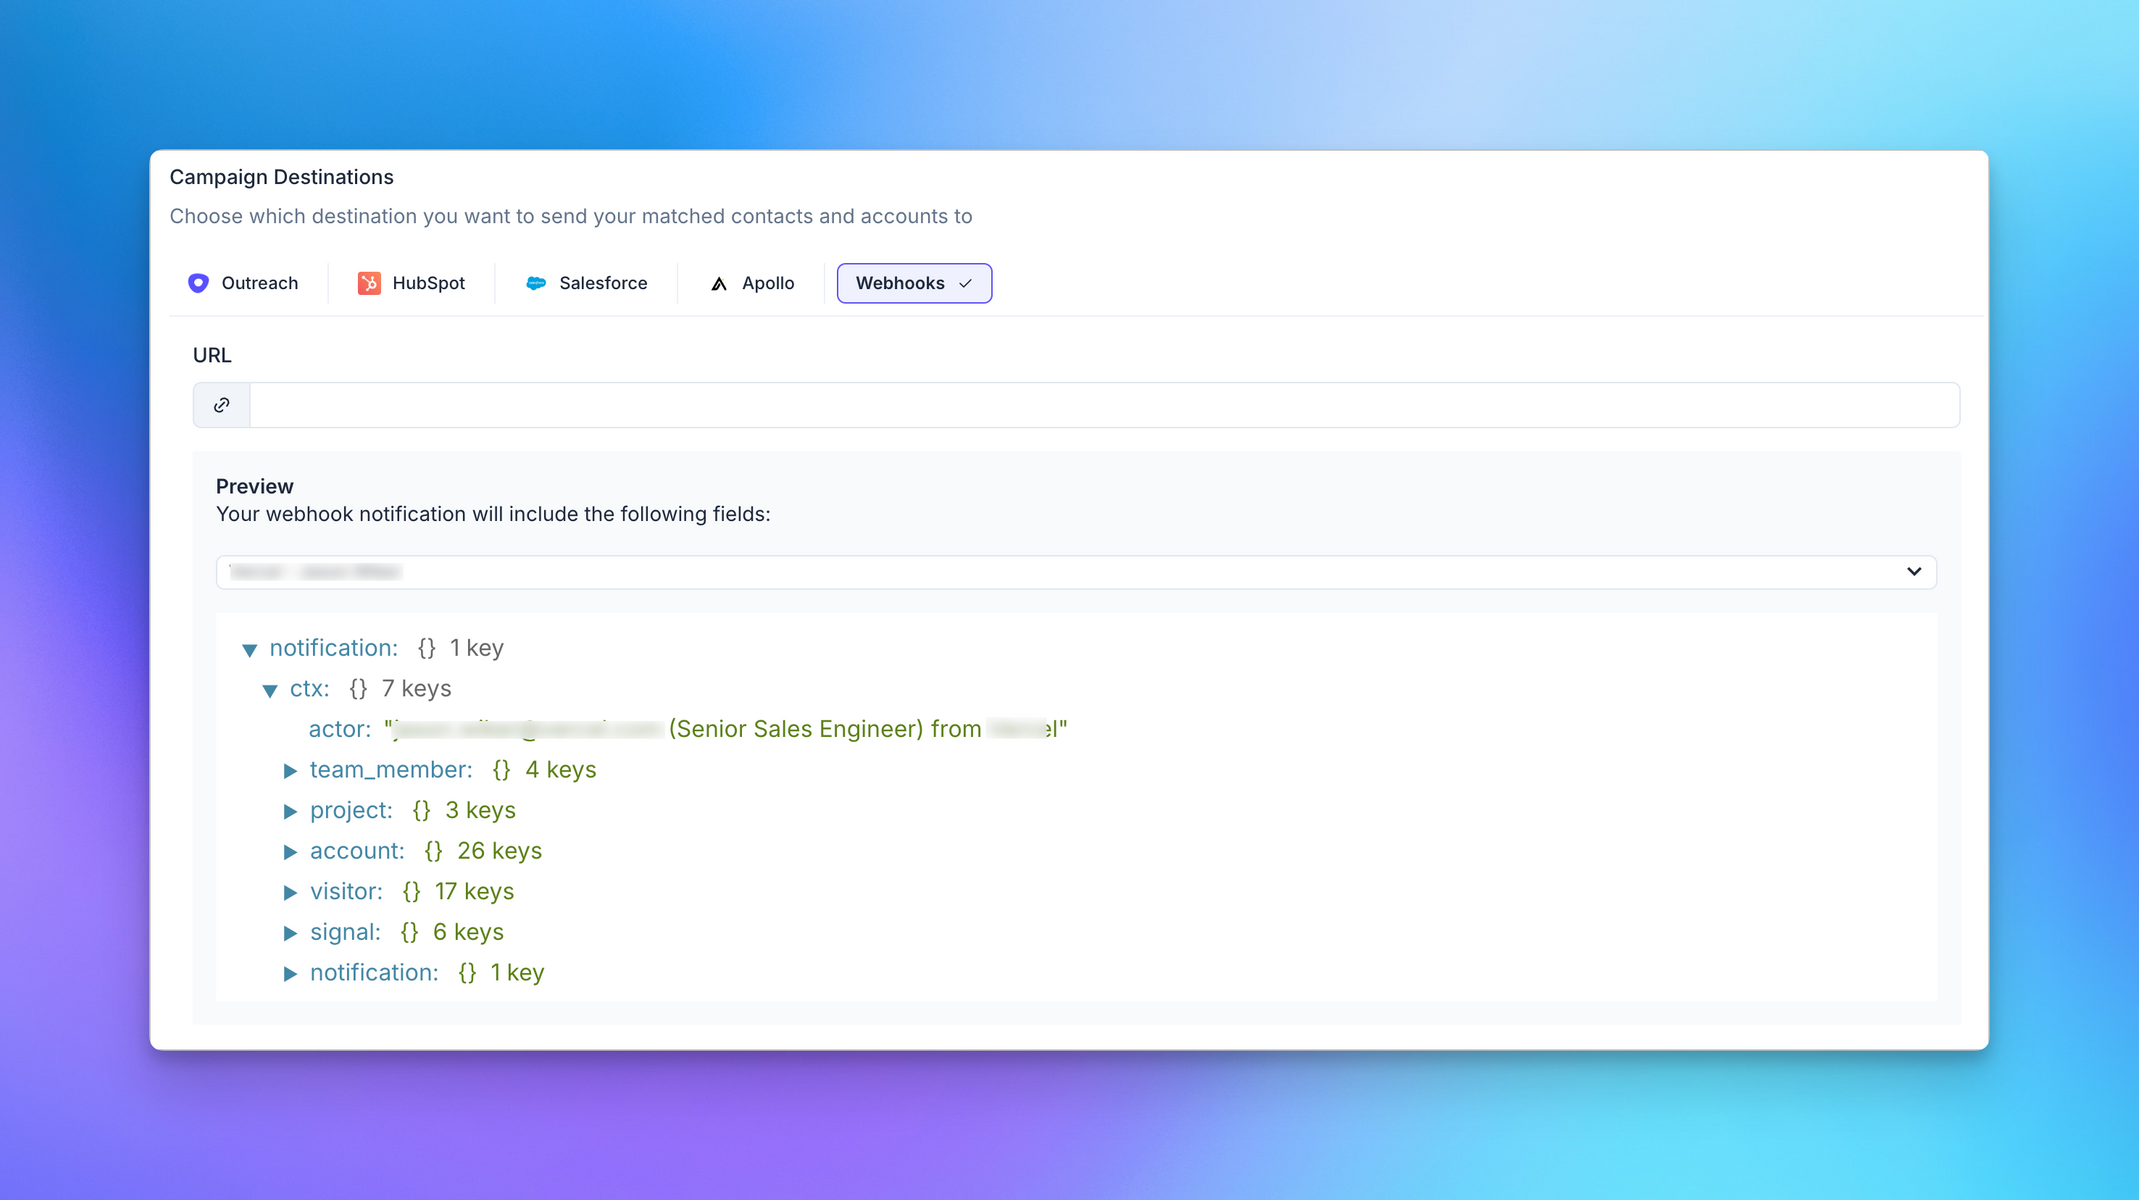
### 1. Create your Auto Outbound campaign in Koala, and select **Webhooks** as your destination.
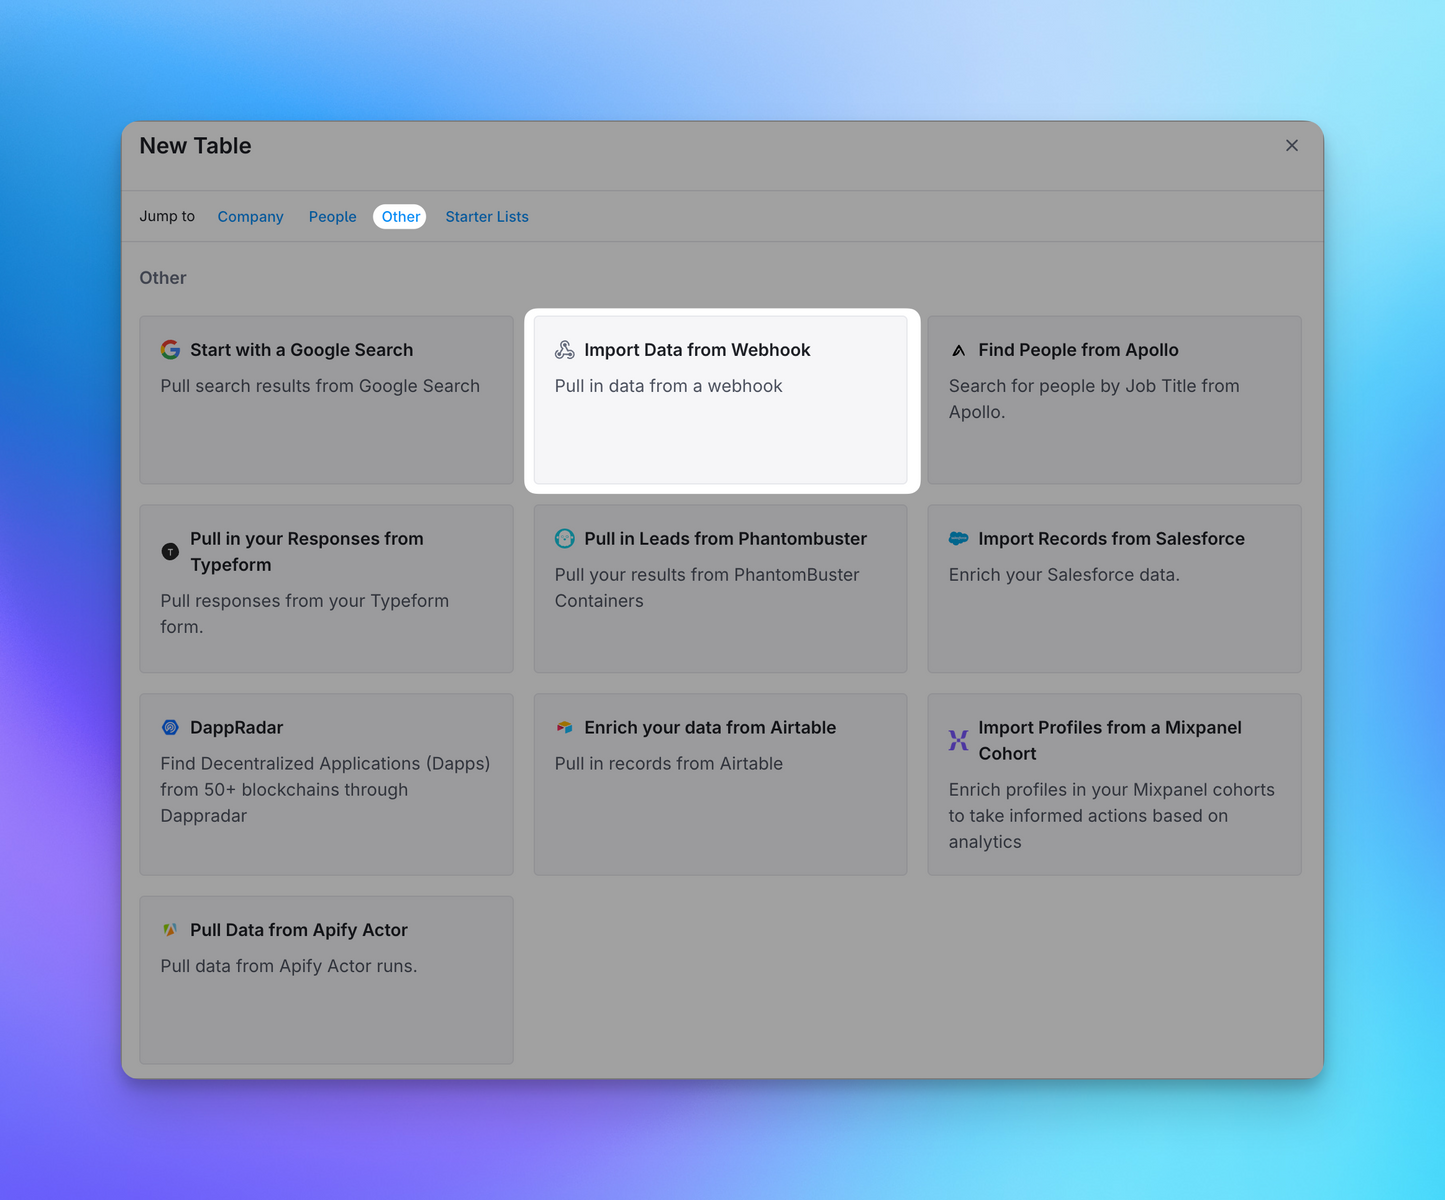
### 2. Head over to Clay and create a new Table
* Click `Other`
* Then select `Import Data from Webhook`
### 3. Copy the Webhook URL from Clay

### 4. Paste the URL into your Auto Outbound configuration
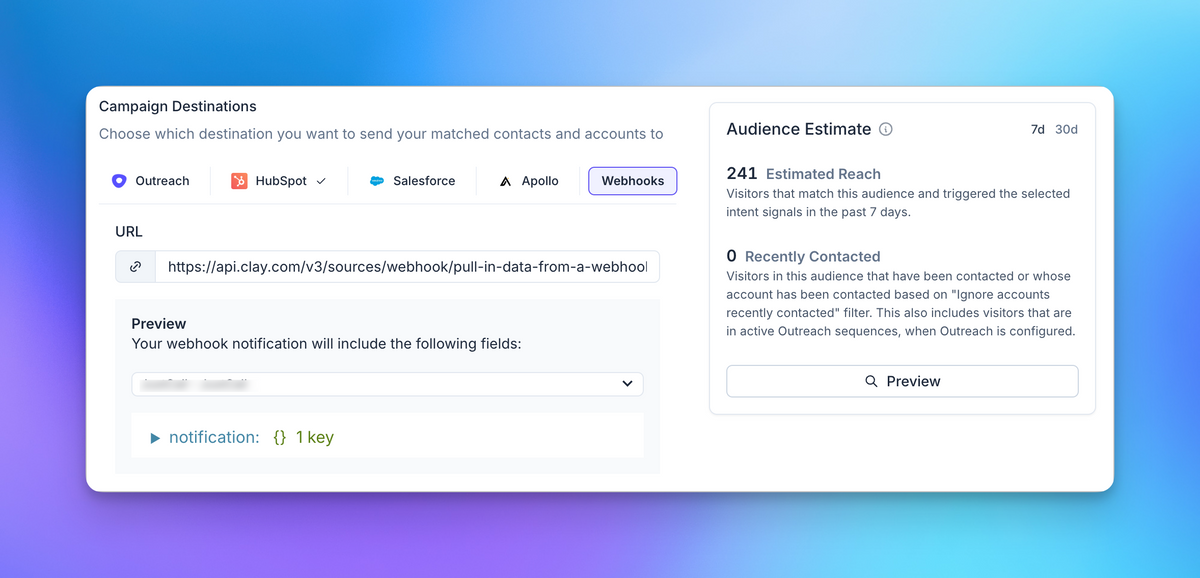
### 5. Use the Preview panel on the right to test your Webhook
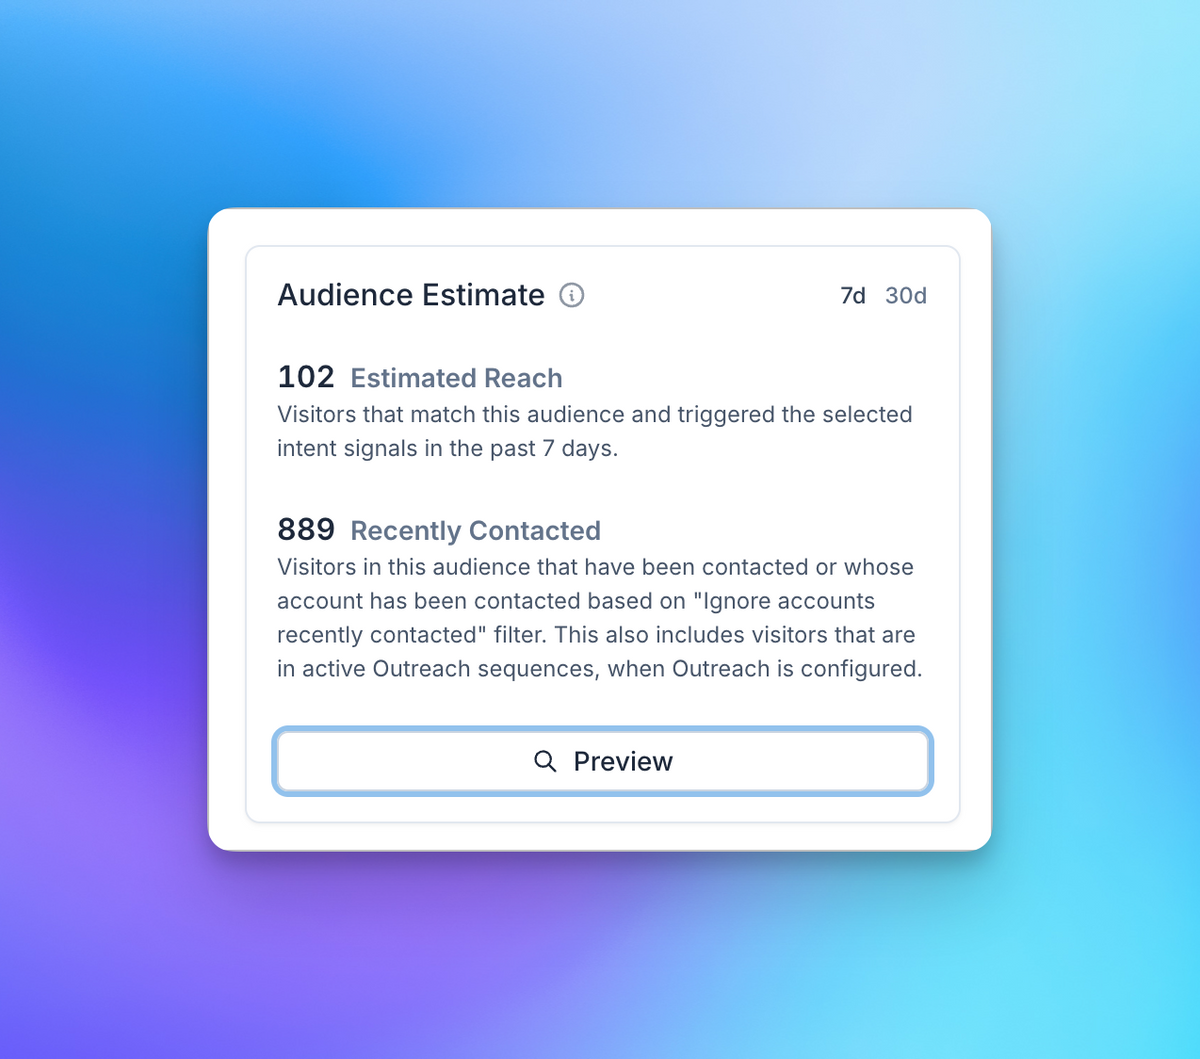
You can use the Audience Preview card on the right side of the screen to see eligible users for your Audience.
After you hit Preview, select one of the users from the list and hit `Send Test`
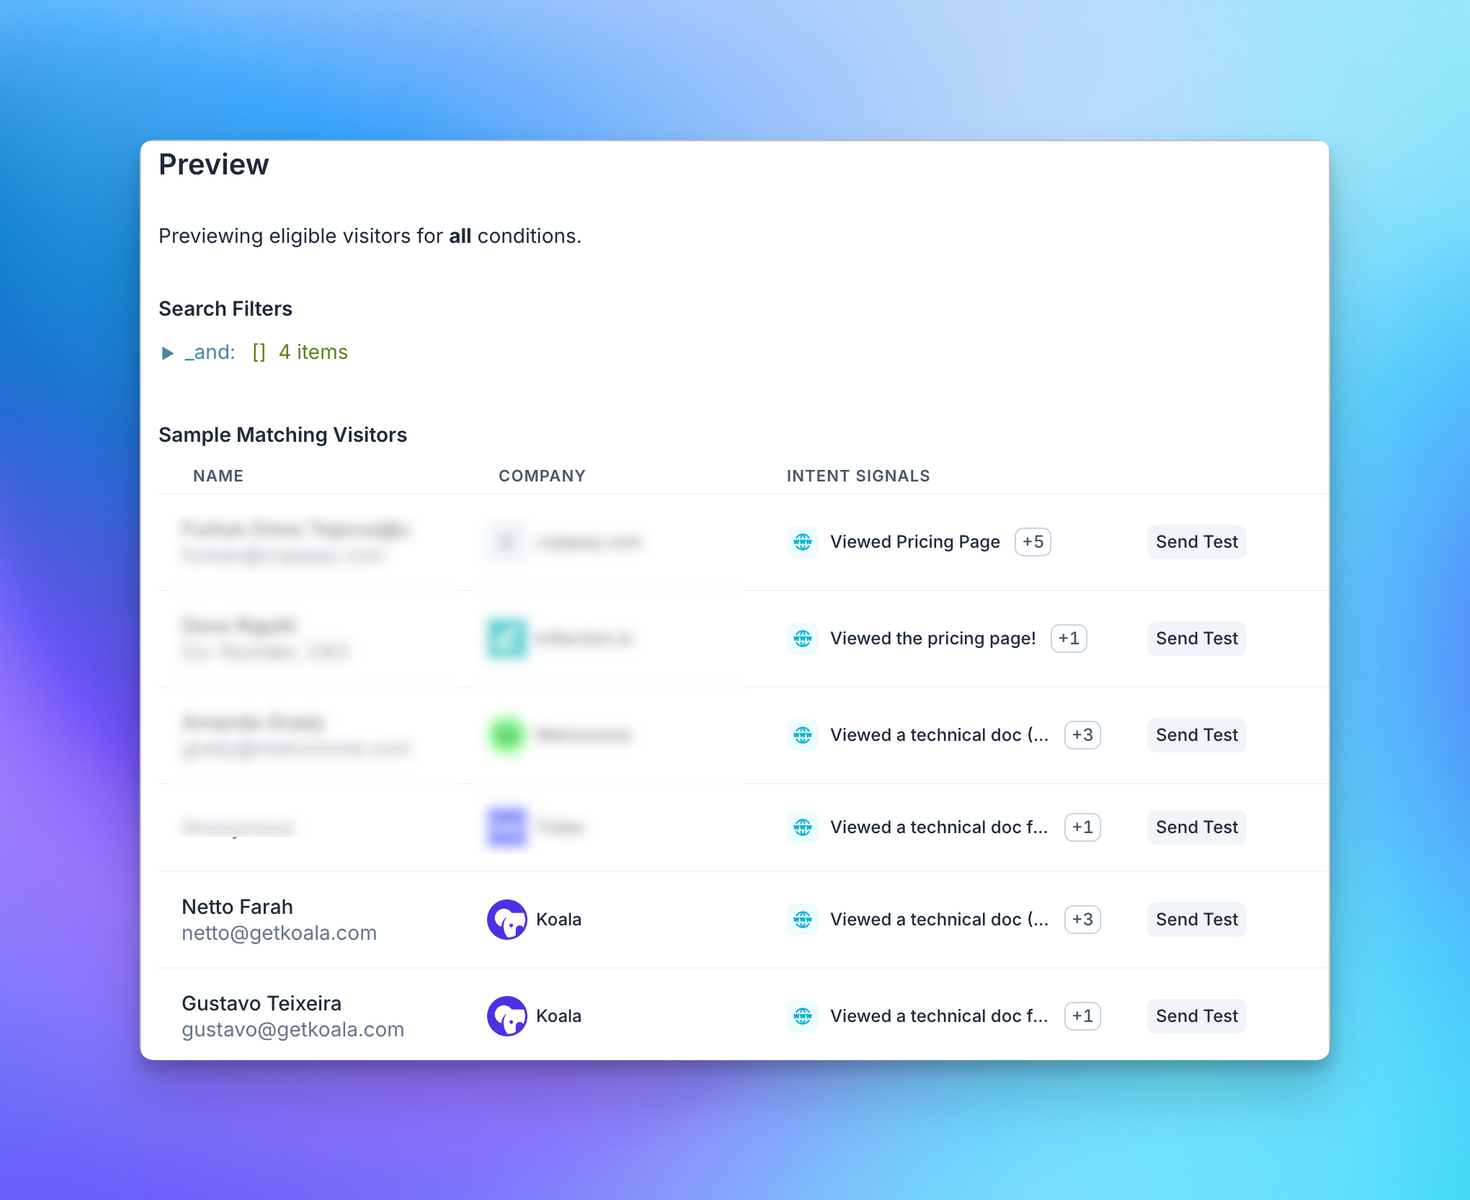
A message should show up in your destination containing the Account, Intent Signal, and Visitor that triggered
the Intent Signal.
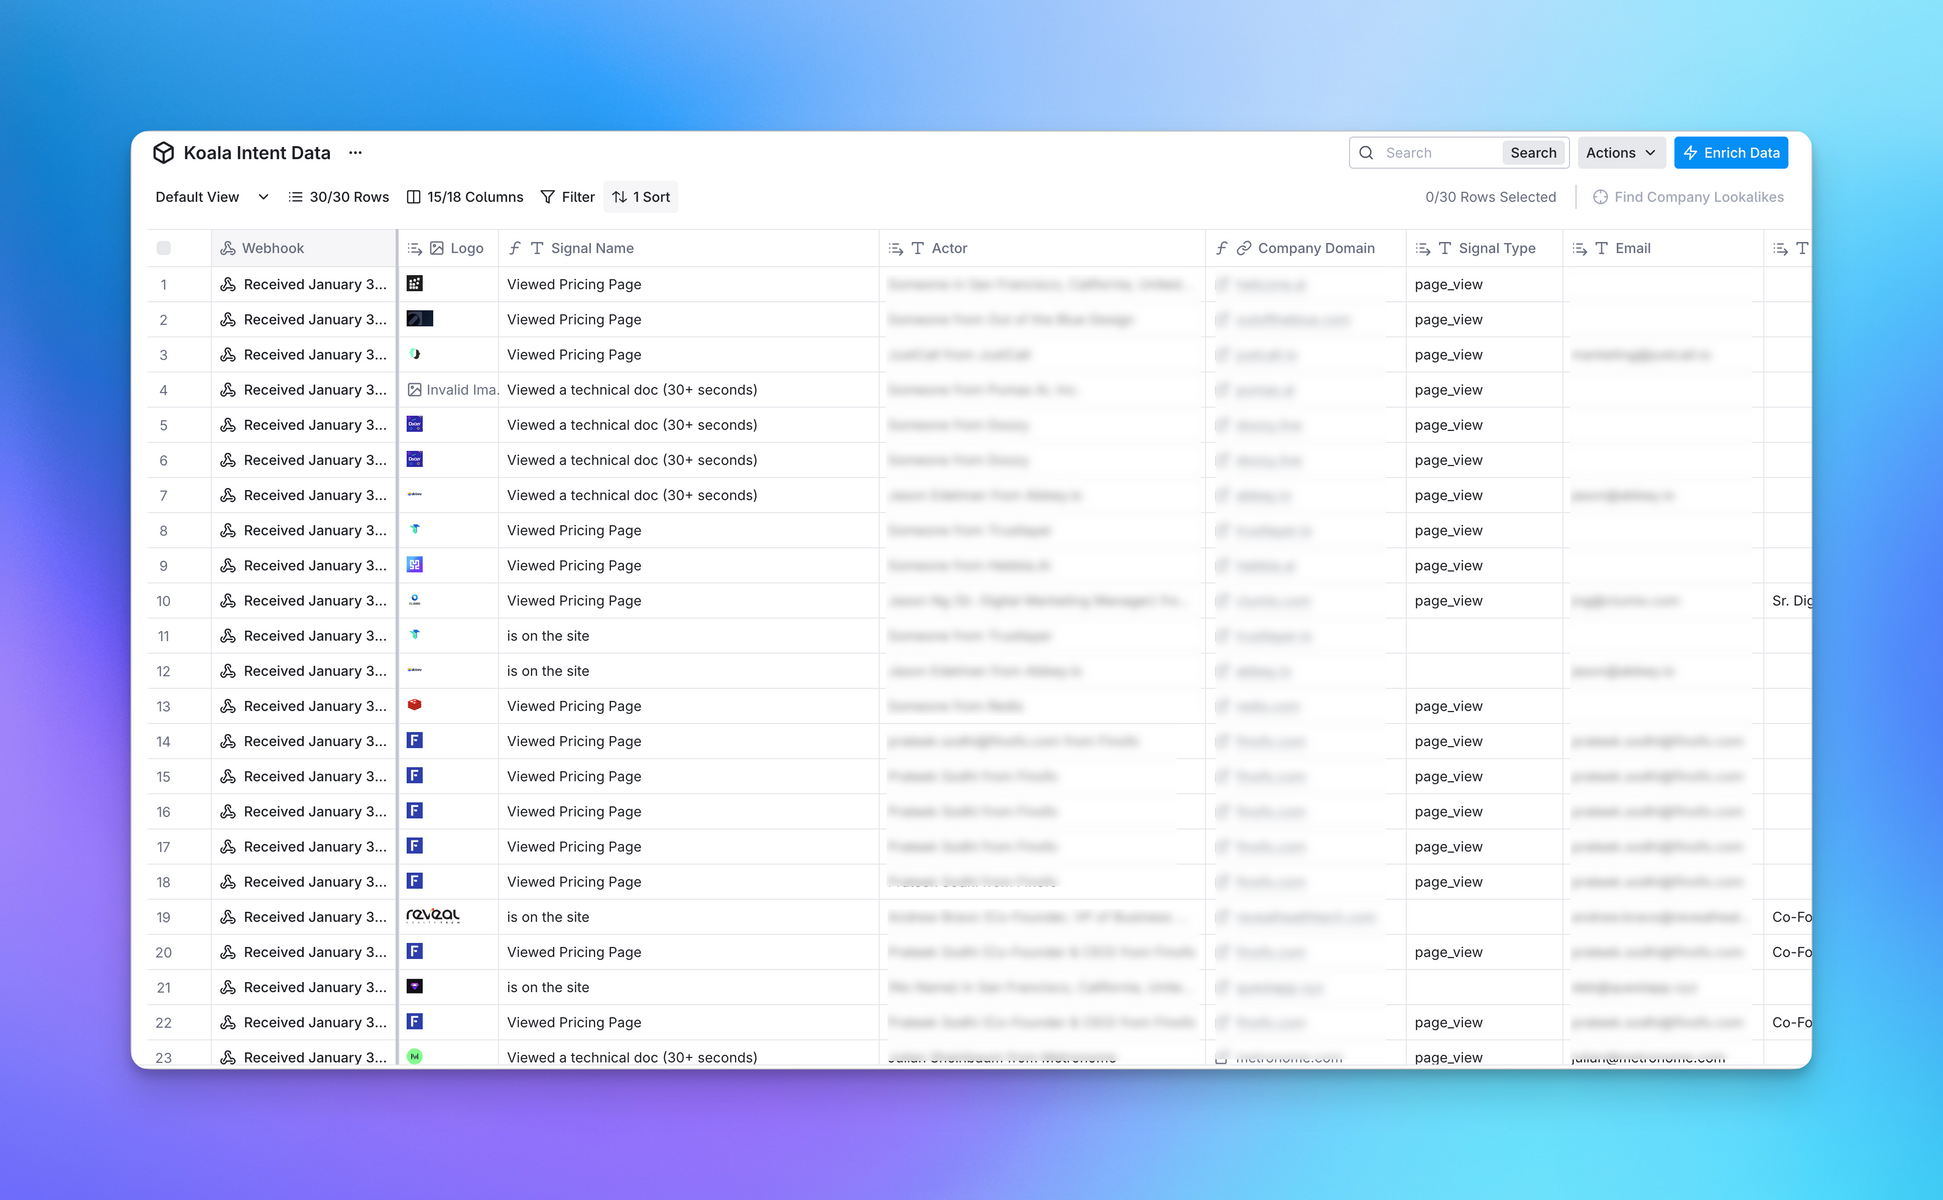
### 6. Get creative with your Auto Outbound Prospects in Clay
You can create new columns using Account, Visitor, and Intent Signal data from Koala, and use them to kick
off enrichment and third party actions from your Clay Table.
# Auto Outbound with HubSpot
Source: https://getkoala.com/docs/automations/auto-outbound/hubspot
Enroll your Auto Outbound Prospects in a HubSpot Sequence
Auto Outbound allows you to sync your eligible prospects into HubSpot Sequences, as well as importing
the qualifying Intent Signal into a Contact of Company record.
## Recommended Setup
The recommended setup for HubSpot includes triggering Workflows that will enroll Contacts in a Sequence
based on changes to properties in the Contact record.
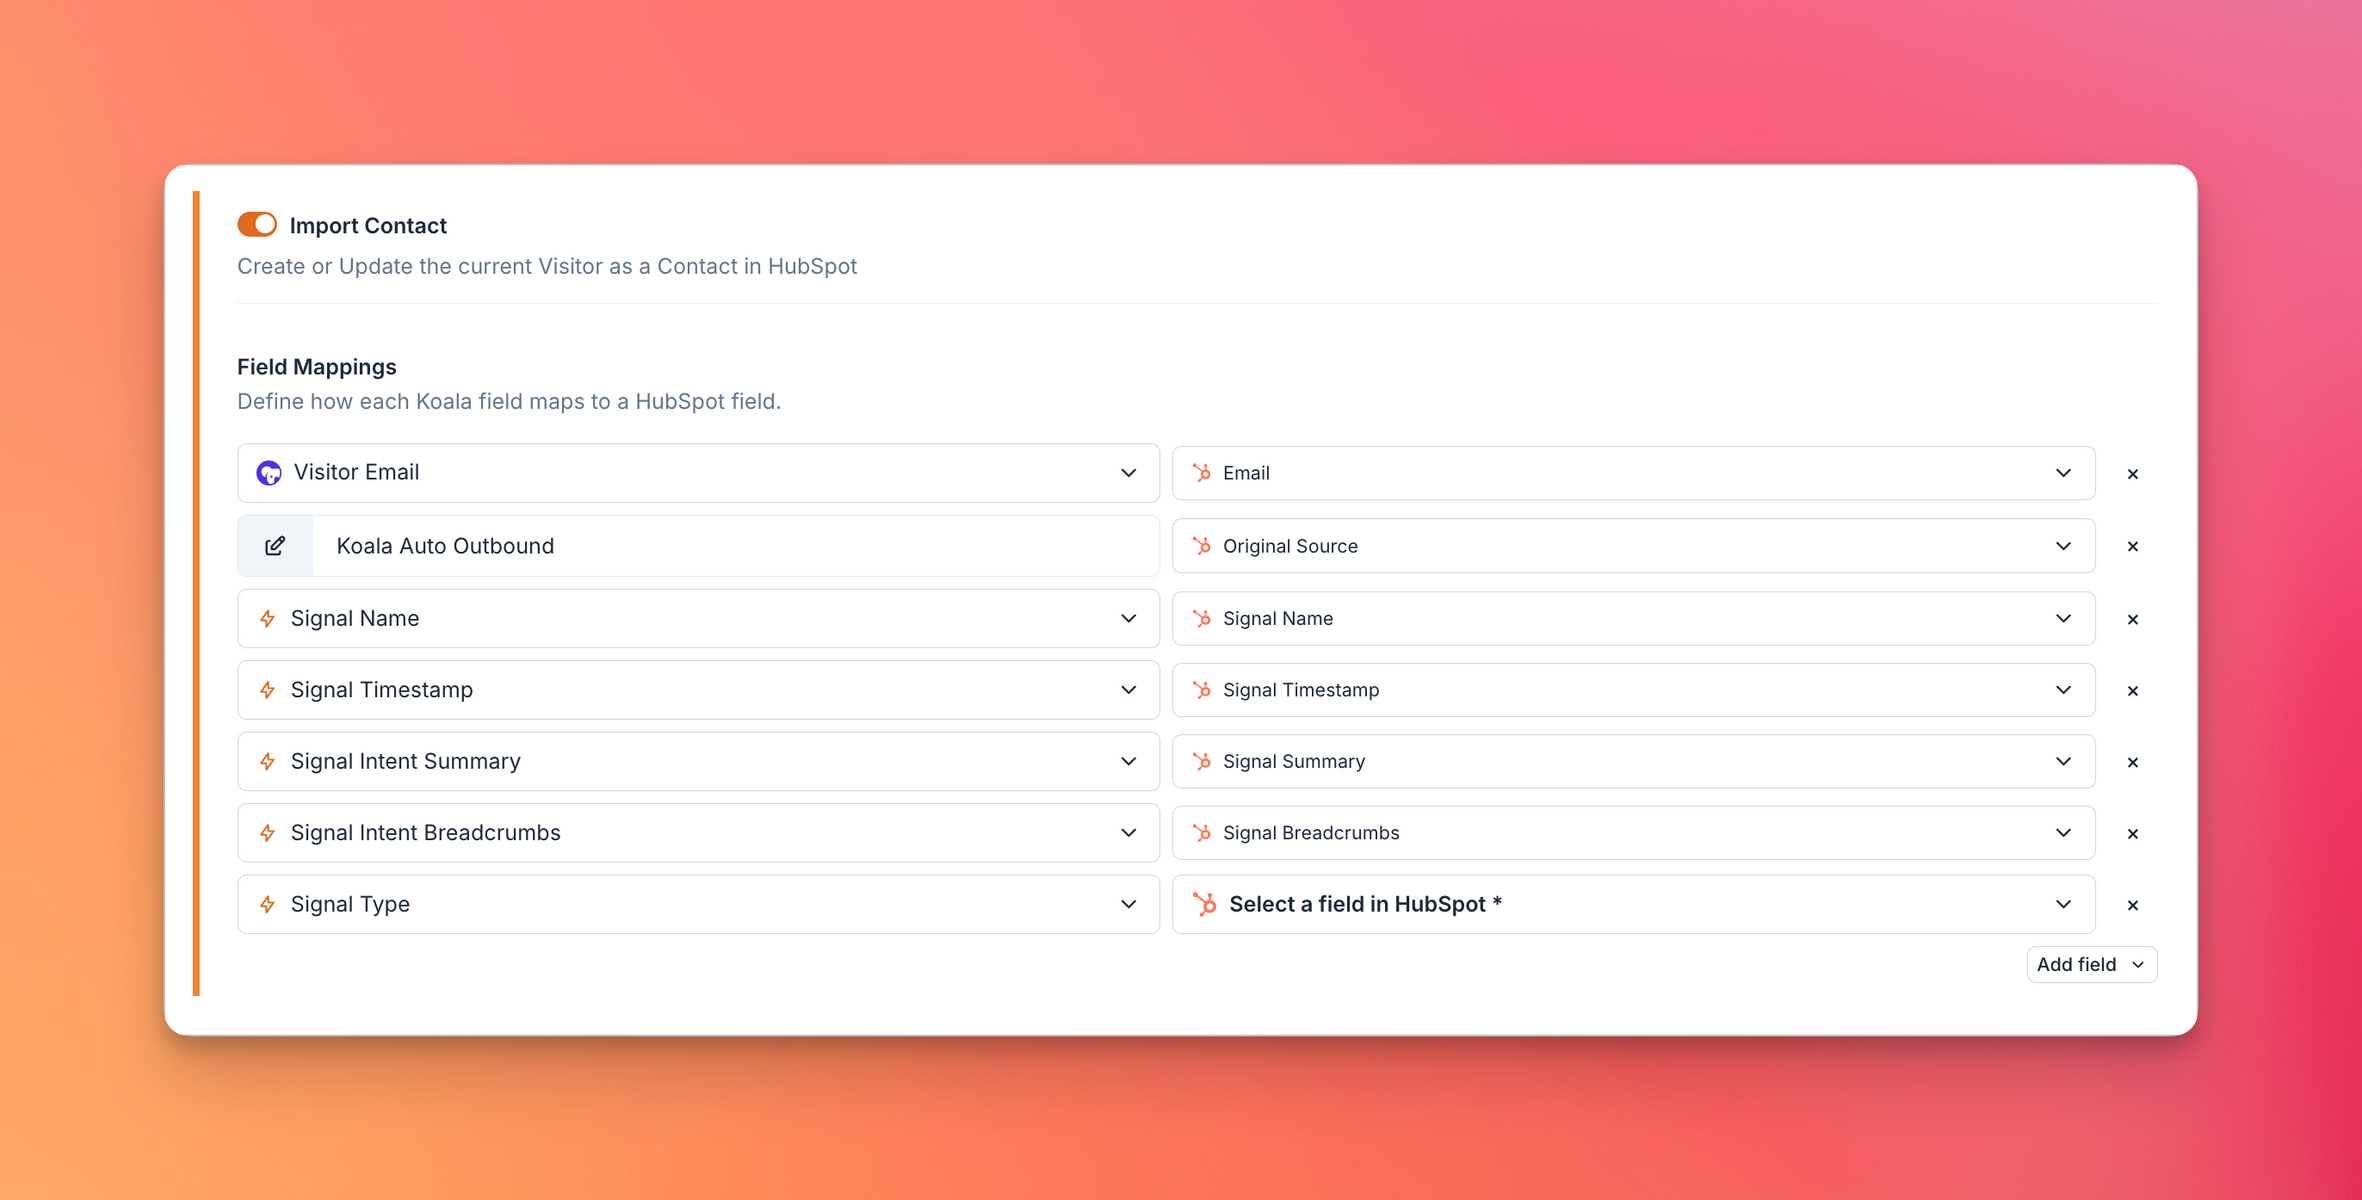
### Tagging Contact Records
The HubSpot destination allows you to tag the Intent Signal performed by the prospect directly
in a Contact record in HubSpot.
Koala will look up the Contact by email, and then update the record or create a new one with the fields
you choose to map between Koala and Hubspot.
We recommend that you map all Intent Signal fields to custom fields in your Hubspot record.
This mapping should enable you to reference the most recent Intent Signal performed by the prospect.
### Optional: Importing Company Records
Similarly to Contact importing, you can choose to automatically map Intent Signal fields into a Company record.
You can follow the same steps as above, to update or create a new Company when a new Prospect is eligible for Auto Outbound.
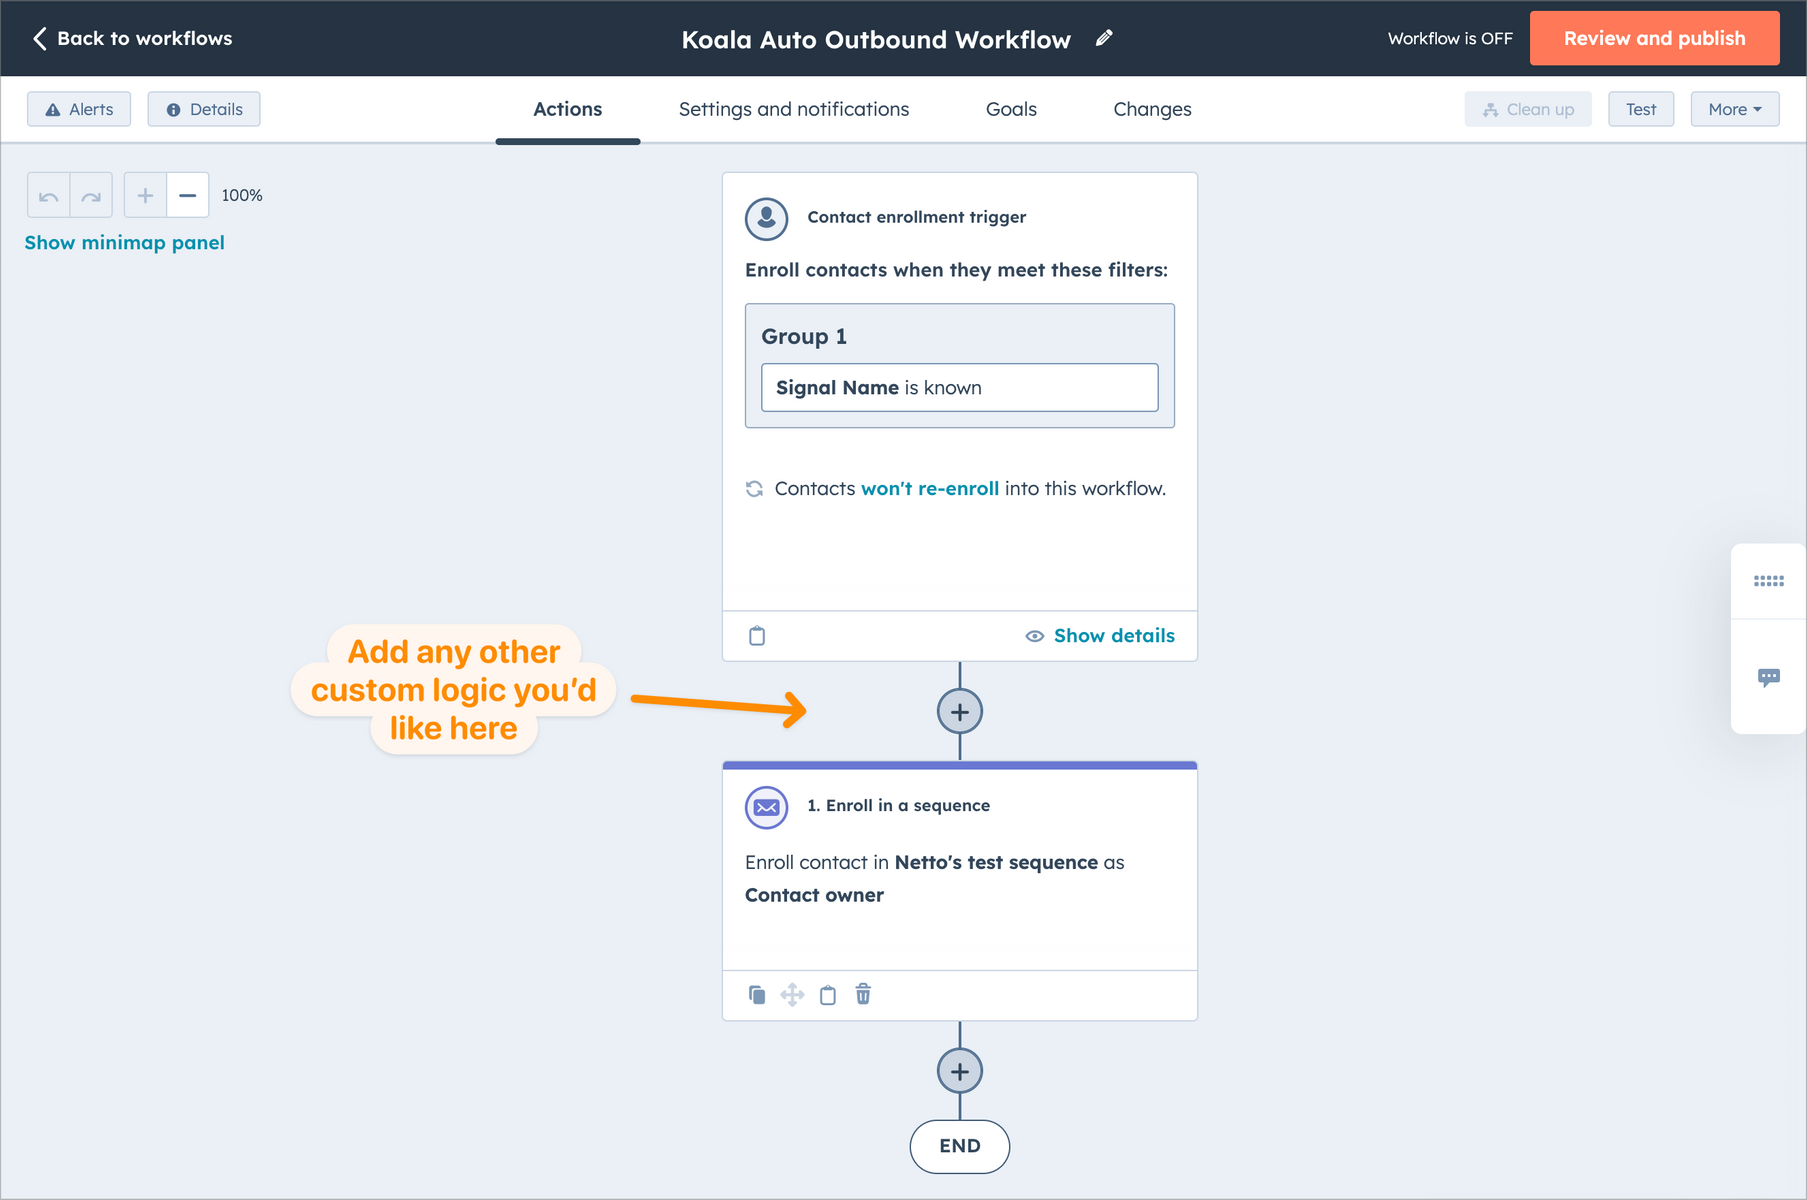
### Enrolling the prospect in a Sequence
Now that you have a tagged Contact record in your HubSpot, you can now create a Workflow that will automatically enroll
the Contact in a Sequence using the Intent Signal data.
* Select your Create a Workflow in HubSpot
* Set the Contact Enrollment Trigger to `Signal Name` (or any of the properties you mapped) to `Is Known`
* This will enable your Workflow to trigger any time Koala tags a new Contact via Auto Outbound
* Select a Sequence to enroll the Contact
* \[Bonus]: We recommend that you customize your setup to include multiple Sequences based on the `Signal Name` property,
in order to increase relevancy of your messaging.
# Getting Started
Source: https://getkoala.com/docs/automations/auto-outbound/intro
2x~5x your opportunity creationg rate by automatically sending an email to a prospect when a new intent signal is detected.
# What is Auto Outbound
Auto Outbound automatically enroll a prospect into a highly relevant Sequence when they show intent, and message them at the right time.
Koala's Auto Outbound engine offers a variety of customization options that allow you to target the right
prospects with the right message without interferring with existing deals, customers, or highjacking any existing conversations.
# Why use Auto Outbound
Auto Outbound is a powerful tool that can help you reach the right Prospect with the right message at the right time, leading to higher reply rates and more opportunities.
Our customers have seen a significant increase in reply rates when using Auto Outbound, as well as 2x\~5x more opportunities created.
They achieve this by:
* Mapping Website and Product usage data to Intent signals
* Targeting the highest Fit prospects based on their Ideal Customer Profile
* Using highly relevant messages that are tailored to the prospect's intent
* Reliably tracking the performance of their Auto Outbound campaigns, and iterating on targeting and messaging
Koala helps you with all of the above.
* [Intent Signals](/admin-guides/first-intent-signals) allow you to map your website and product usage to signals you Sales Team understands.
* [Content Reports](/product-manual/content-reports) help you track the conversion rate of each Intent Signal, and understand which Signals and Content drives most pipeline.
* [Fit Scoring](https://app.getkoala.com/goto/scoring) allows you to define and score your Ideal Customer Profile based on firmographic and technographic data.
* Auto Outbound allows you to map individual Intent Signals to Sequences, and send highly relevant messages based on Intent.
* The Auto Outbound engine keeps all the receipts for every action it takes, and helps you understand who qualifies for your Auto Outbound campaigns, and who doesn't.
# Creating an Auto Outbound Campaign
Head over to the [Auto Outbound](https://app.getkoala.com/goto/auto-outbound) page in the Koala App to get started.
## Getting Started
You can create multiple campaigns and target different segments of your prospects based on their Intent and Fit.
### 1. Give your Auto Outbound Campaign a name
Give it a name that you can easily recognize, and that describes the purpose of the campaign.
### 2. Define the Eligible Audience
The next step to using Auto Outbound is to define who's eligible for your Auto Outbound campaign.
We recommend using firmographic filters such as `# of Employees`, `Estimated Revenue`, or `Industry` to target the right prospects for your business.
Customers on our Pro and Business plan can also use Koala firmographic Fit Scores to target the highest Fit prospects. We recommend targeting `A` and `B`
Fit Accounts.
For Visitors, we recommend checking the `Work Emails` option to screen out folks who have no intention of buying your product.
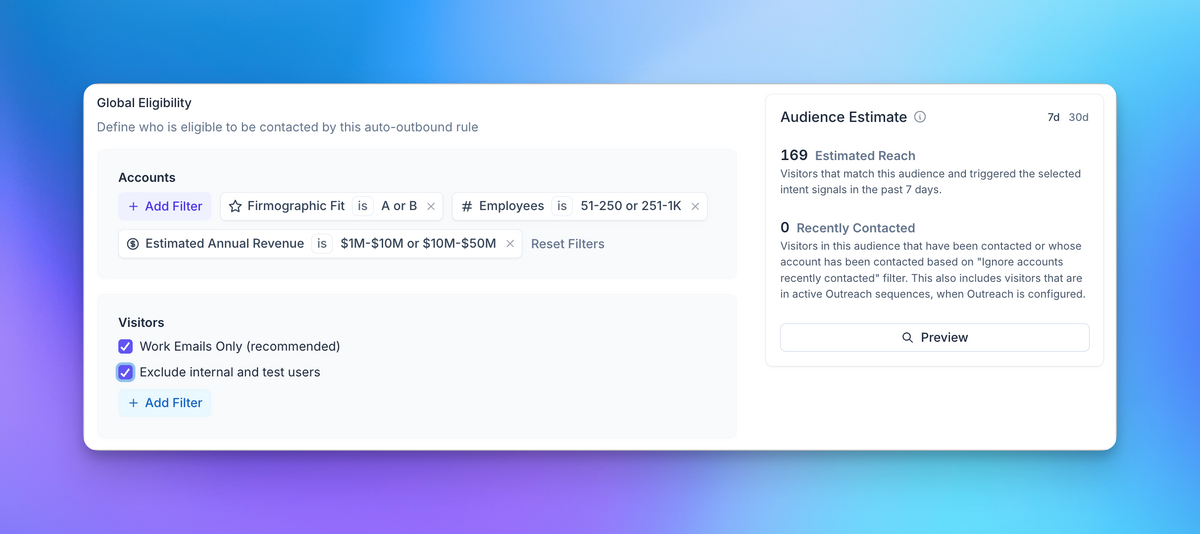
<Note>
Koala will automatically calculate the size of the audience that matches your criteria, and show you how many prospects are eligible for your Auto Outbound campaign in real time as you update your filters.
You can also use the `Preview` button to see a list of prospects that match your criteria.
</Note>
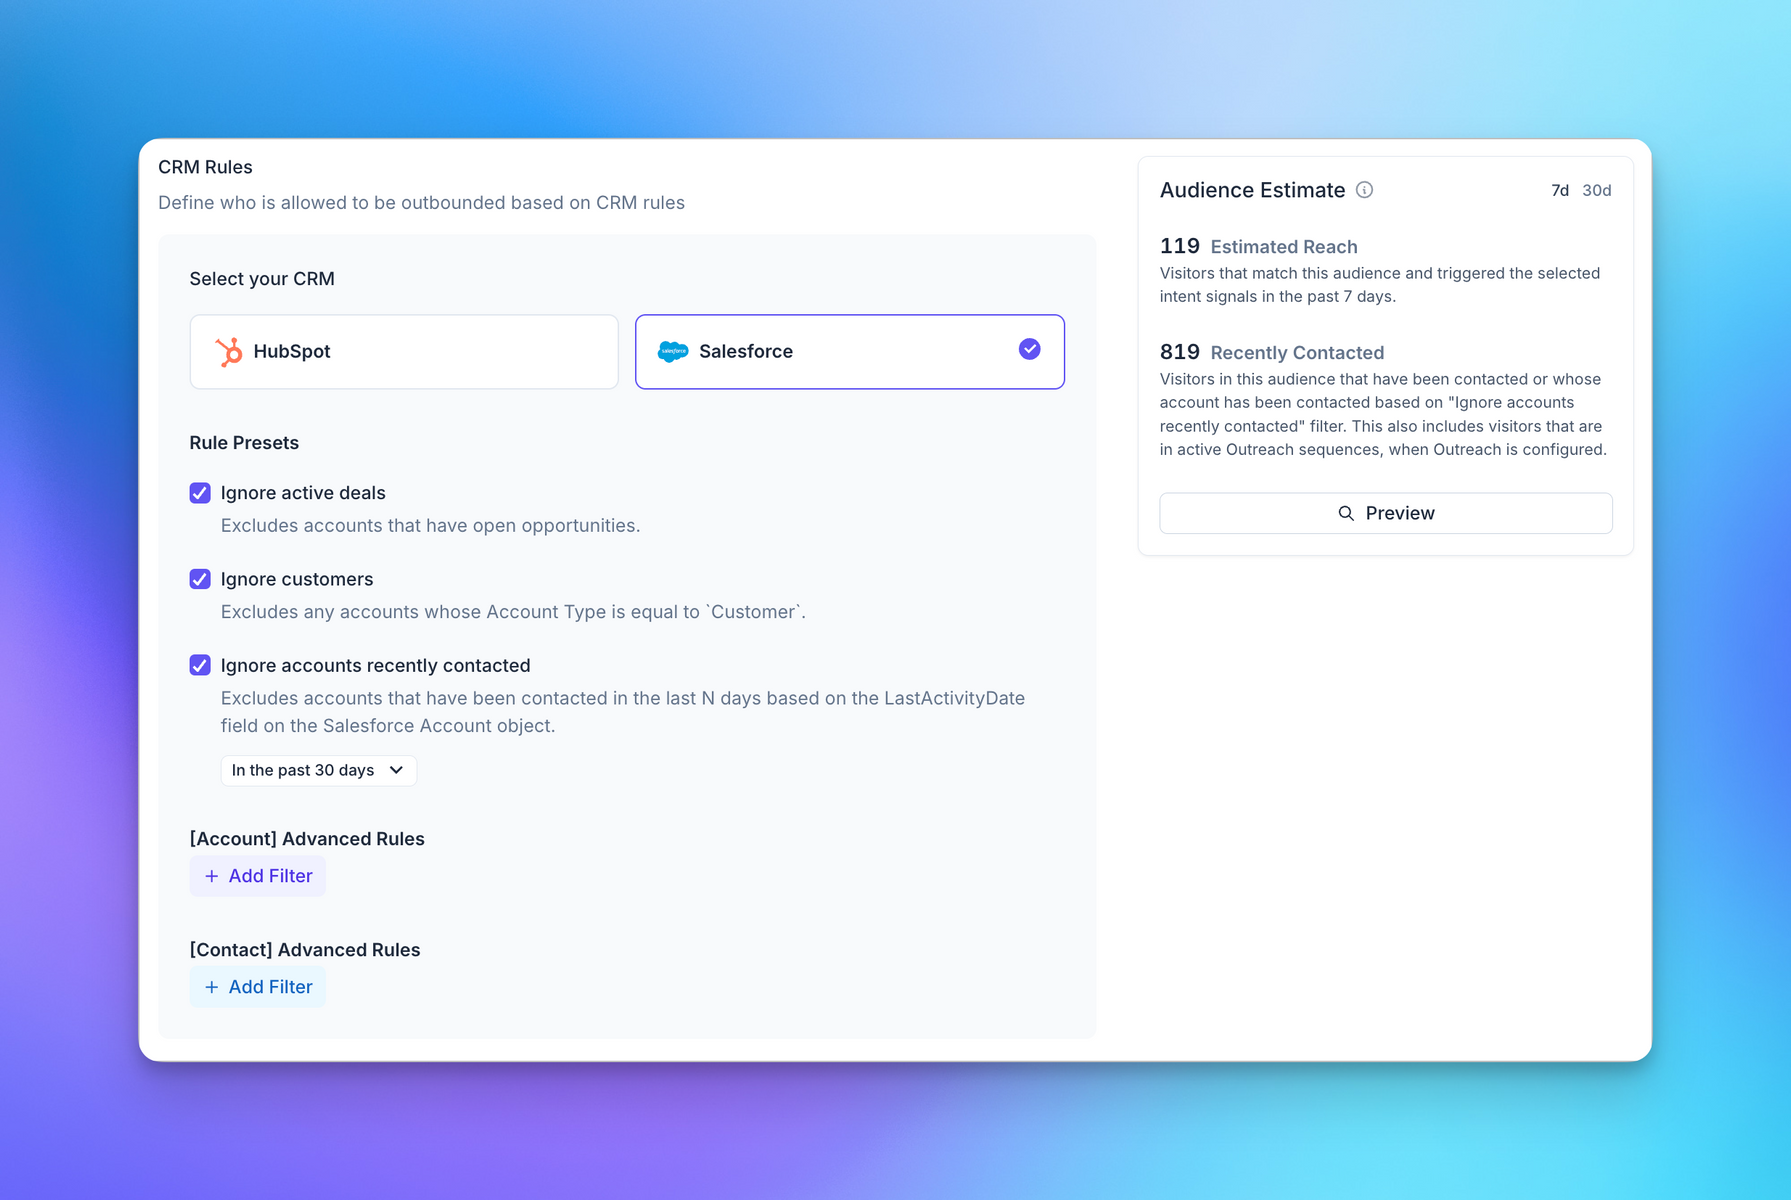
### 3. Handle Existing Customers
The next step is to define how Koala should handle existing customers and conversations.
You likely want to ignore any customer who's already in a conversation with your team, or has already purchased your product.
Our recommended presets work out of the box for most standard HubSpot and Salesforce setups,
but you can also customize the rules to fit your specific use case using Advanced Filters.
### 4. Define the enrollment criteria
Now that you have defined the audience for your Auto Outbound campaign, it's time to define the enrollment criteria.
The criteria for your campaign should be based on the Intent Signals you're tracking in Koala, how often you want to enroll a Prospect.
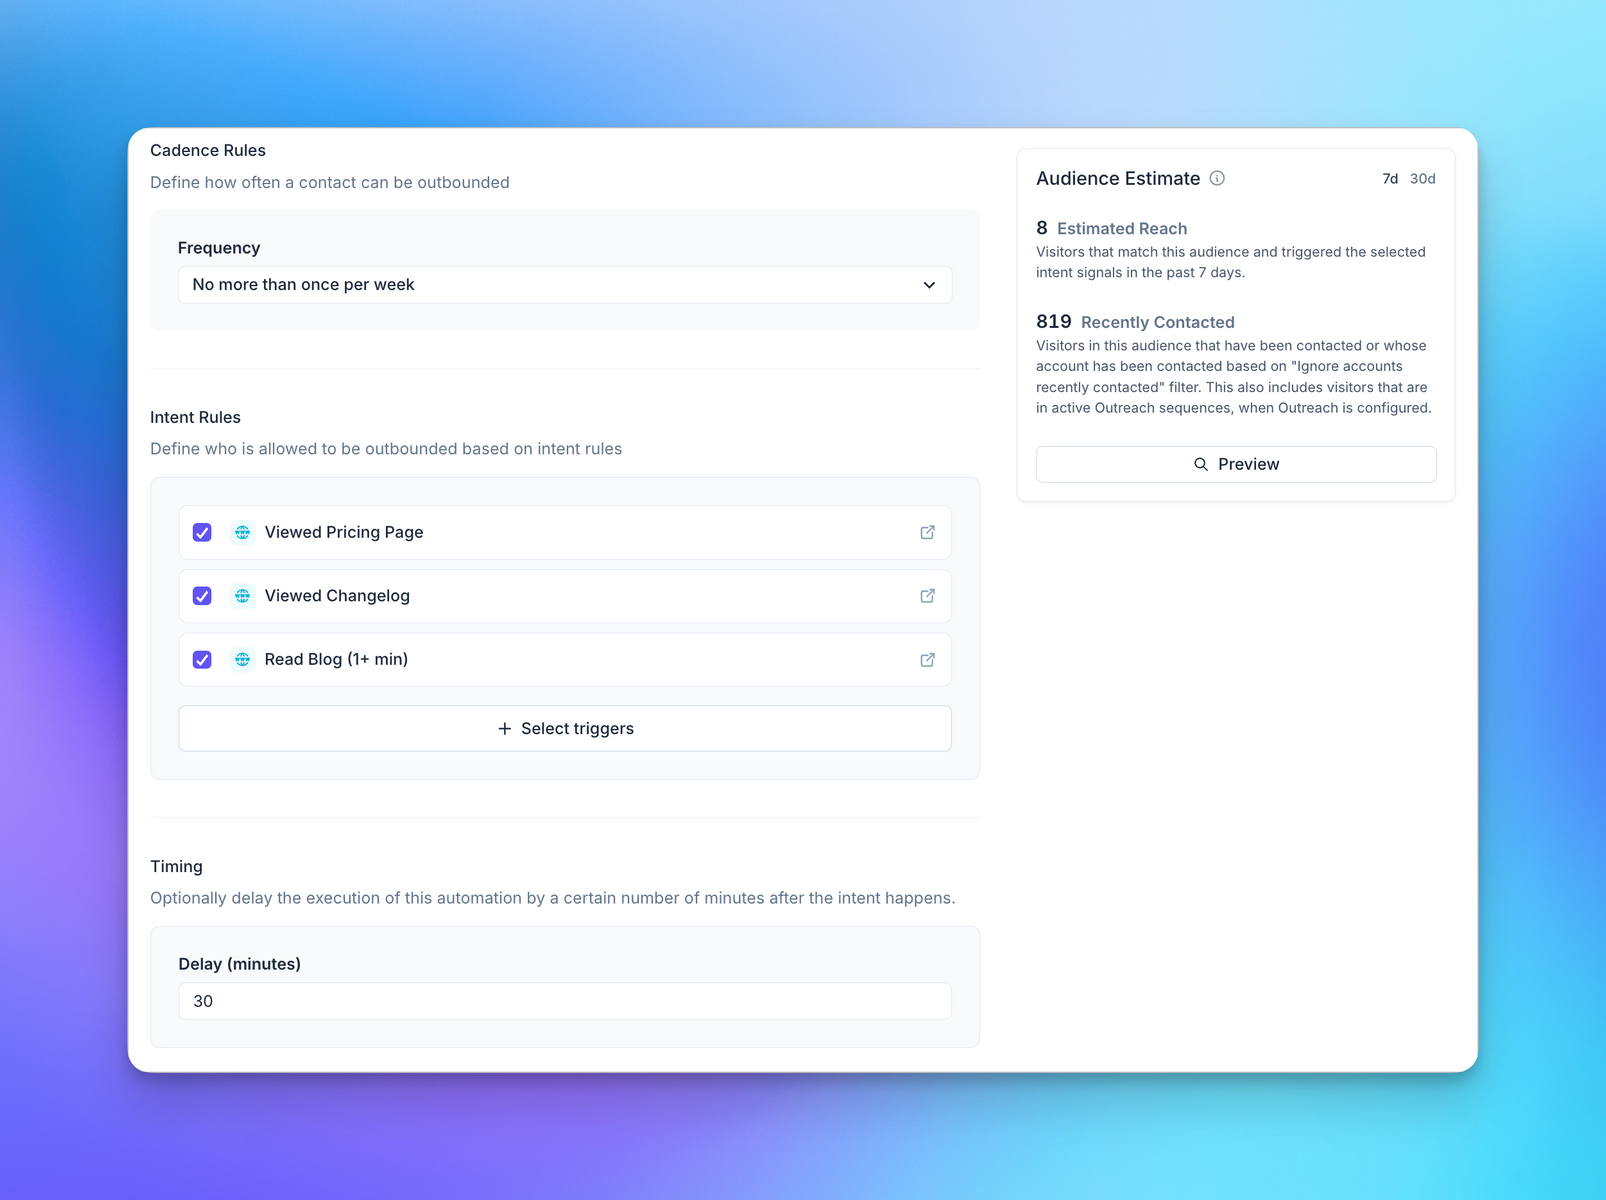
<Note>
You can also choose to set an artificial delay to your Auto Outbound campaign,
to ensure that the prospect has enough time to engage with your product before you reach out to them.
</Note>
### 5. Select a Sender
You can optionally select a specific user to send the Auto Outbound emails from.
This helps you maintain your threads going when a prospect replies to your Auto Outbound email.
We recommend that you pick the sales rep who owns the account, or the territory owner for your audience.
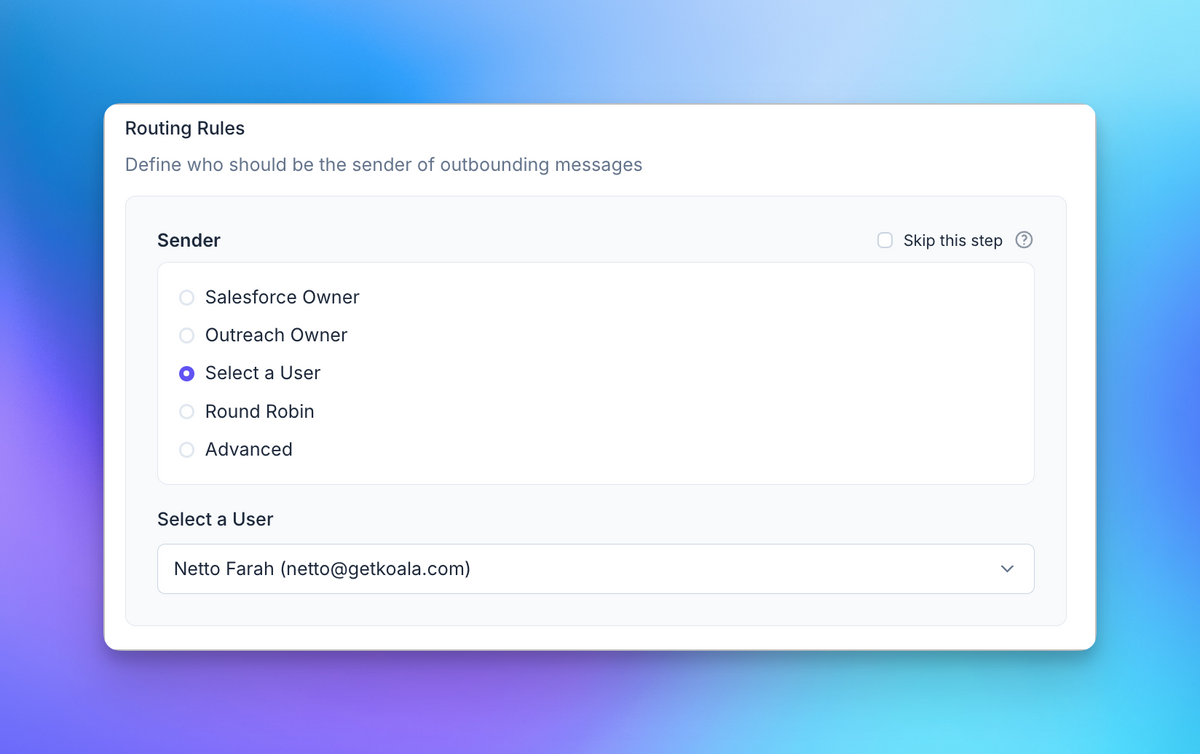
You can choose from one of the presets available, or roll your own advanced Routing with the `Advanced Filters` option.
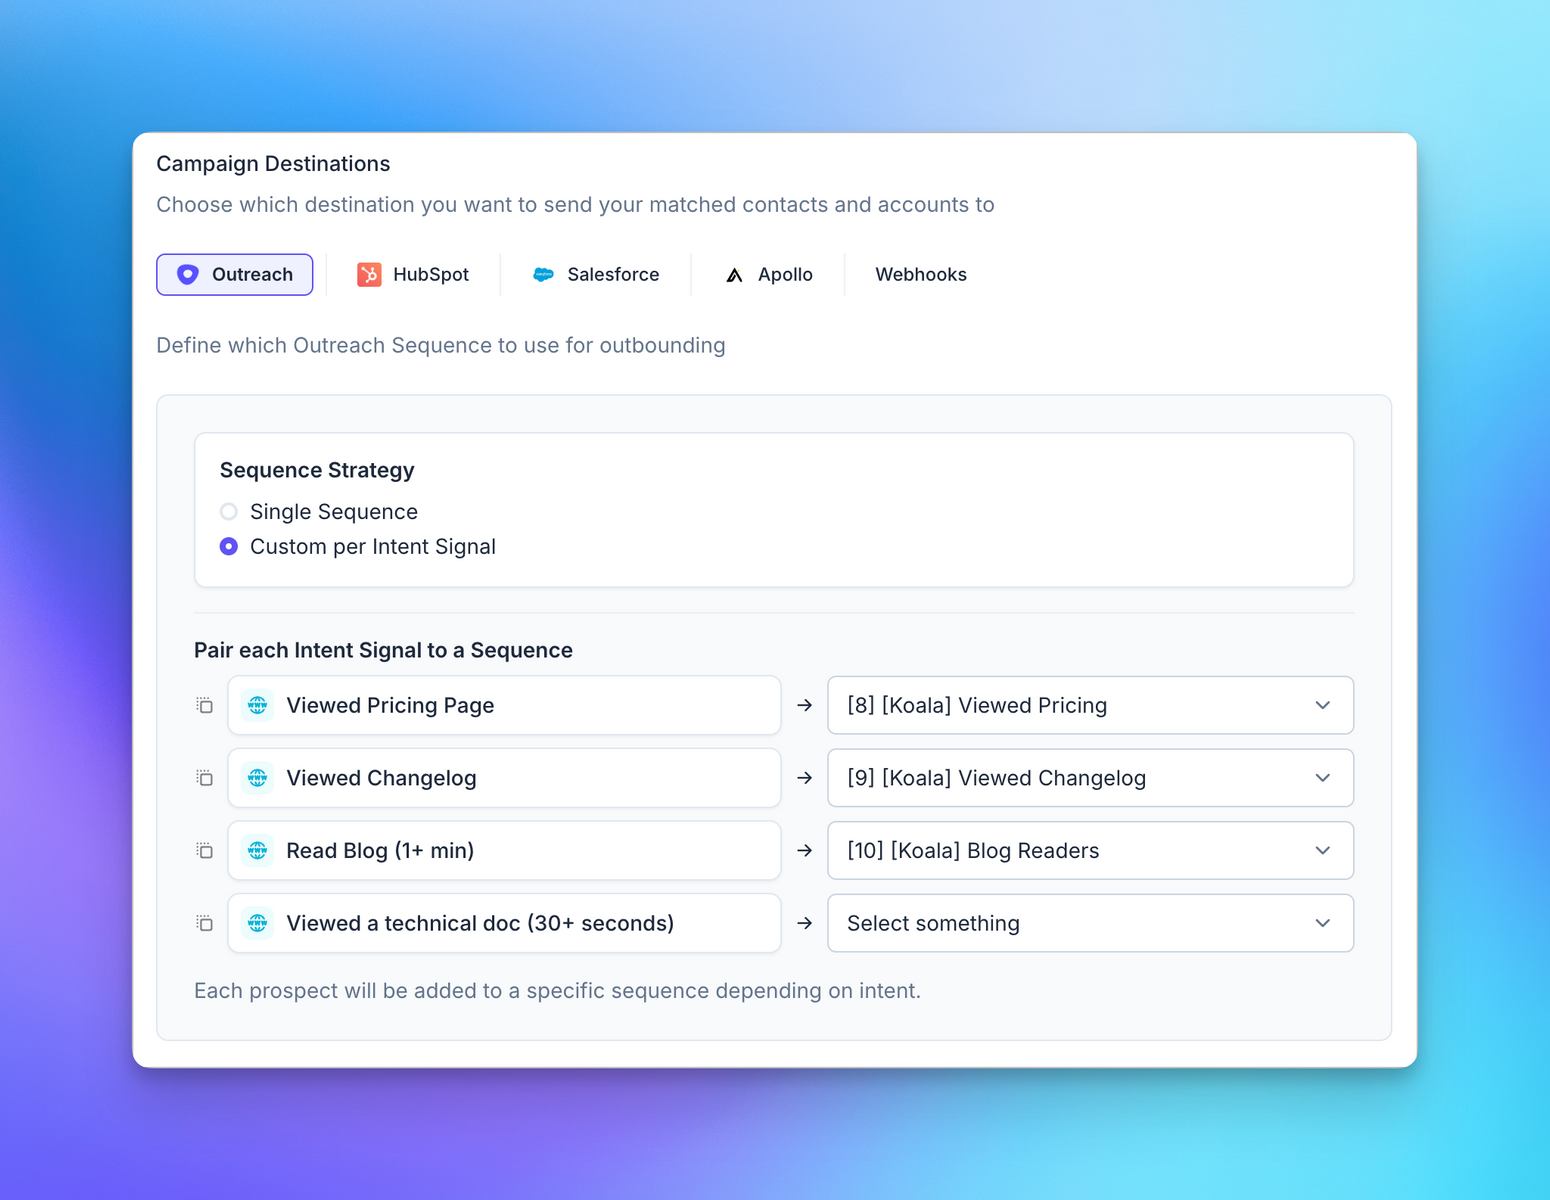
### 6. Map Intent to Sequences
You're now ready to map your Intent Signals to Sequences. This is where the magic happens.
Our guidance here is that you should map each Intent Signal to a Sequence that is aligned with the prospect's intent.
We'll use Outreach Sequences as an example, but you can use any other Sequence tool that you prefer.
Learn more about how to use Auto Outbound with:
* [Salesforce](/automations/auto-outbound#using-salesforce-campaigns)
* [HubSpot](/automations/auto-outbound#using-hubspot-sequences-and-workflows)
* [Apollo](/automations/auto-outbound#using-outreach-sequences)
* [Clay](/automations/auto-outbound#using-clay-tables)
* [Webhooks](/automations/auto-outbound#extending-auto-outbound-with-webhooks)
As you can see in the screenshot below, we have mapped the `Pricing Page` Intent Signal to a
`Pricing` specific Sequence, as well as the other Intent Signals to other specific sequences.
This allows you to send highly relevant messages to your prospects based on their intent.
### 7. Keep track of your Auto Outbound with logs
Koala keeps track of every time we evaluate or enroll a prospect into your Auto Outbound campaign, and every time we add them to a Sequence.
You can follow the progress of your Auto Outbound campaign in the `Logs` tab, as well as watch as any new Prospect is enrolled into your campaign via Slack messages.
Just toggle the Slack integration on, and you'll get a message every time a new prospect is enrolled into your Auto Outbound campaign in your channel of choice.
### Put your Auto Outbound campaign on Autopilot
Once you're feeling confident about your mapping, you can put your Auto Outbound campaign on Autopilot.
Toggle the `Autopilot` option on, and Koala will start evaluating and enrolling prospects into your Auto Outbound campaign based on your criteria.
***
# Writing Good Sequences
General tips for writing good sequences:
* Try to be helpful. You should offer to help the prospect with their problem based on the signal, and not just sell them your product.
It's better to send them a helpful article or a case study that's relevant to their problem, and then follow up with a call to action.
* Do not offer to book a meeting right away.
* It's generally ok to mention that you noticed their intent, and that you're reaching out to help them with their problem.
There are non creepy ways to mention you know they visited your website, and that you're reaching out to help them.
Here's an example of a good sequence for a `Pricing` Intent Signal:
```
Subject: Pricing for [Company Name]
Hey [First Name],
My name is Netto, I'm a Sales Rep at Koala.
I was checking out our analytics report and noticed that you were looking at our pricing page.
I wanted to reach out to send you a helpful article that explains how our pricing works.
Here's some more information about our pricing that you might find helpful:
- [link to pricing guide]
- [link to free trial]
- [link to case study]
```
***
# Auto Outbound Destinations
Auto Outbound can be used with a variety of destinations.
## Managed destinations
Fully managed destinations allow you to map an Intent Signal to a Sequence, and send an email to the prospect when they show intent.
Koala will manage the enrollment of the prospect into the Sequence directly via Outreach or Apollo.
## Destinations
You sometimes want to have more control over the enrollment process, or want to stage contacts in your CRM before enrolling them into a Sequence.
In those cases, you can instead write an Intent Signal directly into your CRM, and then use your own enrollment logic.
### Using Outreach Sequences
The Outreach integration allows you to map Intent Signals to Sequences directly.
You can choose to send the email from the owner of the account, or from a specific user in your Outreach account.
Check out our [Outreach Auto Outbound guide](/automations/auto-outbound/outreach) for more information
### Using Salesforce Campaigns
You can use Salesforce Campaigns to stage prospects before enrolling them into a Sequence.
We also recommend writing an Intent Signal directly into a Salesforce Account, Contact/Lead records,
or creating a Custom Object to store the Intent Signal.
Check out our [Salesforce Auto Outbound guide](/automations/auto-outbound/salesforce) for more information.
### Using HubSpot Sequences and Workflows
You can use HubSpot Workflows to stage prospects before enrolling them into a Sequence, or write an Intent Signal directly into a HubSpot
Contact or Company record.
Check out our [HubSpot Auto Outbound guide](/automations/auto-outbound/hubspot) for more information.
### Using Apollo Lists
Apollo supports the use of Lists to stage prospects before enrolling them into a Sequence, or mapping a Signal to a Sequence directly.
Check out our [Apollo Auto Outbound guide](/automations/auto-outbound/apollo) for more information.
### Using Clay Tables
You can trigger complex enrichment and routing logic using Clay Tables. Examples include:
* Enriching the prospect with additional data from LinkedIn, Clearbit, or other data providers
* Using OpenAI to summarize the contents of the Intent Signal
* Looking up more people at the same company to include in the Sequence
Check out our [Clay Auto Outbound guide](/automations/auto-outbound/clay) for more information.
### Extending Auto Outbound with Webhooks
You can use Webhooks to extend Auto Outbound to any other destination that you prefer that are not currently
integrated with Koala directly.
Auto Outbound will send a POST request to your Webhook URL every time a new prospect is enrolled into your Auto Outbound campaign.
Check out our [Webhooks Auto Outbound guide](/automations/auto-outbound/webhooks) for more information.
***
## When to use Actions vs Auto Outbound
While both Actions and Auto Outbound have some overlap, they are used in different scenarios.
We have a [cheatsheet](/automations/intro#when-to-use-actions-vs-auto-outbound) that can help you decide when to use Actions vs Auto Outbound.
# Auto Outbound with Outreach
Source: https://getkoala.com/docs/automations/auto-outbound/outreach
Enroll your Auto Outbound Prospects in an Outreach Sequence
Auto Outbound works out of the box with Outreach Sequences. You can choose to enroll every prospect
into the same Sequence, or choose to map each individual Intent Signal to a specific Outreach Sequence.
## Recommended Setup
The recommended setup for Outreach includes mapping each Intent Signal to an individual Outreach Sequences, as that leads to higher
conversion rates due to higher relevancy in messaging.
### Mapping Intent to Sequences
Select the Intent Signal from the dropdown on the left, and map it to the relevant Sequence in Outreach
on the right.

We recommend naming your Sequences after the Intent Signal in Koala using the following naming convention:
`[Koala] <Intent Signal Name>`
<Note>
Following the above naming convention allows you to more easily track the performance of your Auto Outbound campaigns,
as well as indicates that sales reps shouldn't manually add prospects to these Sequences.
</Note>
### Multi enrollment and Prospect creation
Koala will automatically manage Prospect creation in Outreach in cases where a record does not exist already.
The Auto Outbound engine will also prevent that the same Prospect is enrolled in multiple Sequences at the same time.
# Auto Outbound with Salesforce
Source: https://getkoala.com/docs/automations/auto-outbound/salesforce
Enroll your Auto Outbound Prospects in a Salesforce Campaign
Auto Outbound allows you to sync your eligible prospects into Salesforce (Salesforce Sales Cloud) campaigns, as well as importing
the qualifying Intent Signal into a Contact, Lead, Account, or Custom Object.
## Recommended Setup
The recommended setup for Auto Outbound in Salesforce includes two steps: Updating any records about the Prospect, and enrolling
them into a Campaign.
You can choose to do both, or only tag specific fields in an object.
### Enrolling the prospect in a Campaign
Similar to other Auto Outbound destinations, the Salesforce destination allows you to map specific Intent Signals to
specific Campaigns in Salesforce. This allows you keep track of the performance of individual signals, as well as give
you more control on how you want to activate Intent Data in your CRM.
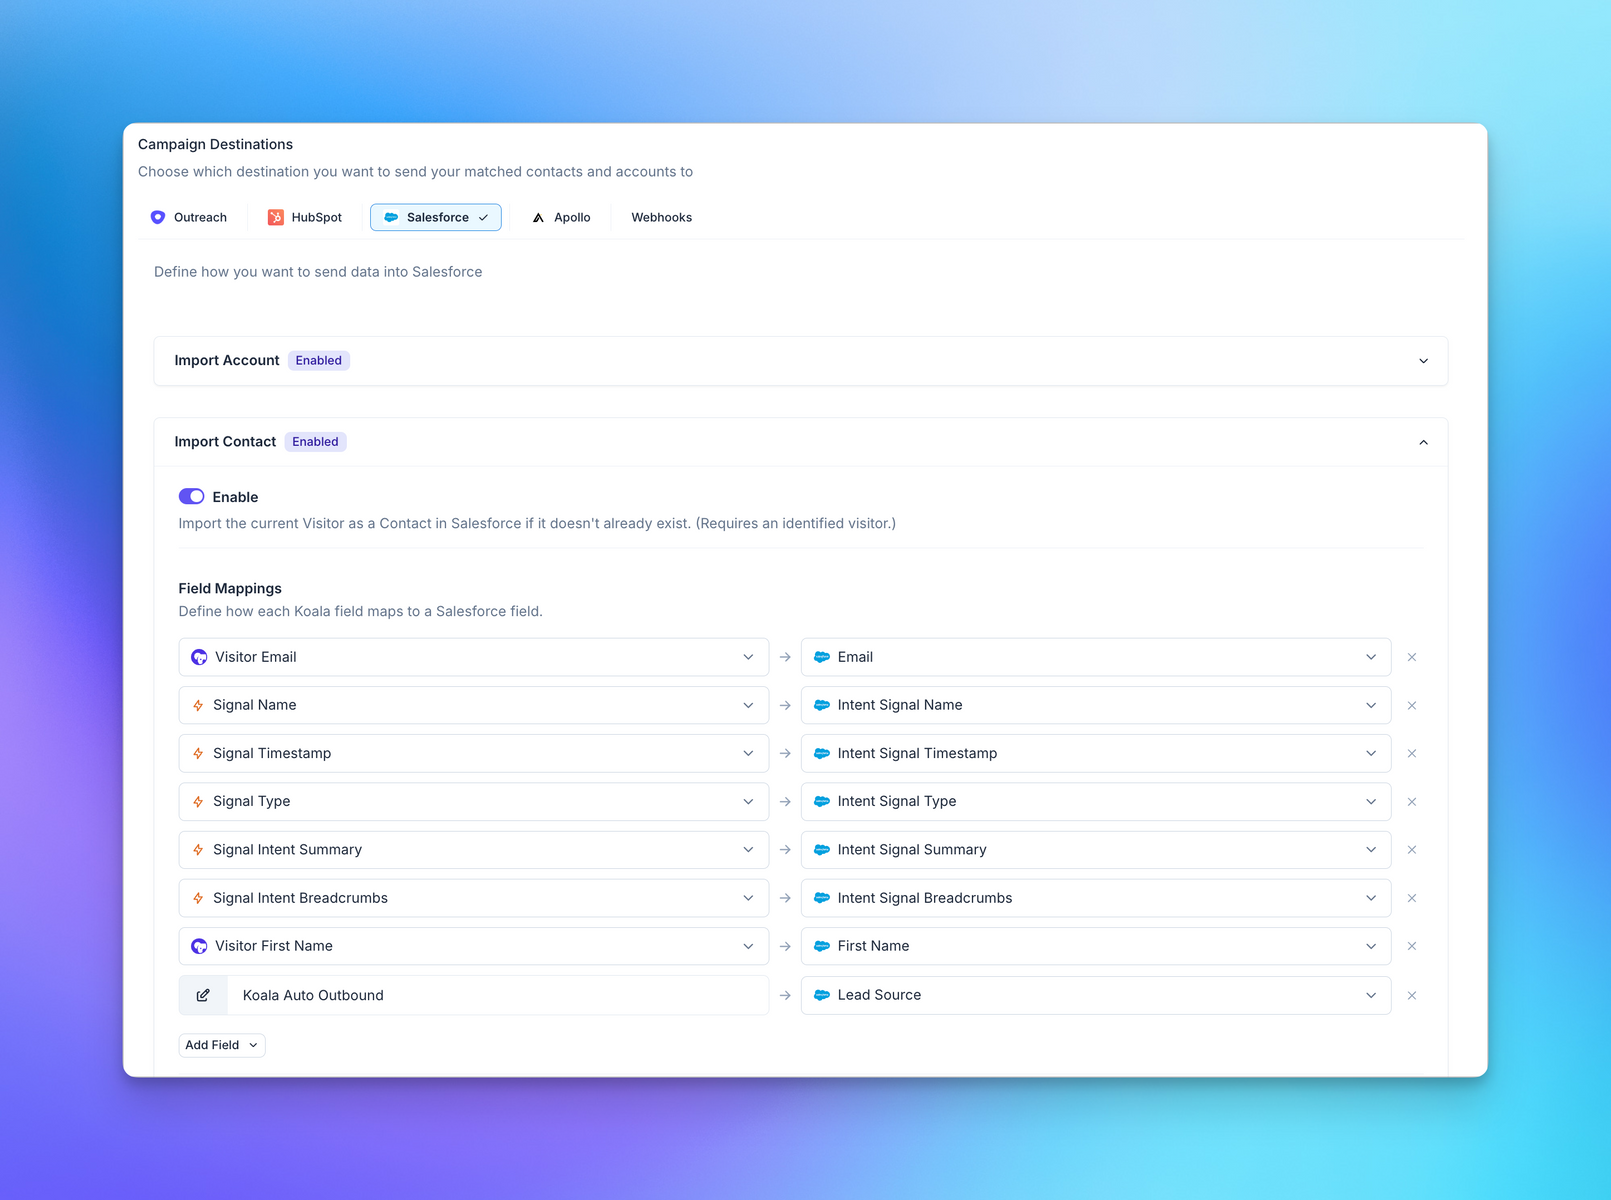
### Importing Contact and Lead Records
The Salesforce destination allows you to tag the Intent Signal performed by the prospect directly
in a Lead or Contact record in Salesforce.
Koala will look up the Contact or Lead by email, and then update the record or create a new one with the fields
you choose to map between Koala and Salesforce.
We recommend that you map all Intent Signal fields to custom fields in your Salesforce object.
This mapping should enable you to reference the most recent Intent Signal performed by the prospect.

### Importing Account Records
Similarly to Contact importing, you can choose to automatically map Intent Signal fields into an Account.
You can follow the same steps as above, to update or create a new Account when a new Prospect is eligible for Auto Outbound.
# Auto Outbound with Webhooks
Source: https://getkoala.com/docs/automations/auto-outbound/webhooks
Extend Auto Outbound with Webhooks
Can't find your favorite tool in our list of destinations?
You can use Webhooks in order to send your Auto Outbound prospects anywhere you'd like.
## Enabling Webhooks
* Paste the URL to your Webhook in the input field
* Koala will start sending data into your webhook when a new prospect is eligible for Auto Outbound

## Testing your Webhook
You can use the Audience Preview card on the right side of the screen to see eligible users for your Audience.

After you hit Preview, select one of the users from the list and hit `Send Test`

A message should show up in your destination containing the Account, Intent Signal, and Visitor that triggered
the Intent Signal.
# Automation Credits
Source: https://getkoala.com/docs/automations/credits
Understand how Automation Credits are used.
Automations are available to try on all plans, including our free plan.
Our free plan, and older plans include a limited number of trial credits, allowing you to try out automations before exploring a paid plan that includes a monthly allotment. You'll see your total available credits on the automations overview page for both Automated Actions and Auto Outbound.
Our Growth plan includes 1,000 webhook credits per month + 100 Auto Outbound prospects per month.
Meanwhile our Business tier plan includes **unlimited** credits for automated actions and automated outbound, and is not limited to just webhooks — you can use any supported destination.
## Understanding Credits
Each Automation that gets triggered and successfully completes will consume 1 credit from your available credit pool.
There are separate pools for Actions, Auto Outbound and Slack Alerts, so you can try
all three products individually on your own time.
### When are credits consumed?
* **Action Credits**: Credits are consumed when any Action is triggered and completes successfully. i.e. when intent data is delivered to your destination.
* **Auto Outbound Credits**: Credits are consumed when any Auto Outbound prospect is sent to your outbound destination (Salesforce, HubSpot, Apollo, Outreach, Instantly, Webhooks and more).
* Auto Outbound credits will not be consumed if the prospect is not sent due to a filter or a condition.
* Auto Outbound credits will not be consumed if Autopilot is off, until you've manually reviewed and synced the prospect to your destination.
* **Slack Alert Credits**: Credits are used each time a Slack alert is sent to a slack channel.
## Credit Limits
* Slack credits are counted per month, and reset on the first day of your subscription start date.
* Action and Auto Outbound credits are counted cumulatively for your workspace, and do not reset.
* There's no limit on the number of Automations you can create, only on the number of times they can run.
The following table shows the credit limits for each plan:
| Plan | Action Credits | Auto Outbound Credits | Slack Alert Credits |
| :----------- | :----------------- | :-------------------- | :------------------ |
| Free + Other | 100 trial credits | 10 trial credits | 250 alerts /mo |
| Growth | 1,000 webhooks /mo | 100 leads /mo | Unlimited |
| Business | Unlimited | Unlimited | Unlimited |
## What happens when I run out of credits?
When you run out of credits, your Automations will not run until you have more credits available.
For trial credits, once these are used up, your Automations will stop running until you upgrade to a paid plan that includes monthly or unlimited credits.
Slack Alert credits will reset monthly based on your workspace's billing cycle.
# Koala Automations
Source: https://getkoala.com/docs/automations/intro
Understand how to leverage Koala Automations to activate your Intent Data.
The Koala Automations suite offers 3 ways in which you can activate your intent data.
Each product offers unique ways to you can leverage your intent data to drive more revenue, and streamline your sales and marketing processes.
## Slack Alerts
Get notified in Slack when a new intent signal is detected.
You can send alerts into a shared Slack channel in reaction to an Intent Signal, or send alerts directly to
a Sales Rep when one of their customers or prospects shows intent.
Slack messages can be customized to include the Intent, Firmographic data from our extensive companies database, as well
as your own CRM and custom fields.
Learn more about [Slack Alerts](/automations/slack-alerts) in our guides.
## Actions
Trigger workflows in your CRM, Sales Engagement Platform, or third party tools when a new intent signal is detected.
Koala's Actions engine allows you to create custom workflows that are triggered by intent signals.
You can use these workflows to update your CRM, Sales Engagement Platform such as Outreach and Apollo,
or any other third party tool that accepts Webhooks.
Some examples of workflows include:
* Syncing your website intent data into Salesforce & HubSpot
* Creating a new task in Salesforce, HubSpot, or Outreach when a new intent signal is detected
* Automatically importing Contacts, Accounts, or Leads into your CRM when they show intent
* Enriching your CRM with firmographic data from our extensive companies database
* Tracking prospects and companies in lists, campaigns, or sequences
Learn more about [Actions](/automations/actions) in our guides.
## Auto Outbound
2x\~5x your reply rate by automatically sending an email to a prospect when a new intent signal is detected.
Auto Outbound allows you to automatically enroll a prospect into a highly relevant sequence or campaign in your Sales Engagement Platform
when they show intent, and message them at the right time.
Koala's Auto Outbound engine offers a variety of customization options that allow you to target the right fit
prospects with the right message without interferring with existing deals, customers, or highjacking any existing conversations.
Your team gets notified when a new Prospect is enrolled into a sequence, and can take over the conversation at any time.
Learn more about [Auto Outbound](/automations/auto-outbound) in our guides.
## Auto Prospecting
Find the most relevant prospects to reach out to based on their intent signals, demographics, and persona.
Koala's Auto Prospecting engine allows you to find the most relevant prospects based on several
heuristics that triangulate a visitor's behavior, demographics and your historical sales data.
Auto Prospected prospects can be automatically enrolled in your Auto Outbound campaigns, or enrolled in your Koala Automations.
***
## When to use Actions vs Auto Outbound
While both Actions and Auto Outbound have some overlap, they are used in different scenarios.
### When to use Actions
You should choose Actions when you want to trigger a workflow in response to an intent signal, or update your CRM, and you don't need to send an email.
The Actions engine is designed to be flexible and react to intent signals in a Trigger / Action fashion for both Accounts and Visitors.
### When to use Auto Outbound
Auto Outbound is focused on enrolling Prospects in the right sequence or campaign, and sending highly relevant emails at the right time.
This means the enrollment criteria will be different for Auto Outbound when compared to Actions. You don't want to trigger the same workflow multiple times
for the same Prospects, or send an email to a Prospect that is already in a sequence or in an existing deal.
Auto Outbound includes more strict rules to make sure you're not spamming your Prospects and Accounts.
### Cheatsheet
Use the following table to help you decide when to use Actions vs Auto Outbound.
| Use Case | Actions | Auto Outbound |
| --------------------------------------------------------------------- | ------- | ------------- |
| Updating CRM data | ✅ | ❌ |
| Account Level Actions | ✅ | ❌ |
| Visitor Level Actions | ✅ | ✅ |
| Email and Sequence Enrollment | ❌ | ✅ |
| Strict enrollment rules | ❌ | ✅ |
| Evergreen workflows that are run multiple times per Visitor / Account | ✅ | ❌ |
| Advanced Intent to Campaign mapping | ❌ | ✅ |
# Slack Alerts
Source: https://getkoala.com/docs/automations/slack-alerts
Get notified in Slack when a new intent signal is detected..
## What are Slack Alerts?
Slack Alerts allow your team to get notified in Slack when a new intent signal is detected.
You can send alerts into a shared Slack channel, or send alerts directly to
a sales rep when someone in their territory is showing intent.
Slack messages can be customized to include the Intent, Firmographic data from our extensive companies database, as well
as your own CRM and custom fields.
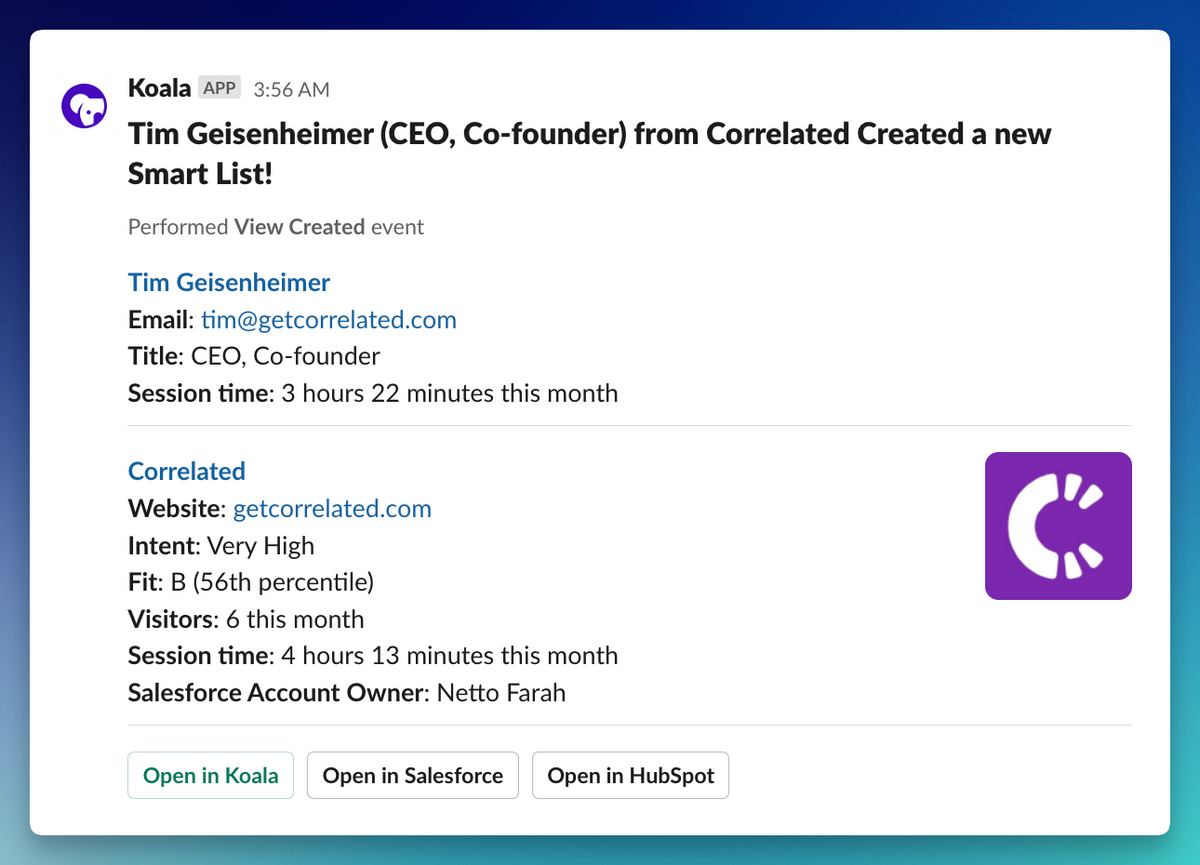
## What do the Slack messages look like?
## How do I create, edit, and delete Slack Alerts?
<Note>
In order to use Slack Alerts, you'll first need to connect your Slack workspace to Koala. Read more about the <a href="/docs/integrations/slack">Slack integration</a>.
</Note>
***
# Slack Alerts for larger teams
Your Slack channels can get noisy with intent alerts when you have too much traffic,
or a larger sales team with many territories.
Koala team alerts allow you to send alerts to a specific channel that is owned by the owner of the account or territory.
## How do I set up Koala team alerts?
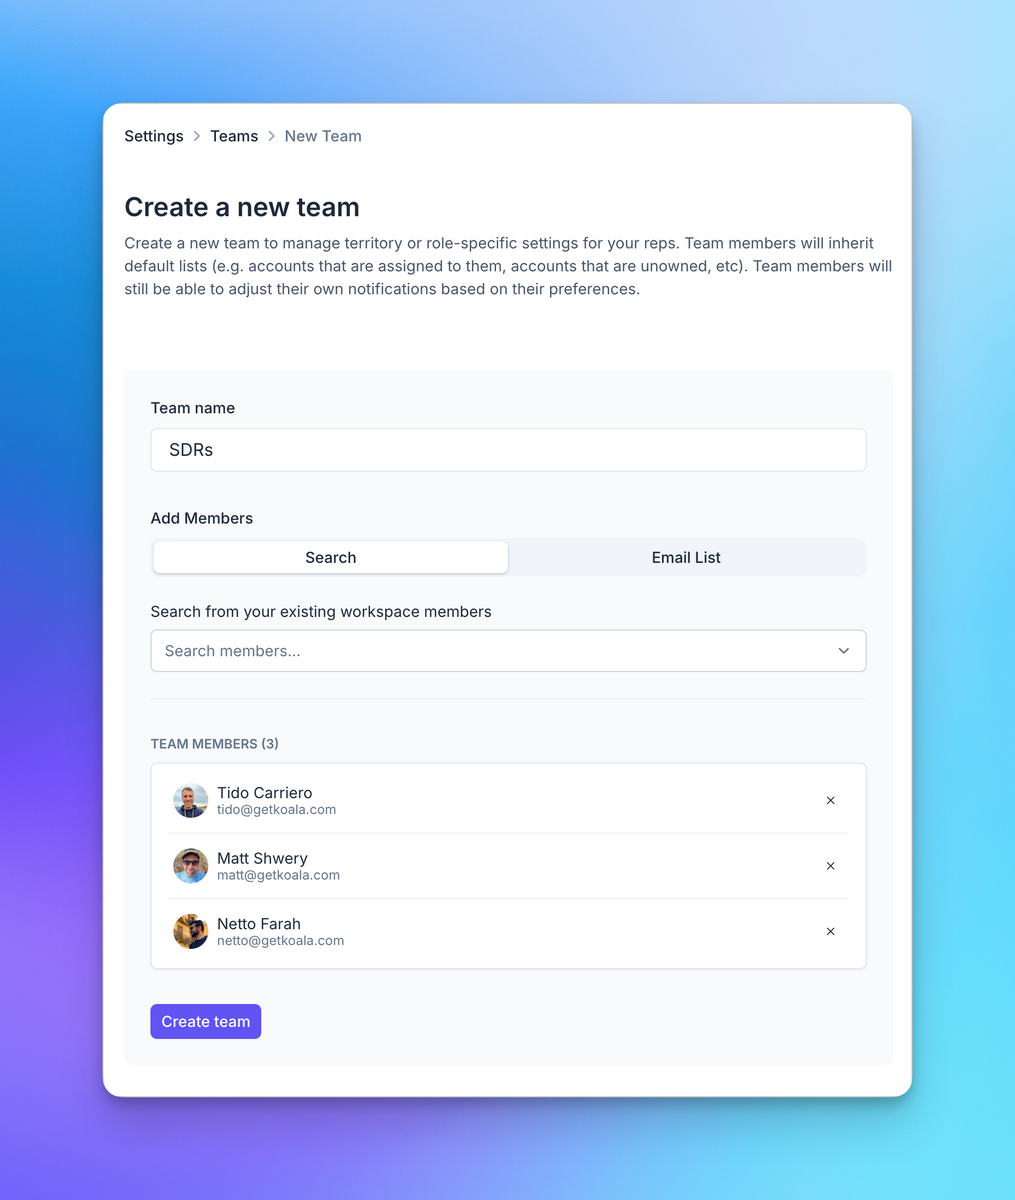
1. Go to the [Teams](https://app.getkoala.com/goto/settings/teams) page in the Koala app.
2. Create your first team and give it a name such as "AEs", "SDRs", or "Sales".
3. Add your list of team members to the team.
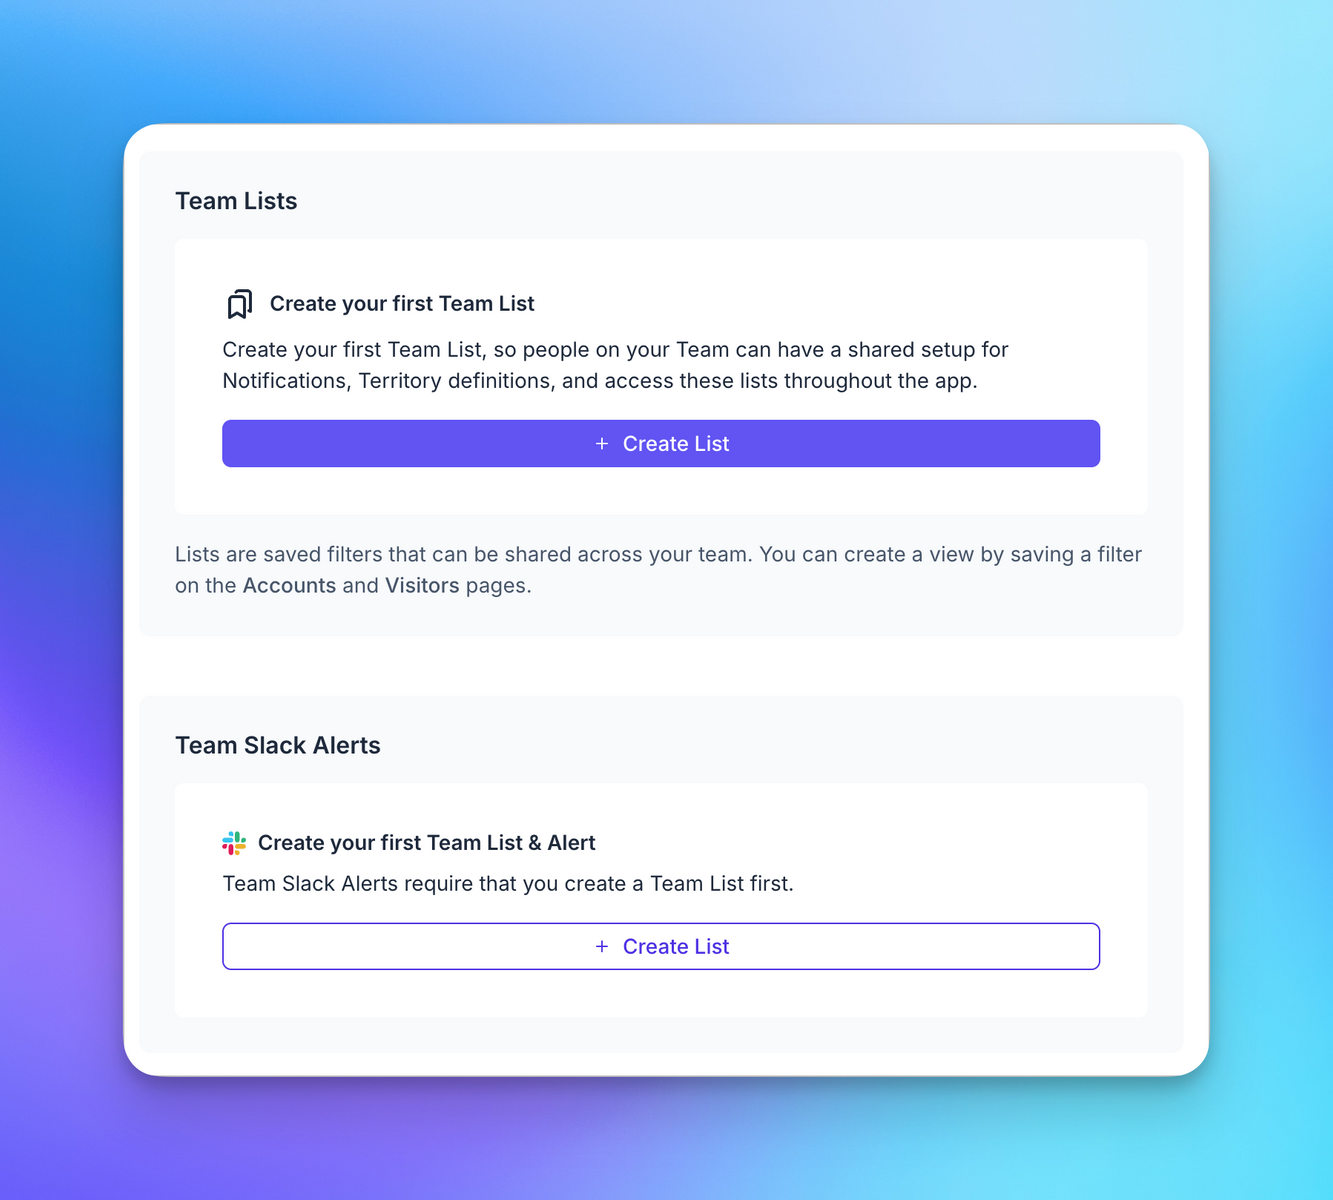
4. Create a new Team Saved List for your newly created team
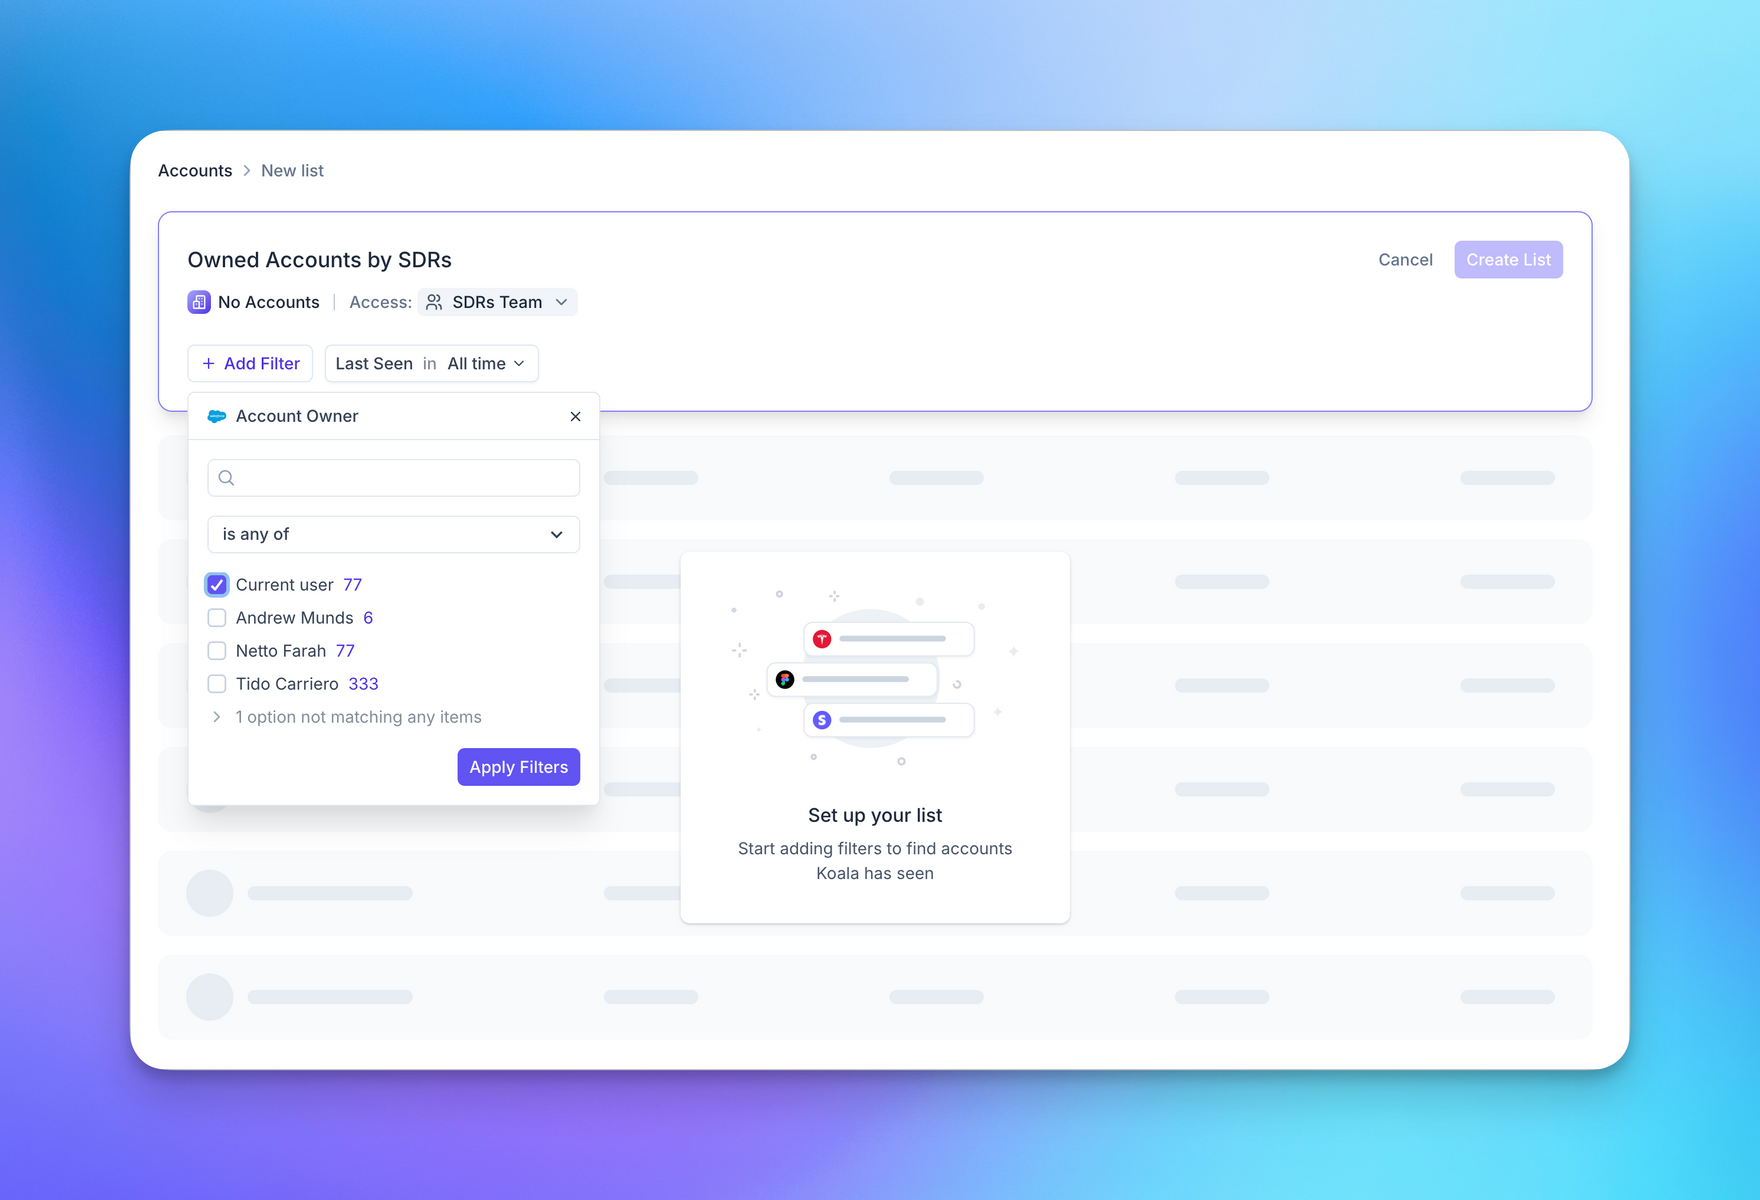
5. Make sure to select the "Account Owner" field in Salesforce, or "Company Owner" field in HubSpot, and set the
value to "Current User".
This will ensure that the alerts are sent to the correct channel for each team member based on ownership in your CRM.
<Note>Pro and Business plan workspaces can use any custom field from their CRM that is a lookup to a user.</Note>
6. Create a new Slack Alert and select the Team Saved List you created in the previous step.
* Make sure to select the Team List you created in the previous step.
* Then select "Route messages to Team Member". This will ensure each team member have their own Slack channel for alerts.
* Select "@mention Account Owners in Slack". This will automatically invite your team members to their channel.
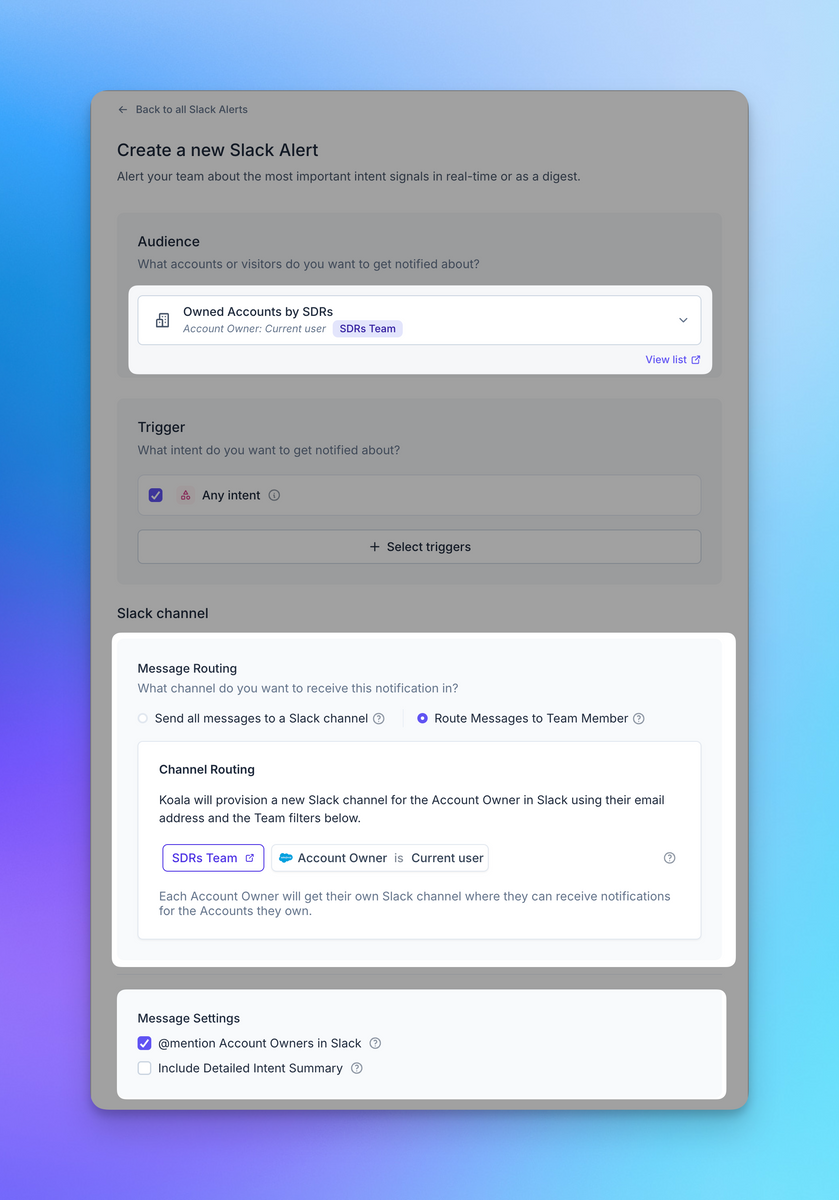
7. Save your new Slack Alert and you're done!
Team member specific Slack channels will be named after their email handle in your CRM.
e.g. `netto@getkoala.com` becomes `#koala-netto` in Slack.
<Note>
If you have a large team, you can create multiple teams and team lists to segment your alerts.
</Note>
# Custom proxy setup
Source: https://getkoala.com/docs/developer-guides/custom-proxy-setup
How to set up a custom proxy.
Custom domains allow you to proxy Koala and send all tracking events to Koala using your own domain. This can be useful if you find that some events are getting intercepted by tracking and ad-blockers using Koala's default domain. With a reverse proxy, you'll be able to capture more intent data.
Setting up a proxy means creating a service to redirect requests from a subdomain you choose (like `koala-api.yourdomain.com`) to Koala. We recommend avoiding subdomains that include the words `analytics`, `tracking` or other similar words that are sometimes blocked.
<Warning>
Cloudflare does not support cross-account proxying. If you're using Cloudflare for your main domain, you'll need to use a different CDN provider (like AWS CloudFront, Netlify, Vercel rewrites, nginx, etc.) for the proxy setup.
</Warning>
There are a variety of CDN and reverse proxy options. This guide explains how to set up CloudFront as a proxy for Koala, but you can apply these principles to almost any modern CDN that supports proxies.
You need to set up two key parts, regardless of the CDN provider you use:
* Proxy to the Koala API (`proxy.getkoala.com`)
* Proxy to the Koala CDN (`cdn.getkoala.com`)
## CloudFront setup for the Koala API
### Custom certificates
If you plan on using Route 53 certificates on your CloudFront distributions, go ahead and create the two certificates for your domains of choice, e.g. `kapi.yourdomain.com` and `kcdn.yourdomain.com`.
<Warning>
You must create these certificates in `us-east-1` for them to be usable in CloudFront.
</Warning>
### CloudFront distribution for the Koala API
1. Log into the AWS console and navigate to CloudFront
2. Click **Create Distribution**
3. In the Origin section, configure it as follows:
* **Origin Domain Name**: `proxy.getkoala.com`
* **Protocol**: `HTTPS Only`
4. In the Default cache behavior section, configure it as follows:
* **Viewer protocol policy**: `Redirect HTTP to HTTPS`
* **Allowed HTTP methods**: `GET, HEAD, OPTIONS, PUT, POST, PATCH, DELETE`
5. Under "Cache key and origin requets", select **Legacy cache settings** and:
* **Cache Policy**: `CachingDisabled`
* **Origin Request Policy**: `Create a new Origin Request Policy`
6. After clicking "Create policy":
* Enter a name and description for the policy (something that describes this is for Koala headers)
* On Origin request settings, select **Include the following headers** and select these headers:
* Origin
* Accept
* CloudFront-Viewer-Address
* CloudFront-Viewer-Latitude
* CloudFront-Viewer-Longitude
* Still on the "Add header" section, click **"Add Custom"** and enter these headers one by one:
* Sec-WebSocket-Key
* Sec-WebSocket-Version
* Sec-WebSocket-Protocol
* Sec-WebSocket-Extensions
* User-Agent
* Under "Query Strings" select **All**
* Under "Cookies" select **All**
* Save your changes
7. Back on the "Create distribution" page, refresh the Origin Request Policy dropdown and select the policy you just created.
8. Under "Settings":
* add an **Alternate Domain Name** (use the domain from the certificate you created earlier)
* select the certificate as the **Custom SSL certificate**
9. Finalize by clicking **Create distribution**
Copy the distribution domain name for the next step.
### Route 53 CNAME for the Koala API
1. Log into the AWS console and navigate to Route 53
2. Enter a record name (e.g. `koala-api`), this should be the subdomain you want to use for the proxy
3. Select **CNAME** as the record type
4. Enter the distribution domain name you just created in CloudFront as the **Value**
5. Save your record. This might take awhile to take effect, depending on your TTL configuration.
6. Test that all steps have worked by making a curl request to your domain. For example: `https://yoursubdomain.yourdomain.com/web/projects/YOUR_PUBLIC_KEY` should return a JSON response.
<Note>
If you run into issues, check that the CloudFront distribution has completed deploying and that the DNS is resolving correctly. You may have to flush your local DNS cache: `sudo killall -HUP mDNSResponder` on macOS.
</Note>
## CloudFront setup for the Koala CDN
### CloudFront distribution for the Koala CDN
The CloudFront distribution for the CDN should look very similar to the same steps you took for the Koala API, but using `cdn.getkoala.com` as the origin domain.
1. For the **Alternate domain name (CNAME)** use a subdomain like `koala-cdn` or `kcdn` - something that denotes this one is for the CDN
2. Select the certificate you created earlier for the **Custom SSL certificate**
3. Finalize by clicking **Create distribution**
Copy the distribution domain name for the next step.
### Route 53 CNAME for the Koala CDN
Once your Cloudfront distribution is created, copy its domain name:
Follow the same steps as you did for the Route 53 CNAME for the Koala API, except using the names and distribution domain for the CDN.
You can verify the CDN proxy by navigating to `https://yoursubdomain.yourdomain.com/v1/koala/sdk.js` to get a JavaScript response.
## Koala pixel setup
Now that your CloudFront (or other CDN provider) proxy is set up, you can configure the Koala pixel to use those domains instead.
1. Log into the Koala app and navigate your installation settings page: [https://app.getkoala.com/goto/settings/install](https://app.getkoala.com/goto/settings/install)
2. Copy the snippet from the **Installation** section, but replace `cdn.getkoala.com` with your proxy domain: `your-cdn-subdomain.yourdomain.com`
3. At the top of this script tag, add the following line using the API proxy url (this **must come first**):
```js
window.koalaSettings = { host: 'https://your-api-subdomain.yourdomain.com' }
```
Your final script tag should look something like this:
```html
<script>
window.koalaSettings = {
host: 'https://your-api-subdomain.yourdomain.com'
}
!function(t){if(window.ko)return;window.ko=[],["identify","track","removeListeners","on","off","qualify","ready"].forEach(function(t){ko[t]=function(){var n=[].slice.call(arguments);return n.unshift(t),ko.push(n),ko}});var n=document.createElement("script");n.async=!0,n.setAttribute("src","https://your-cdn-subdomain.yourdomain.com/v1/YOUR_PUBLIC_KEY/sdk.js"),(document.body || document.head).appendChild(n)}();
</script>
```
# GDPR Endpoint
Source: https://getkoala.com/docs/developer-guides/gdpr-endpoint
A developer's guide for GDPR deletion via API
## Requesting Deletion
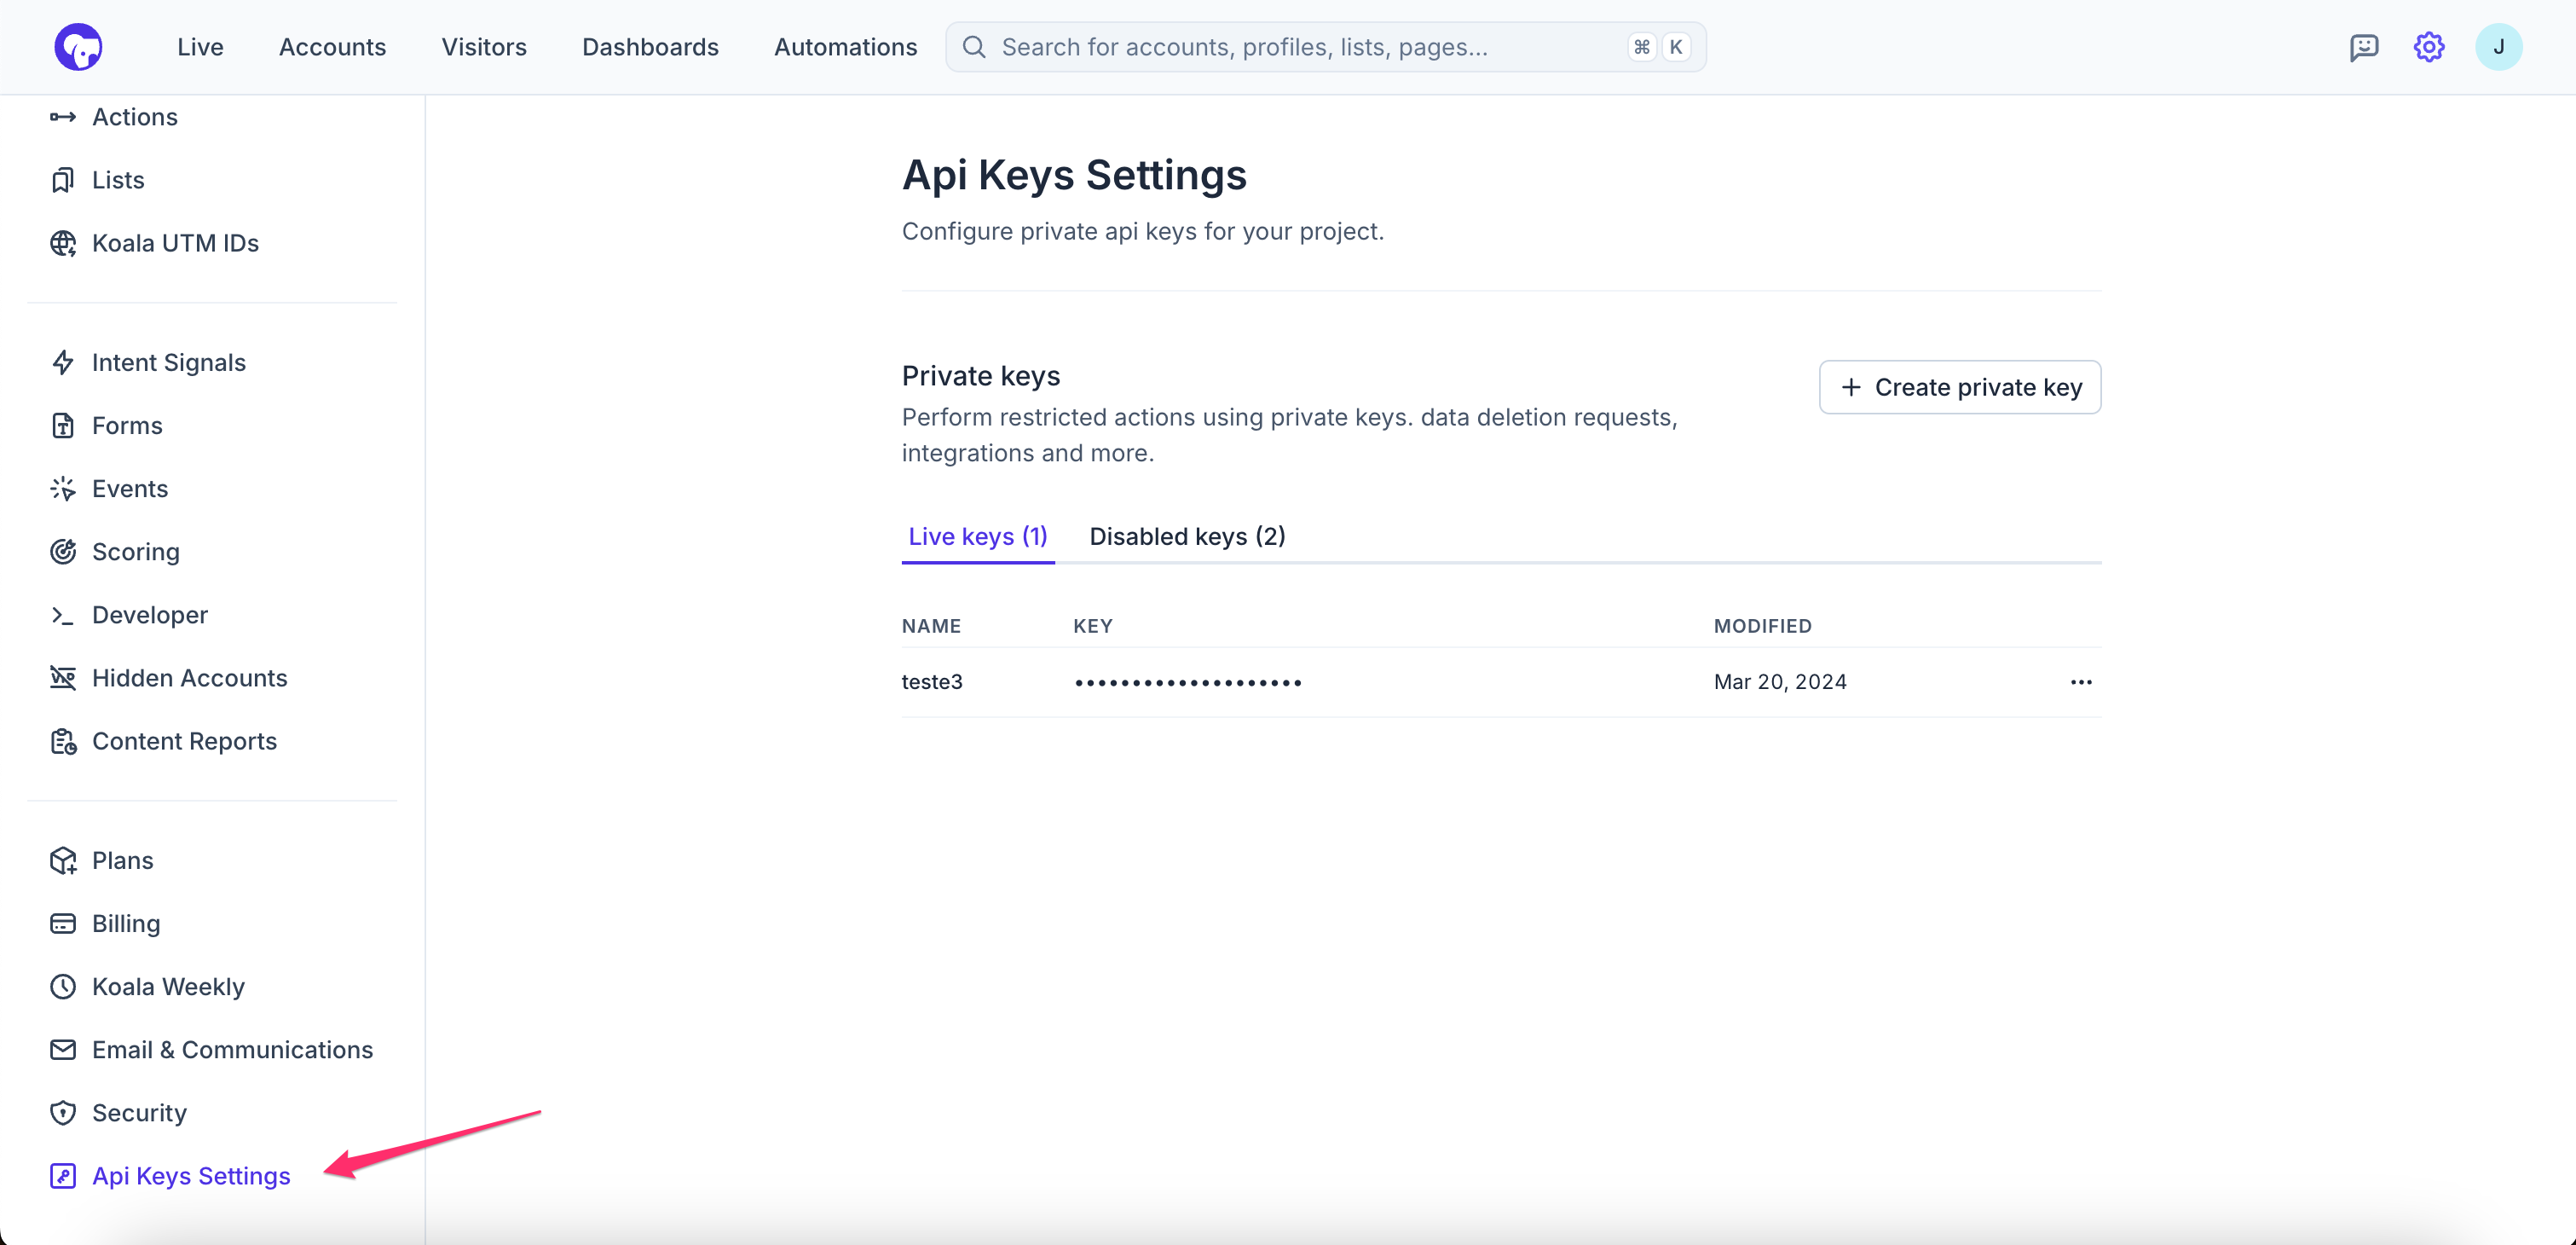
Before starting with code, you'll need a secret API key to make the request, which you can create in Settings -> API Keys:
Endpoint:
`https://app.getkoala.com/api/v1/deletion-requests`
Request instructions:
* The request must be sent via POST
* The request is authorized using our private API keys, and they must include an Authorization header in the following pattern: `Authorization: Bearer sk_21231kjlk123hj123kh`
* The limit of emails per request is 50. If the list has more than 50, we're just going to grab the first 50 and ignore the rest.
* Sample request body:
```
{
"emails": [
"emails1@email.com",
"emails2@gmail.com"
]
}
```
When a deletion request is sent, it will respond with the deletion request id, like this:
```
{
"deletion_request_id": "3772f22a-4f8d-4d14-8fa2-987a38c3456e"
}
```
## Checking Deletion Status
You can use your ID from the section above to check the deletion process by making a GET request, using the same
Authorization header above. Here is a sample GET request:
```
https://app.getkoala.com/api/v1/deletion-requests/3772f22a-4f8d-4d14-8fa2-987a38c3456e
```
As soon the process its done they will be able to consult the deletion receipt, the response should look like this
```
{
"id": "3772f22a-4f8d-4d14-8fa2-987a38c3456e",
"deleted_receipt": [
{
"ips": [
"23.123.140.89"
],
"email": "netto@getkoala.com",
"events": 0,
"metrics": 0,
"profiles": [
"4839c81b-ec74-4c3e-a946-f77728359a9a"
],
"page_views": 0,
"project_slug": true,
"visitor_status": 1,
"form_submissions": 0,
"anonymous_profile": 0,
"import_list_profile": 0,
"account_associations": 0,
"outreach_user_caches": 0,
"clearbit_reveal_cache": 0,
"hubspot_contact_cache": 0,
"outreach_prospect_cache": 0,
"clearbit_enrichment_cache": 0,
"salesforce_contact_caches": 0
}
],
"project_id": "de2a0d37-fbf8-4e9a-abd6-2efd20277d4d",
"created_at": "2024-03-21T16:47:15.113Z",
"updated_at": "2024-03-21T16:48:34.941Z",
"created_by_id": "95aa57db-0d2b-42b9-a918-d402bef92d97",
"input": [
"netto@getkoala.com"
],
"status": "completed",
"messages": []
}
```
# Use Koala with Next.js
Source: https://getkoala.com/docs/developer-guides/install-on-nextjs
Learn how to use Koala to uncover visitor intent happening on your Next.js application.
## Install in `pages/_app.js`
The easiest way to install Koala on Next.js applications is to add it to the main `_app.js` file.
Copy the Koala snippet from your [workspace installation settings page](https://app.getkoala.com/goto/settings/install) and paste it into the [`Script` component](https://nextjs.org/docs/pages/building-your-application/optimizing/scripts#inline-scripts).
```jsx pages/_app.js
import Script from 'next/script'
export default function MyApp({ Component, pageProps }) {
return (
<>
<Script
id="koala-snippet"
dangerouslySetInnerHTML={{
__html: `// Paste your Koala snippet here`
}}
/>
<Component {...pageProps} />
</>
)
}
```
Alternatively, you can install Koala in the `<head>` or `<body>` of your site by adding the snippet to the `pages/_document.js` file.
```jsx pages/_document.js
import { Head, Html, Main, NextScript } from 'next/document'
export default function KoalaDocument() {
return (
<Html>
<Head>
<script
dangerouslySetInnerHTML={{
__html: `// Paste your Koala snippet here`,
}}
/>
</Head>
<body>
<Main />
<NextScript />
</body>
</Html>
)
}
```
## Identify visitors
Once you've installed the snippet, you can also start identifying known visitors.
```jsx
window.ko?.identify('jane.doe@example.com', {
name: 'Jane Doe',
title: 'Product Manager'
})
```
Learn more about identifying visitors or setting visitor/account traits in our guide: [Identifying visitors](/sdk/identify).
# Server Side Tracking
Source: https://getkoala.com/docs/developer-guides/server-side
When you need to integrate Koala with your server-side application.
Sometimes you'll need to send events from your backend application in addition to or instead of using Koala's client-side SDK. This guide will show you how to do that.
**What can it do?**
* ❌ Autotracking (pageviews, forms, active session time)
* ❌ Sessions
* ✅ Custom Events
* ✅ Visitor Identification
* ✅ Account Traits
**Important**: Please make sure to always include the `User-Agent` header in your requests to Koala, or it may be flagged as a bot and not processed.
<Note>
The `/batch` endpoint has a few constraints/requirements:
* **you must send either a `profile_id` or `email` identifier as top-level properties in the request body**
* all events, identifies, or page\_views collected are limited to up to 30 of each type
* each request should only send events for the same person (all events are tied to the same `profile_id`/`email`)
</Note>
### Identifying visitors
If you've already got the Koala snippet installed client-side on the same top domain as your server you can identify visitors with known email addresses server-side. For example, if your website ([www.example.com](http://www.example.com)) has the JavaScript snippet installed, and your app (app.example.com) does not, you can enrich the data Koala is collecting across both.
Whenever users do something identifiable in your app, like logging in, you can identify them manually. This enables you to:
* Track a visitor across browsers or devices
* Differentiate truly anonymous visitors from known users
* Combine all activity from a visitor before and after they've logged in
* Associate visitors with company data
To identify anonymous visitors with an email, send a request to your workspace's public API for collection:
```sh Tracking API Endpoint
https://api2.getkoala.com/web/projects/<your public api key>/batch
```
Here's an example bare-bones request:
```sh Example Request
curl -X POST \
-H "Content-Type: application/json" \
-H "User-Agent: your-company-name/1.0.0" \
-d '{ "profile_id": "3e6a2c18-3b02-40c4-b8d2-1842c193d3ba", "email": "person@example.com" }' \
https://api2.getkoala.com/web/projects/my-public-api-key/batch
```
<Note>
If you want to explicitly collect `identify` calls and see them appear in the debugger in the Koala app, you'll need to include the `identifies` array in the body of the request. See an [example below](#sending-traits).
</Note>
You should ensure all websites sharing the same top domain also share the Koala anonymous `profile_id` by respecting one if it's already there, or setting it yourself if it isn't there. You can read and modify the `ko_id` cookie value in the request to do this.
*Note: when setting your own randomly generated `profile_id`, you should use a UUID v4 format.*
Here's an example of parsing the Koala cookie for a `profile_id` using Express in Node.js:
```js Node.js Express Example
const cookieParser = require("cookie-parser");
const express = require("express");
const app = express();
app.use(cookieParser());
app.get("/", (req, res) => {
// use `profile_id` from cookie, else send a randomly generated one
// and set it in the cookie yourself
let profile_id = req.cookies.ko_id;
if (!profile_id) {
profile_id = uuid.v4();
res.cookie("ko_id", profile_id, { domain: ".example.com" });
}
// send http request to Koala with the `profile_id`
});
```
### Sending events
You can also send custom events to Koala using the same `/batch` endpoint for your workspace.
The API call must include either an `email` (most common scenario), or a `profile_id` (read from the Koala cookie).
```sh Example Request
curl -X POST \
-H "Content-Type: application/json" \
-H "User-Agent: your-company-name/1.0.0" \
-d '{
"profile_id": "3e6a2c18-3b02-40c4-b8d2-1842c193d3ba",
"email": "netto@getkoala.com",
"events": [{
"message_id": "any idempotent id (can be a uuid or anything unique)",
"type": "track",
"event": "Created Account",
"properties": {},
"sent_at": "2022-11-09T23:57:14.776Z"
}]
}' \
https://api2.getkoala.com/web/projects/my-public-api-key/batch
```
You can send multiple events at once. You can omit the `message_id` if you do not require it, but note that the event could potentially be captured more than once (if retries are needed). The `message_id` acts as an idempotency key to dedupe replayed/retried events.
### Sending Traits
You can send custom traits that can be attached to a Koala visitor using the `/batch` endpoint for your workspace.
<Note>
You must either pass a `profile_id` or `email` key in the body of a request in order for it to be attached to an existing visitor in Koala.
* You can find the `profile_id` for a visitor by reading the `ko_id` cookie that is set by the Koala pixel client side.
* Alternatively, you can attach an `email` field to your `/batch` call, and Koala will associate the traits to an existing user that has been previously identified using the same email.
</Note>
```sh Example Request
curl -X POST \
-H "Content-Type: application/json" \
-H "User-Agent: your-company-name/1.0.0" \
-d '{
"profile_id": "3e6a2c18-3b02-40c4-b8d2-1842c193d3ba",
"email": "user@example.org",
"identifies": [{
"type": "identify",
"sent_at": "2023-11-30T02:51:36.840Z",
"traits": {
"email": "user@example.org",
"billing_plan": "pro",
"vip": true,
"is_current_customer": true
}
}]
}' \
https://api2.getkoala.com/web/projects/my-public-api-key/batch
```
### Sending Account Traits
Sometimes you want to send traits that are associated with an account, rather than a visitor. You can do this by sending a `domain` along with the traits for the Account.
Account traits will be associated with the `domain` and will be available to all visitors that have been identified with the same account.
You should use the `/accounts/batch` endpoint for your workspace to send Account traits:
```sh Example Request
curl -X POST \
-H "Content-Type: application/json" \
-H "User-Agent: your-company-name/1.0.0" \
-d '{
"domain": "getkoala.com",
"identifies": [{
"type": "identify",
"traits": {
"billing_plan": "pro",
"vip": true,
"headcount": 100
}
}]
}' \
https://api2.getkoala.com/web/projects/my-public-api-key/accounts/batch
```
The traits above will be visible in the Account page for `getkoala.com` in the Koala app.
<Note>
You must either pass an `account_id` or `domain` key in the body of a request in order for it to be attached to an existing Account in Koala.
We recommend using the `domain` parameter to associate traits with an account.
* Koala will automatically create a new Account if the `domain` hasn't been tracked in Koala yet.
</Note>
#### Deduplicating Account Traits
There are scenarios where the same Account has multiple tenants in your App. For example, your customers may have a workspace for their development team and another for their marketing team.
In this case, you can pass along a `group_id` parameter alongside your Account Traits, that way, Koala can disambiguate multiple groupings within the same company.
```sh Example Request
curl -X POST \
-H "Content-Type: application/json" \
-H "User-Agent: your-company-name/1.0.0" \
-d '{
"domain": "getkoala.com",
"identifies": [
{
"type": "identify",
"traits": {
"group_id": "development-team",
"billing_plan": "free",
"vip": false
}
},
{
"type": "identify",
"traits": {
"group_id": "marketing-team",
"billing_plan": "pro",
"vip": true
}
}
]
}' \
https://api2.getkoala.com/web/projects/my-public-api-key/accounts/batch
```
<Note>
* The `group_id` parameter is optional, and you can use it to disambiguate multiple groupings within the same company.
* Koala will group the traits by `group_id` and display them in the Account page in Koala under each individual grouping.
</Note>
### Sending Account Events
Sometimes you want to send events that are associated with an account, rather than an individual.
Similar to account traits, you must provide either a Koala `account_id` or `domain` to identify the account. These events work similarly to profile-level events but are associated with the entire account rather than individual users.
You should use the `/accounts/batch` endpoint for your workspace to send Account events:
```sh Example Request
curl -X POST \
-H "Content-Type: application/json" \
-H "User-Agent: your-company-name/1.0.0" \
-d '{
"domain": "getkoala.com",
"events": [{
"message_id": "any idempotent id (can be a uuid or anything unique)",
"type": "track",
"event": "Workspace Created",
"properties": {
"workspace_id": "1234567890",
"workspace_name": "Acme, Inc."
},
"sent_at": "2022-11-09T23:57:14.776Z"
}]
}' \
https://api2.getkoala.com/web/projects/my-public-api-key/accounts/batch
```
# Using NPM
Source: https://getkoala.com/docs/developer-guides/using-npm
How to use Koala's npm packages for instrumentation
## Instrumenting with NPM Packages
You can choose to instrument your website using our npm packages when instrumenting Koala directly via script tag is not a possibility.
### When to use one of the Koala NPM packages?
* If you want to pin versions of the Koala SDK and not rely on the dynamically generated ones from our CDN
* When you want to add typescript types for Koala in your project
* You want to use React hooks in your Koala tracking
* When you want a tighter integration with your build or type system
### Using the generic Browser package
We ship new versions of our SDK to NPM on every release, all releases of the Koala SDK will be available on the `@getkoala/browser` package on NPM.
The browser package includes the most recent bundled version of our SDK.
1. Install the npm package
```bash
$ yarn add @getkoala/browser
```
2. Load the Koala SDK
```javascript
import * as KoalaSDK from '@getkoala/browser'
```
3. Load your project
```javascript
// returns a promise containing the ko namespace object
let ko = null
KoalaSDK.load({
// add your project's public key here
project: 'pk_...'
}).then(koalaSDK => {
ko = koalaSDK
})
```
4. Use the Koala SDK
Once you've loaded your project, you should be able to use all methods from the Koala SDK normally on your website
```javascript
ko.track('Hello from Koala!', eventProperties)
ko.identify({
email: 'netto@getkoala.com',
...userTraits
})
```
<Note>
We recommend using our inline script tag whenever possible, so you can leverage our fast CDN times and the latest updates, features, and bug fixes whenever they're available.
</Note>
### Using the React package
Koala also works with Typescript and React. You can install the `@getkoala/react` package to start using Koala directly in your React app.
You can find more in-depth and up to date guides on our [getkoala/react](https://github.com/getkoala/react) github repo.
# How Koala works
Source: https://getkoala.com/docs/get-started/how-koala-works
An introduction to how Koala does its magic.
Koala collects data about what activity is happening on your site or app, and highlights the activity that indicates high intent. Koala collects this data via a pixel that typically is installed on your website. Most companies start by installing it on their marketing website, blog, and technical docs.
Koala reports on the entire intent spectrum — from the first time someone comes to your marketing site, through a trial, POC, or product-led motion, and even after someone becomes a customer. This is done by installing Koala directly via our SDK or by connecting us to one of your analytics tools (e.g., Segment, Rudderstack, Heap, etc.). Koala also collects data via server-side integrations that can send data directly from your servers when client-side tracking doesn't work for your use case.
Next, the entire GTM team can collaborate on defining intent signals (think of this as highlighting a particular page view, event, or form submit):
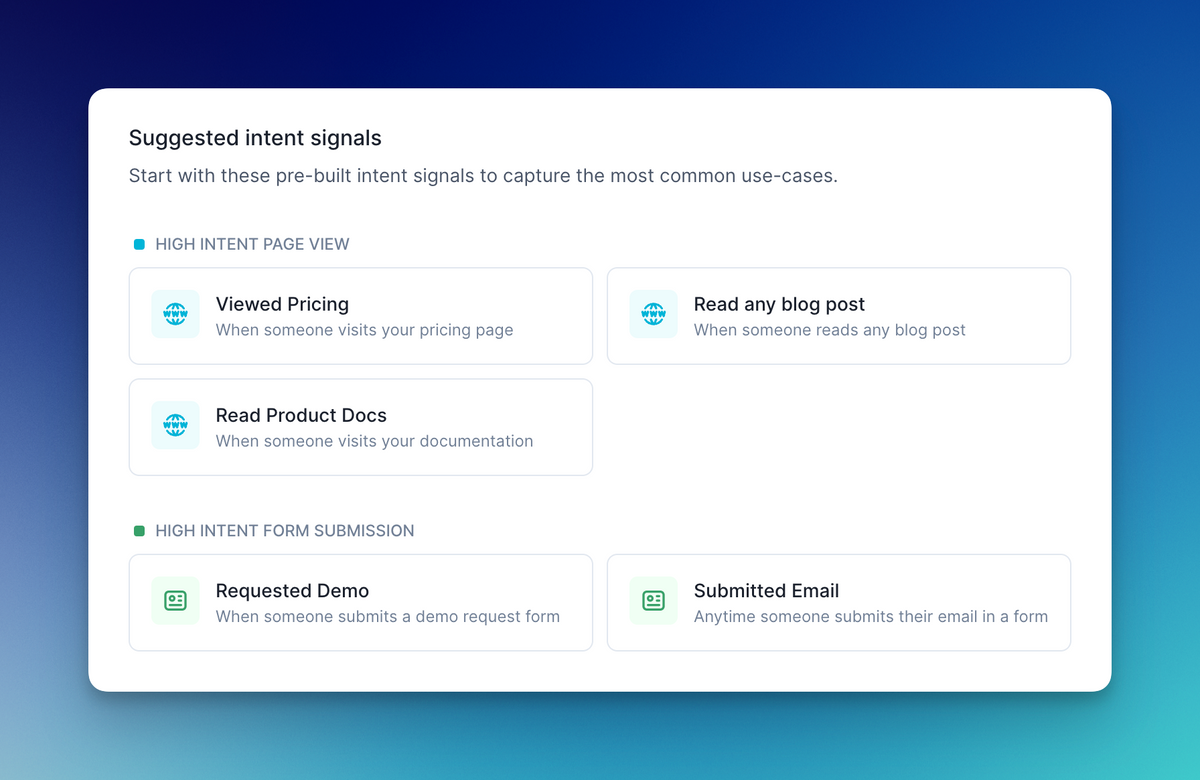
From there, these intent signals can be sent to Slack and are surfaced throughout the Koala app. This will ensure that your SDRs can prospect net new opportunities from all this buying intent happening on your marketing site, your AEs are always aware of what their prospects are doing (trust us when you see that magic pricing page visit from the executive buyer), and even CSMs are prepared to have that renewal upsell chat (or intervene if product usage isn't as expected).
There's a lot more under the hood (read on!), but this covers the basics of Koala!
## FAQ
<AccordionGroup>
<Accordion title="How does Koala know which companies are on my site?">
Koala partners with Clearbit to power IP to company intelligence using the
Clearbit Reveal product.
If you are already a Clearbit Reveal customer, you can simply connect Koala to
your Clearbit account using your Clearbit API key.
If you don't yet use Clearbit Reveal, Koala helps to automatically provision a
Clearbit that includes a generous credit of 10,000 Reveal calls / month and
250 Enrich calls / month, with pay-as-you-go plans if you need more.
Manage your Clearbit integration from the
[Clearbit settings page](app.getkoala.com/goto/apps/clearbit).
</Accordion>
<Accordion title="How does Koala know the geolocation of prospects?">
Koala uses Cloudflare and the MaxMind GeoLite2 Database to provide IP-based geolocation to
give you a better idea of where your visitors are from. This is especially helpful when you
have an anonymous visitor from an account and can use the city/state/country and another tool
like LinkedIn Sales Navigator to figure out who it is.
</Accordion>
<Accordion title="How does Koala detect known users?">
When users identify themselves on your website (ie., submit an email address), Koala
will automatically observe that and associate their browser session with the user.
This often happens when a user logs in or signs up, but it also happens whenever they
submit a form (ie., demo request, gated content, webinar registration, etc.).
Koala manages all of the tricky profile merging logic on your behalf.
</Accordion>
<Accordion title="Does Koala detect HubSpot forms automatically?">
Koala automatically detects form inputs and ignores sensitive fields. If there are
visitor or account traits you want to capture, you can manually instrument that via
`ko.identify` though (client-side or server-side)!
</Accordion>
</AccordionGroup>
# Quick start
Source: https://getkoala.com/docs/get-started/quick-start
A step-by-step guide to get Koala set up in under an hour.
<Note>
We have a step-by-step welcome experience in the product that will walk you through these steps in detail. If you'd prefer that, you can simply create an account and the product will guide you through the process.
That said, we know that some folks like to review the entire process in docs first; this article is for you!
</Note>
## Step 1: Install the pixel
<CardGroup cols={3}>
<Card title="JavaScript" icon="js" href="#step-1-copy-the-snippet">
Install the JavaScript snippet directly (keep reading!)
</Card>
<Card
title="Segment"
icon={
<svg
className="h-7 w-7"
xmlns="http://www.w3.org/2000/svg"
width="64"
height="64"
viewBox="0 0 64 64"
>
<g transform="matrix(.768307 0 0 .768307 0 2.304922)">
<path
d="M51.9 52.8H4c-2.2 0-4-1.8-4-4s1.8-4 4-4h47.9c2.2 0 4 1.8 4 4s-1.8 4-4 4z"
fill="#99cfac"
/>
<path
d="M41.7 77.3c-3.9 0-7.8-.6-11.5-1.7-2.1-.7-3.3-2.9-2.6-5s2.9-3.3 5-2.6c2.9.9 6 1.4 9.1 1.4 13.6 0 25.4-8.7 29.3-21.7.6-2.1 2.9-3.3 5-2.7s3.3 2.9 2.7 5c-5.1 16.3-19.9 27.3-37 27.3z"
fill="#49b881"
/>
<path
d="M79.3 32.5H31.4c-2.2 0-4-1.8-4-4s1.8-4 4-4h47.9c2.2 0 4 1.8 4 4s-1.8 4-4 4z"
fill="#99cfac"
/>
<path
d="M8.5 32.5c-.4 0-.8-.1-1.2-.2-2.1-.6-3.3-2.9-2.7-5C9.7 11 24.5 0 41.7 0c3.9 0 7.8.6 11.5 1.7 2.1.7 3.3 2.9 2.6 5s-2.9 3.3-5 2.6c-2.9-.9-6-1.4-9.1-1.4-13.6 0-25.4 8.7-29.3 21.7-.6 1.8-2.2 2.9-3.9 2.9z"
fill="#49b881"
/>
<g fill="#99cfac">
<circle r="4" cy="13.3" cx="65.4" />
<circle r="4" cy="64.1" cx="17.9" />
</g>
</g>
</svg>
}
href="/integrations/segment"
>
Install via Segment
</Card>
<Card
title="Google Tag Manager"
icon={
<svg
className="h-7 w-7"
version="1.1"
xmlns="http://www.w3.org/2000/svg"
xmlns:xlink="http://www.w3.org/1999/xlink"
x="0px"
y="0px"
width="192px"
height="192px"
viewBox="0 0 192 192"
enable-background="new 0 0 192 192"
xml:space="preserve"
>
<rect fill="none" width="192" height="192" />
<g>
<polygon
fill="#8AB4F8"
points="111.31,176.79 80.76,147 146.37,80 178,111 "
/>
<path
fill="#4285F4"
d="M111.44,45.08L81,14L14.44,79.93c-8.58,8.58-8.58,22.49,0,31.08L80,177l31-29L61.05,95.47L111.44,45.08z"
/>
<path
fill="#8AB4F8"
d="M177.56,80.44l-66-66c-8.59-8.59-22.52-8.59-31.11,0c-8.59,8.59-8.59,22.52,0,31.11l66,66
c8.59,8.59,22.52,8.59,31.11,0C186.15,102.96,186.15,89.03,177.56,80.44z"
/>
<circle fill="#246FDB" cx="95.5" cy="162.5" r="21.5" />
</g>
</svg>
}
href="/integrations/google-tag-manager"
>
Install via Google Tag Manager
</Card>
</CardGroup>
### Copy the snippet
Navigate to [Your Project > Settings](https://app.getkoala.com/goto/settings/install) in
the Koala app and copy the JavaScript snippet and paste it into the `<body>` tag
of your site.
That snippet loads the Koala SDK onto the page asynchronously, so it won't
impact your page load speed.
It'll look something this:
```html
<script>
!(function (t) {
var k = "ko";
var i = (window.globalKoalaKey = window.globalKoalaKey || k);
if (window[i]) return;
var ko = (window[i] = []);
[
"identify",
"track",
"removeListeners",
"on",
"off",
"qualify",
"ready",
].forEach(function (t) {
ko[t] = function () {
var n = [].slice.call(arguments);
return n.unshift(t), ko.push(n), ko;
};
});
var n = document.createElement("script");
(n.async = !0),
n.setAttribute(
"src",
"https://cdn.getkoala.com/v1/<your public key>/sdk.js"
),
(document.body || document.head).appendChild(n);
})();
</script>
```
<Note>
We recommend installing the Koala snippet on your marketing website, docsite,
application and any other places that users are expressing intent in the
product because Koala is going to surface this intent to the sales team. Koala
can only surface intent that it can see, so it’s important to capture all of
these surface areas.
</Note>
## Step 2: Connect Clearbit
We partner with Powered by Clearbit to give 10,000 free Clearbit Reveal calls and 250 free Clearbit Enrich calls every month. This is the cheapest way to get started with Clearbit and is essential to identifying anonymous traffic on your site. We've made this as easy as clicking a button in the welcome flow!
## Step 3: Connect your CRM (optional)
This is an optional step, but strongly recommended if you're using Salesforce (Salesforce Sales Cloud) or HubSpot. (No worries if you're still operating out of a spreadsheet – we support you too!)
Connecting your CRM will:
* allow Koala to figure out who owns which accounts, so that each of your teammates will be receive relevant Weekly Digests, notifications, and individual lists
* be able to differentiate between prospects and customers, so that you can focus your time on prospects
* help Koala build a scoring model to find accounts that look like your Closed Won customers
## Step 4: Set up an intent signal
Set up your first intent signal — we recommend **a pricing page visit that lasts for at least 15 seconds**! Better yet, setting up 3-5 is even better. Here are a few common first intent signals, other than pricing page:
* reading technical docs about paid features
* reading a blog post for 2+ minutes
* ensuring you are notified about form submits / content downloads
That said, you know your business best, so be sure to set up things that your sales development team and AEs will be most interested in!
## Step 5: Set up a Slack Alert
Keep things simple by sending all the intent signals to a single channel for now. If you have a larger sales team, you can read our guide on <a href="/admin-guides/larger-sales-teams">larger sales teams</a>, but to start things off we always recommend watching a single channel for a few business days to see what kind of intent you're working with all in one place.
Reps will love getting pinged about intent signals on their accounts. You can enable this by checking the box that says "@mention Account Owners in Slack"!
## FAQ
<Accordion title="How do I to check that the pixel properly setup?">
If you are comfortable with the browser inspector and need to check that the pixel is setup,
open the inspector by right-clicking in the page you setup the pixel and select `Inspect`.
You can then check these two things:
* select the `console` tab and type `ko.version` and hit enter. It should return the pixel integration version.
* select the `Elements` (Chrome / Safari), `Inspector`(Firefox) and search for `cdn.getkoala.com`. It should match two `<script>` tags.
</Accordion>
# What is Koala?
Source: https://getkoala.com/docs/get-started/what-is-koala
A brief introduction to the Koala platform.
Koala is a customer intent platform. It is the best way to surface real-time intent signals and alert your sales team about prospects/customers showing buying intent.
We use first-party website data to cover the entire spectrum of intent happening across your marketing site, blog, technical docs, application, and any other sites where intent might be happening, so that your GTM team can respond to buying intent in real-time with genuinely helpful messages. You can visualize it as follows:
<img src="https://mintlify.s3.us-west-1.amazonaws.com/koala/images/get-started/what-is-koala/intent-spectrum-final.png" />
If the user has ever provided an email address (via marketing form, sign up, login, or identified analytics traffic), we'll use that to identify the user. If no email has been provided, we partner with Clearbit Reveal to detect the company from their IP and will display as an anonymous visitor from the company instead.
Once your data is instrumented, your team will be able to set up intent signals, send them in real-time to Slack, and start driving revenue!
# Identify Email Recipients
Source: https://getkoala.com/docs/identity-layer/identify-email-recipients
This guide helps ensure your email recipients will be identified in Koala
Koala is able to detect when a user clicks a link to your website from an outbound or marketing email.
You can use this feature to collect identities from any clicks to your outreach messages.
This integration often leads to a boost of 20\~30% net new identities to your Koala workspace, allowing you to
understand how your email prospects are interacting with your content and product.
Koala will also report all UTMs that drove the user to interact with your website from an email.
## Outreach.io
Koala offers an out of the box solution that allows you to track any clicks automatically. All links will be wrapped with a special param that is able to identify
your users when they click any links from an Outreach message that points to your website.
You can install the [Koala Outreach Plugin](https://marketplace.outreach.io/apps/koala-id-links?store=unlisted) in the Outreach Marketplace. All links in your email will be automatically decorated with a `utm_id`.
Note: You need to be logged in to Outreach in order to be able to install the plugin from the App Marketplace. No further action required after you've installed the plugin.
## HubSpot
Koala offers HubSpot specific URL params that can be added to your Marketing and Sales email templates.
Adding these URL params will enable you to track any clicks from when your Marketing or Sales Contacts click a link to your website.
### Instructions:
1. Open the email template editor:
* 1.a) For Sales templates: Select Conversations, then Templates
* 1.b) For Marketing templates: Select Marketing, then Emails
2. Copy one of the following UTM Links:
If there are no other URL params
```
?ko_e={{contact.email}}&k_is=hs
```
If there are other URL params
```
&ko_e={{contact.email}}&k_is=hs
```
3. Add the Koala UTMs to links in your templates:
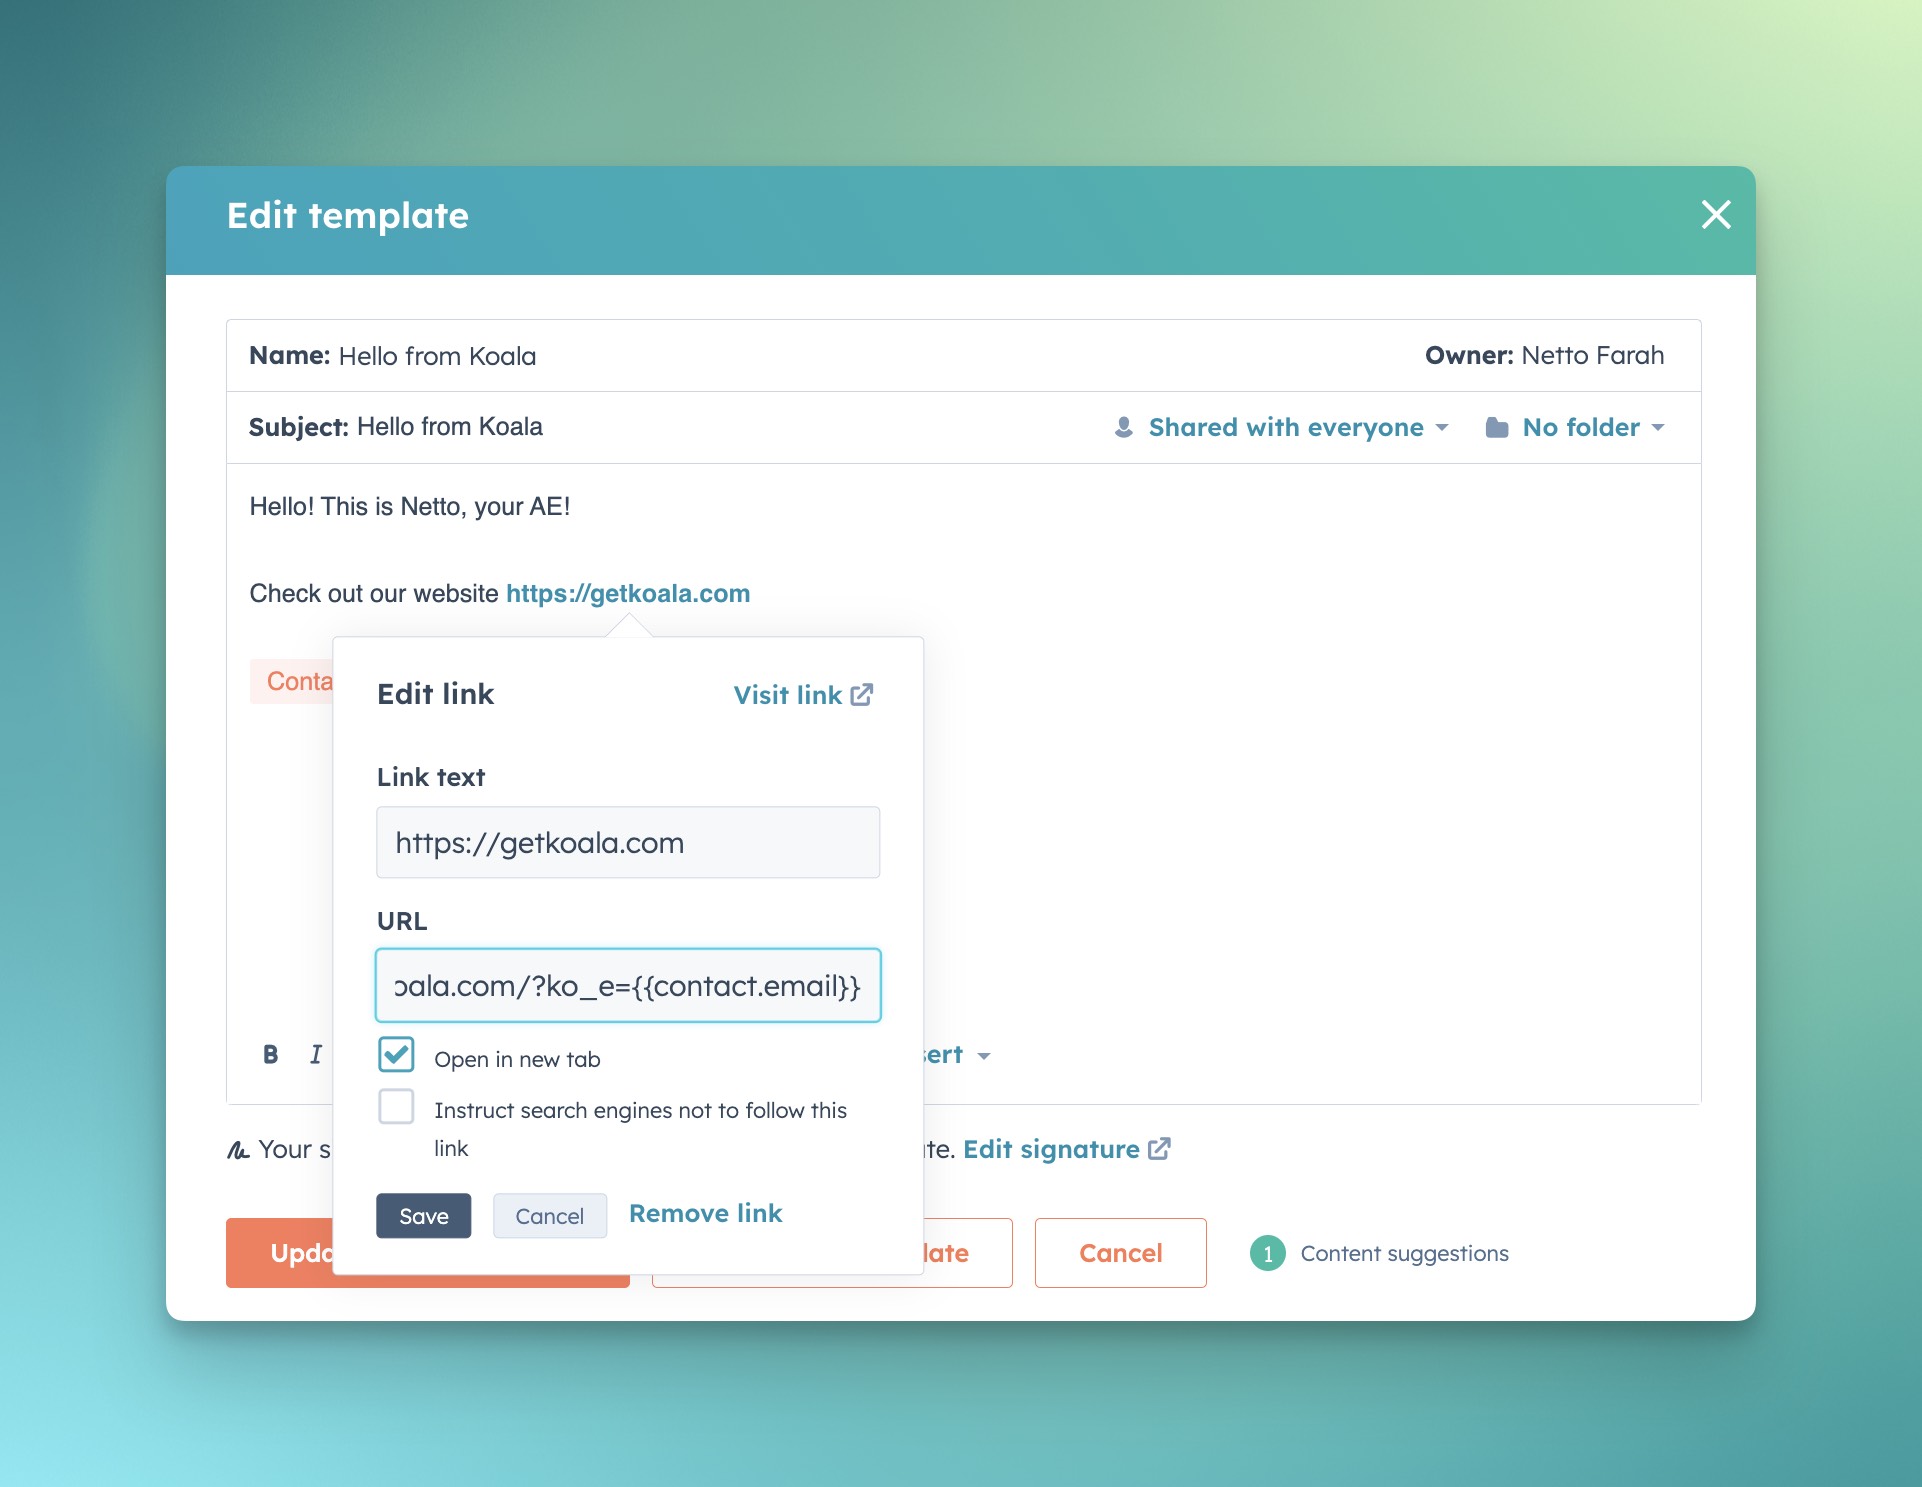
*💡 Note: Koala UTMs also work with your snippets. We recommend creating a handful of snippets that you can use for one-off emails.*
## HubSpot (using base64 emails and utm\_id)
You can choose to send emails using the `utm_id` parameter, as opposed to the `ko_e` param.
The main difference between the two is that `ko_e` takes an email address as is, and the `utm_id` takes a base64 representation of an email, which obfuscates
the email field, as well as compacts the size of the URL for long emails.
You can use all the same steps above, but instead use a `{{contact.base64_email}}` property in your templates.
### Instructions:
1. Create a `base64_email` property in your Contact Object Schema
2. Create a HubSpot Workflow with the following steps:
* a) Set the enrollment trigger to:
* `Email` is known
* `Email` has been updated in the last 1 day
* b) Add a custom code step with the following script:
```javascript
exports.main = async (event, callback) => {
const email = event.inputFields['email'];
let binary = Buffer.from(email);
let base64Encoded = binary.toString("base64");
callback({
outputFields: {
base64_email: base64Encoded
}
});
}
```
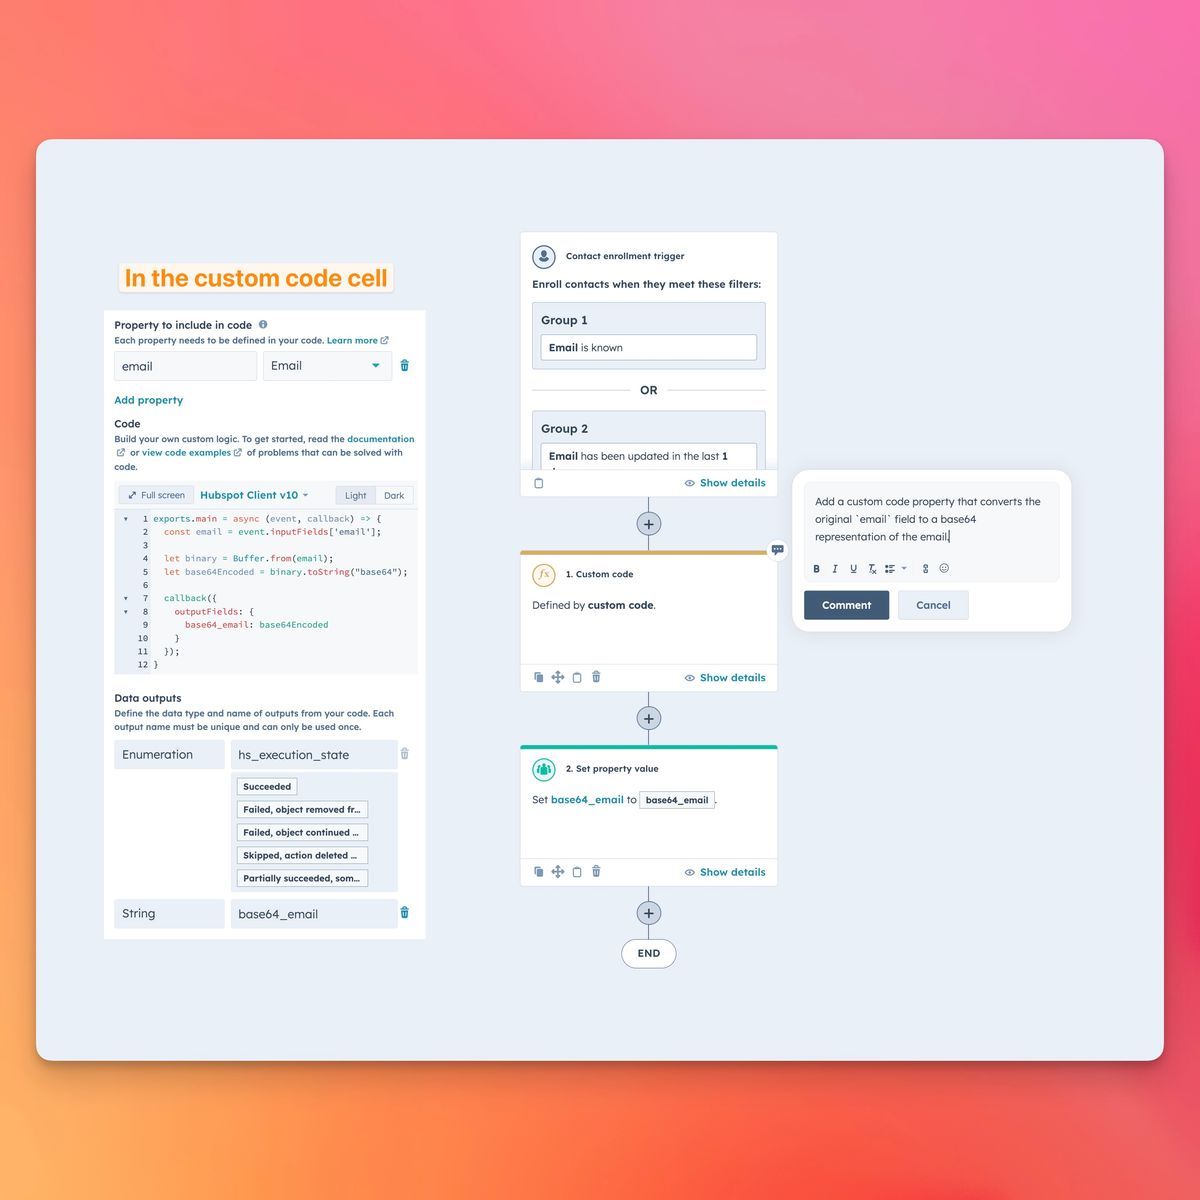
* c) Set the `base64_email` output variable to the contact `base64_email` property
3. Update your templates to use the `{{contact.base64_email}}` template property in all links to your website.
## Apollo.io
Update your sequence templates to add Koala UTM IDs to your links.
### Instructions:
1. Open the Sequences email template editor:
* a) Select Engage, then Sequences
2. Copy one of the following UTM Links:
If there are no other URL params
```
?ko_e={{email}}&k_is=apl
```
If there are other URL params
```
&ko_e={{email}}&k_is=apl
```
3. Add the Koala UTMs to links in your templates:
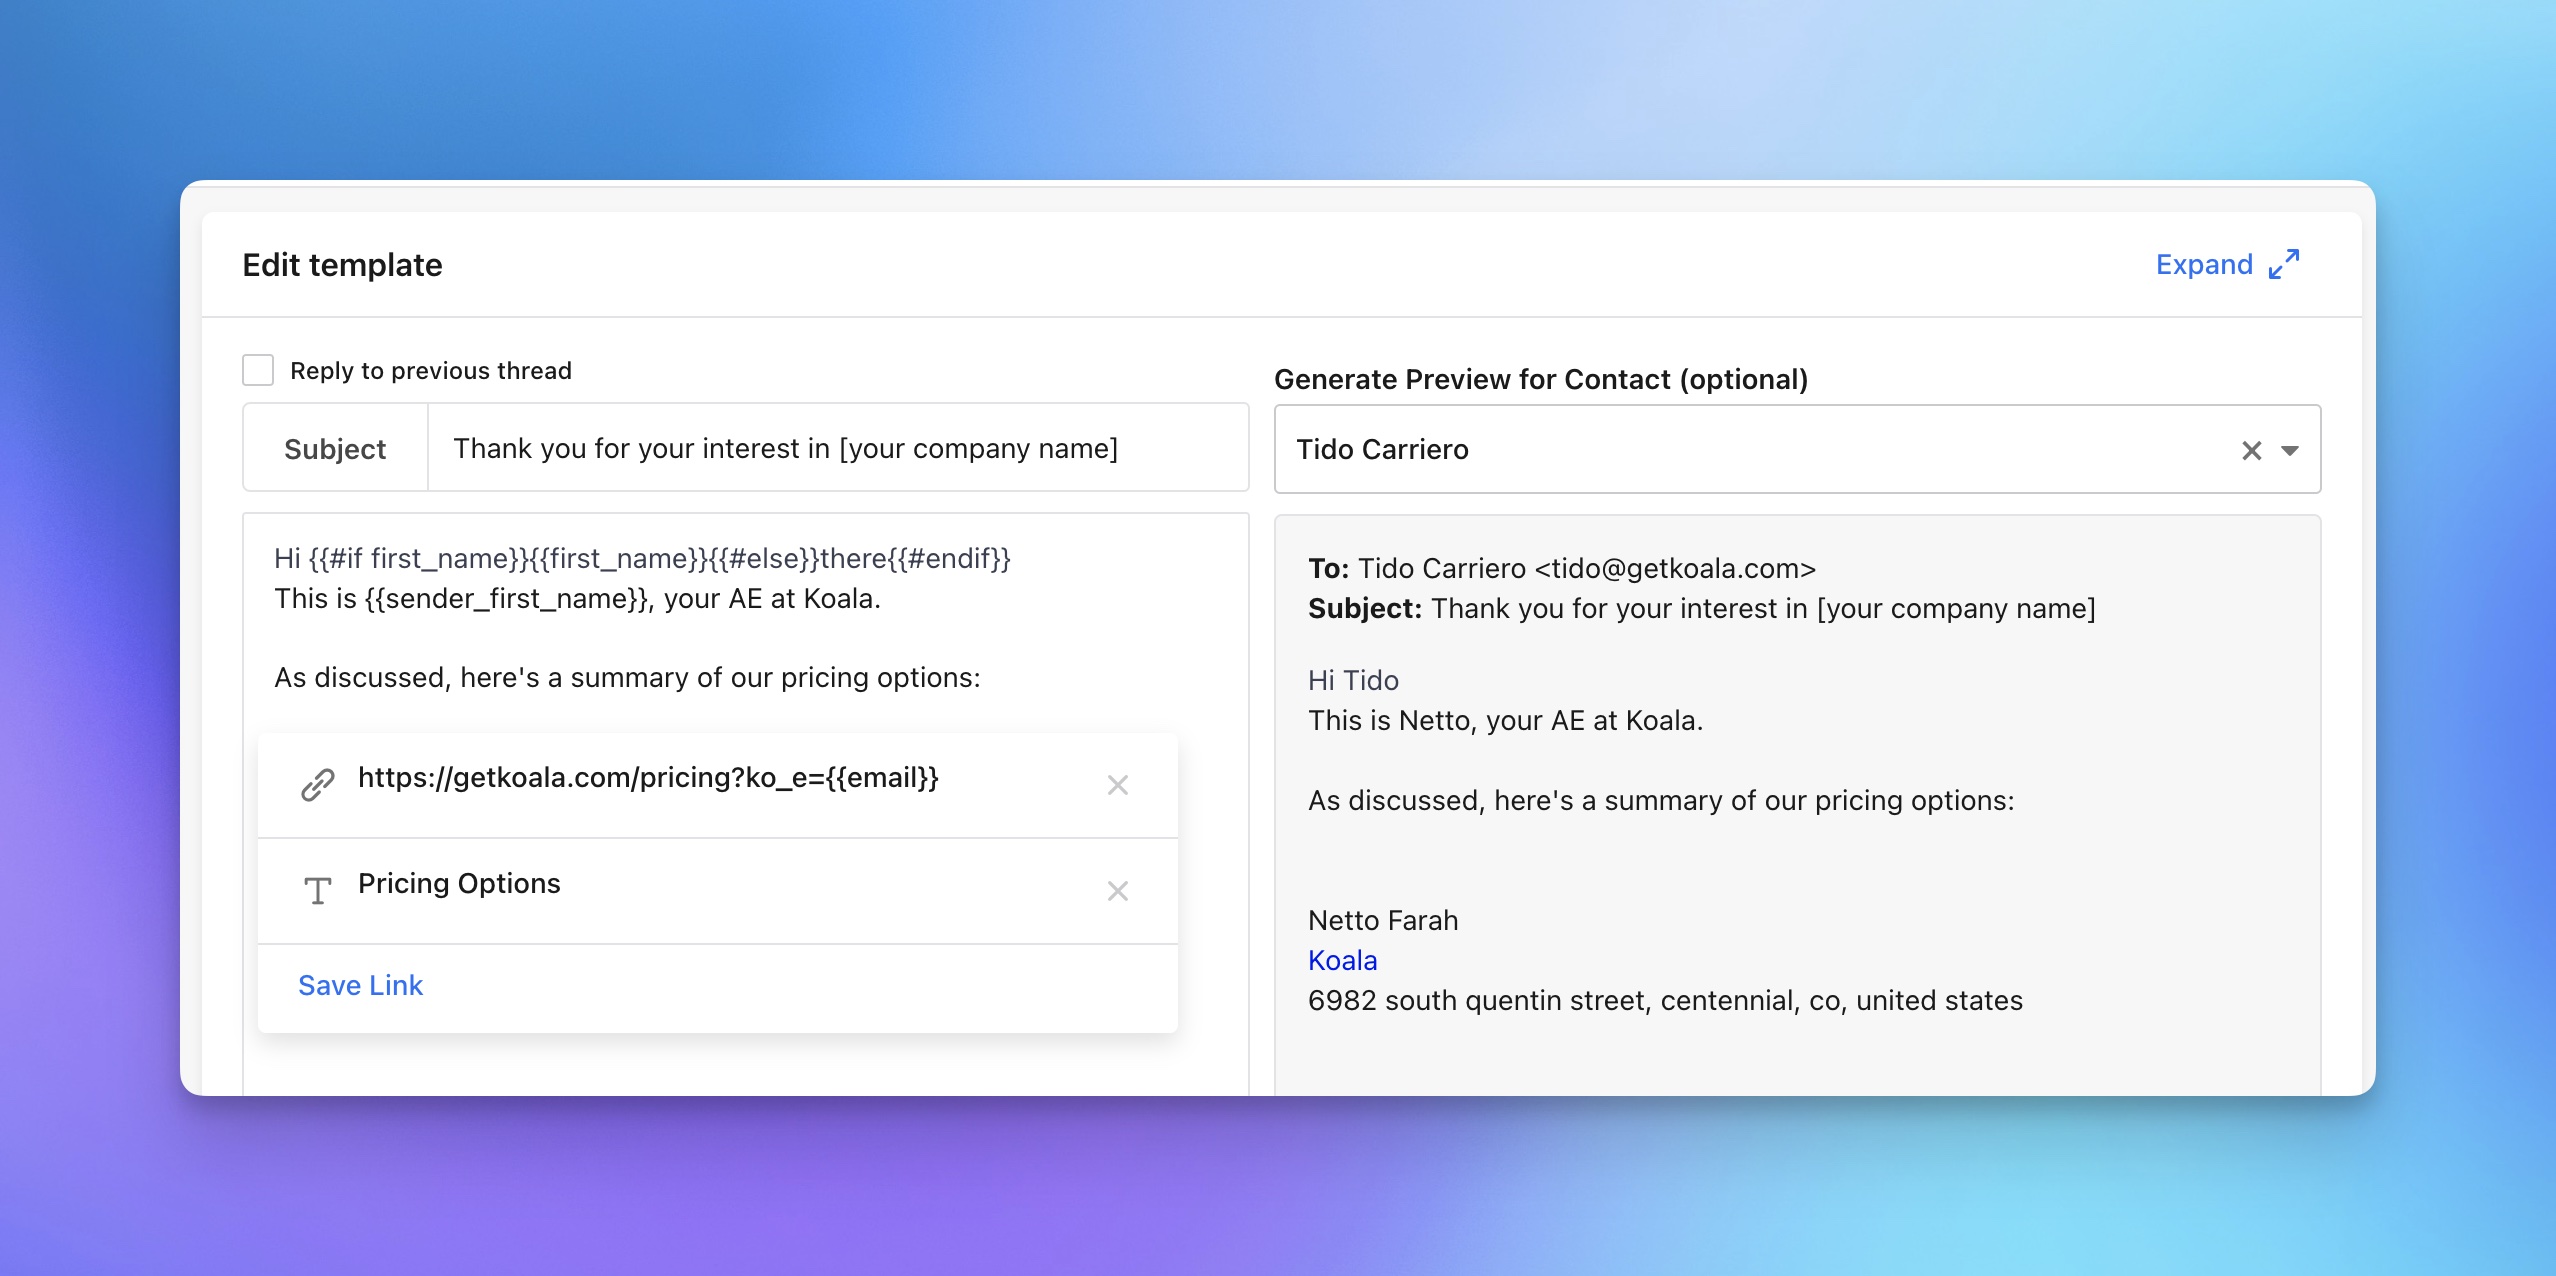
*💡 Note: Koala UTMs also work with your snippets. We recommend creating a handful of snippets that you can use for one-off emails.*
## Salesloft
Update your templates to add Koala UTM IDs to your links.
### Instructions:
1. Open the email template editor:
* a) As described in the docs here.
2. Copy one of the following UTM Links:
If there are no other URL params
```
?ko_e={{email}}&k_is=sl
```
If there are other URL params
```
&ko_e={{email}}&k_is=sl
```
*💡 Note: Koala UTMs also work with your snippets. We recommend creating a handful of snippets that you can use for one-off emails.*
## Amplemarket
Update your sequence templates to add Koala UTM IDs to your links.
### Instructions:
1. Open the Sequences email template editor.
2. For all high-volume sequences, you'll want to change your links to contain the following UTM parameters:
If there are no other URL params
```
?ko_e={{email}}&k_is=am
```
If there are other URL params
```
&ko_e={{email}}&k_is=am
```
3. Add the Koala UTMs to links in your templates:
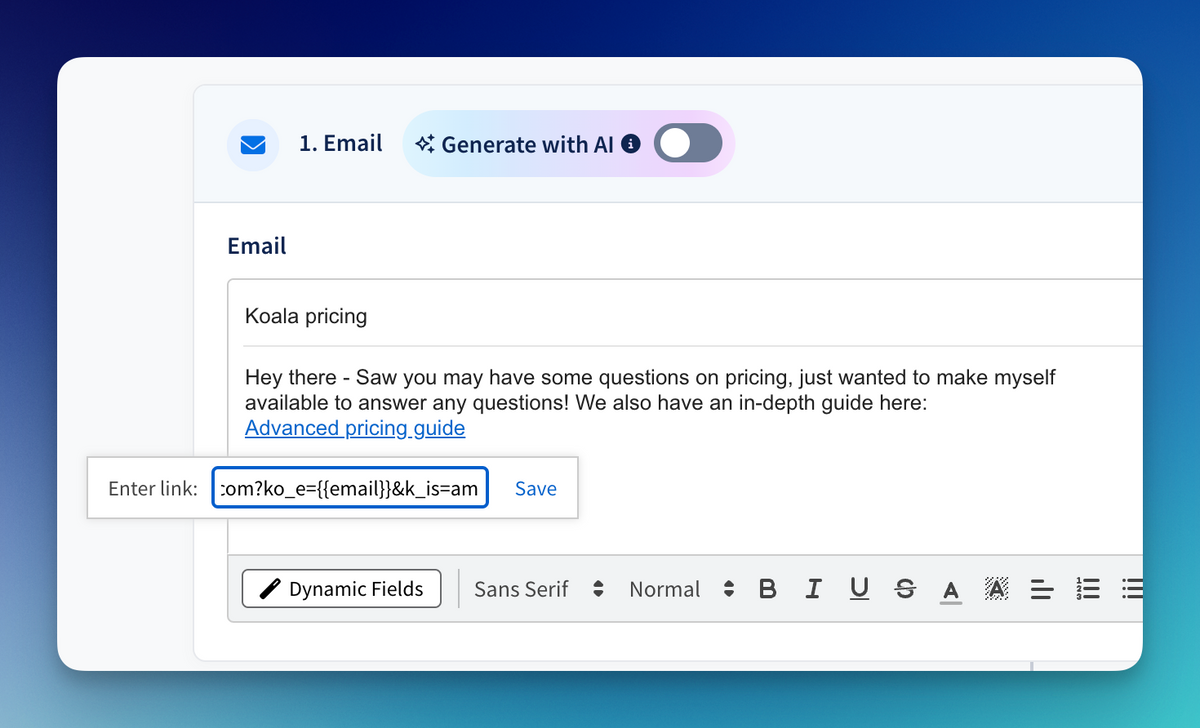
## Koala Email Params
You can tag any outbound links on any platform using the Koala Email param. All you need to is add ko\_e or utm\_id to any URL you'd like to be tracked when a prospect clicks it:
1. Start with an email address
```
tido@getkoala.com
```
2. Choose one of two flavors:
* a) A simple `ko_e` email param:
If there are no other URL params
```
?ko_e=email@example.com&k_is=dir
```
If there are other URL params
```
&ko_e=email@example.com&k_is=dir
```
* b) Or use `utm_id` with a base64 email parameter:
```javascript
let binary = Buffer.from(email);
let base64Encoded = binary.toString("base64");
```
3. Construct your URL:
```
https://getkoala.com/docs?ko_e=netto@getkoala.com
```
or if using option b
```
https://getkoala.com/docs?utm_id=${base64Encoded}
```
*Note: Option b is recommended for use cases where you're generating your URLs with a programing environment where you can base64 emails into IDs*
## Adding extra identification traits
You can add additional traits to enrich the identification of your email recipients. Koala detects any URL param that follows the pattern `ko_trait_<property>` and includes it in the traits list.
1. Start with the list of tratis you want to include
```
{
first_name: 'Netto',
last_name: `Farah`
}
```
2. Build the URL params
If there are no other URL params
```
?ko_trait_first_name=Netto&ko_trait_last_name=Farah
```
If there are other URL params
```
&ko_trait_first_name=Netto&ko_trait_last_name=Farah
```
3. Construct your URL:
```
https://getkoala.com/docs?ko_trait_first_name=Netto&ko_trait_last_name=Farah
```
# Koala Identity Layer
Source: https://getkoala.com/docs/identity-layer/intro
Understand how to get more identified traffic flowing into Koala
Koala automatically deanonymizes the company behind a website visitor via our partnership with Clearbit Reveal,
however, knowing the company behind a visitor will only take your Sales team so far.
Typical analytics tools often fail to connect the dots between website and in-app sessions,
Koala uses identity tracking in order to close the gap between website intent and in-product intent.
We find that our Identity Layer is able to track higher than average identities than the average analytics or website intent tool.
Some of our PLG customers have an identified traffic match rate of close to 50% of their website visitors, while some of our Sales Led and
heavy outbound customers report a close to 30% match rate for emails.
Company deanonymization combined with Koala's sophisticated Identity Layer can help you reach significance performance in your outbound motion,
as well as help accelerate existing deal cycles.
*Note: Koala does not use 3rd party cookies or any kind of 3rd party data in our Identity Layer*.
## Tracking Identities with Identify Calls
We recommend that you instrument your logged in and sign up experiences in order to detect
logged in users from your app that are return visitors to your website.
This helps bridge intent that happens in-product as well as research that is being done on
your marketing website and documentation.
You can learn more about how to [Instrument Identify calls in our Identify Guides](/sdk/identify).
## Segment and RudderStack Integrations
Koala automatically integrates with CDPs such as Segment and RudderStack in order to leverage any existing website or in-product
instrumentation that is done client and server side.
Any `analytics.identify` call that happens in the browser will be forwarded to Koala automatically.
*Note: You can disable the Segment / RudderStack integration on the Settings page in the Koala app.*
## Automatic Form Tracking
Koala automatically tracks Form Submissions that happen on your website in order to collect your visitor's
email address when they submit it.
You can see all Form Submissions in the Koala app under the [Form Submissions](https://app.getkoala.com/goto/forms/reports) tab.
*Note: You can toggle Automatic Form Submission on and off on the Settings page in the Koala app.*
## Identify Email Recipients
Koala is able to detect when a user clicks a link to your website from an outbound or marketing email.
You can use this feature to collect identities from any clicks to your outreach messages.
This integration often leads to a boost of 20\~30% net new identities to your Koala workspace, allowing you to
understand how your email prospects are interacting with your content and product.
Koala will also report all UTMs that drove the user to interact with your website from an email.
You can learn more about how to get started with [Koala Email Links here](/identity-layer/identify-email-recipients)
## HubSpot Tracking Pixel
Koala automatically integrates with the HubSpot tracking pixel when both HubSpot and Koala are loaded onto the
same page, allowing you to track how a HubSpot Contact interacts with all your web properties that are instrumented
with Koala.
*Note: You need to instrument your website with the HubSpot Pixel Tracking in order to connect identities between Koala and HubSpot.*
# Apollo
Source: https://getkoala.com/docs/integrations/apollo
Koala partners with Apollo to enrich email addresses, search for prospects, and take action using Apollo's sales engagement offering.
# Enrich an email address
When you come across a known user in Koala, you can click "Enrich Contact..." and choose "Enrich with Apollo":
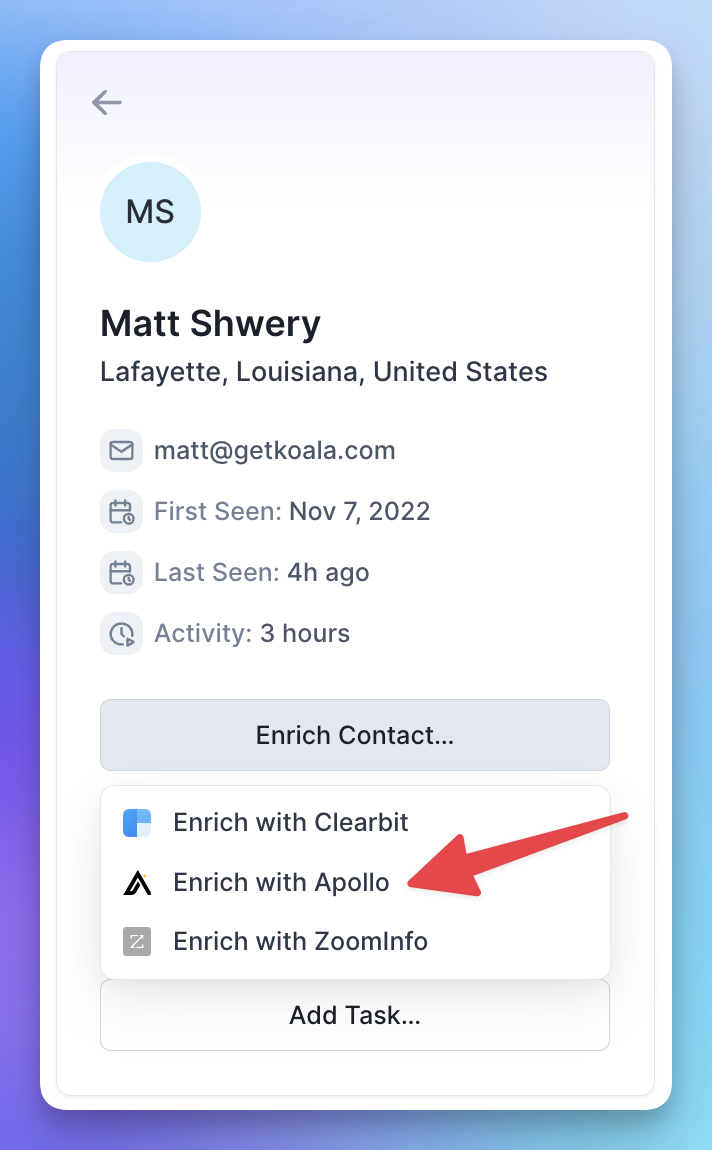
After you've enriched the profile, you'll see the title and LinkedIn profile:
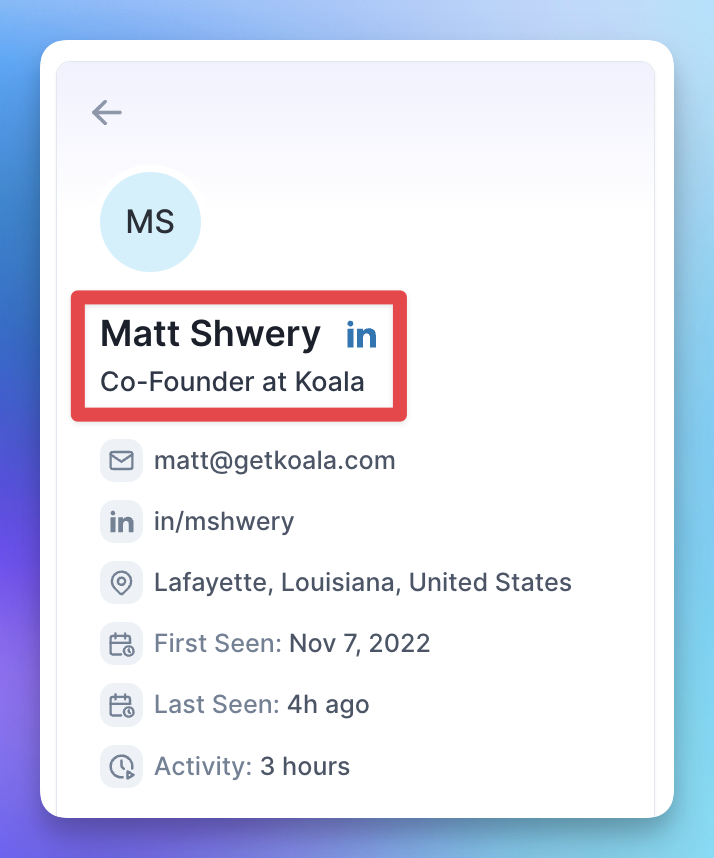
# Search for prospects
When you come across an anonymous profile in Koala, you can click "Search in Apollo" to prospect into the account:
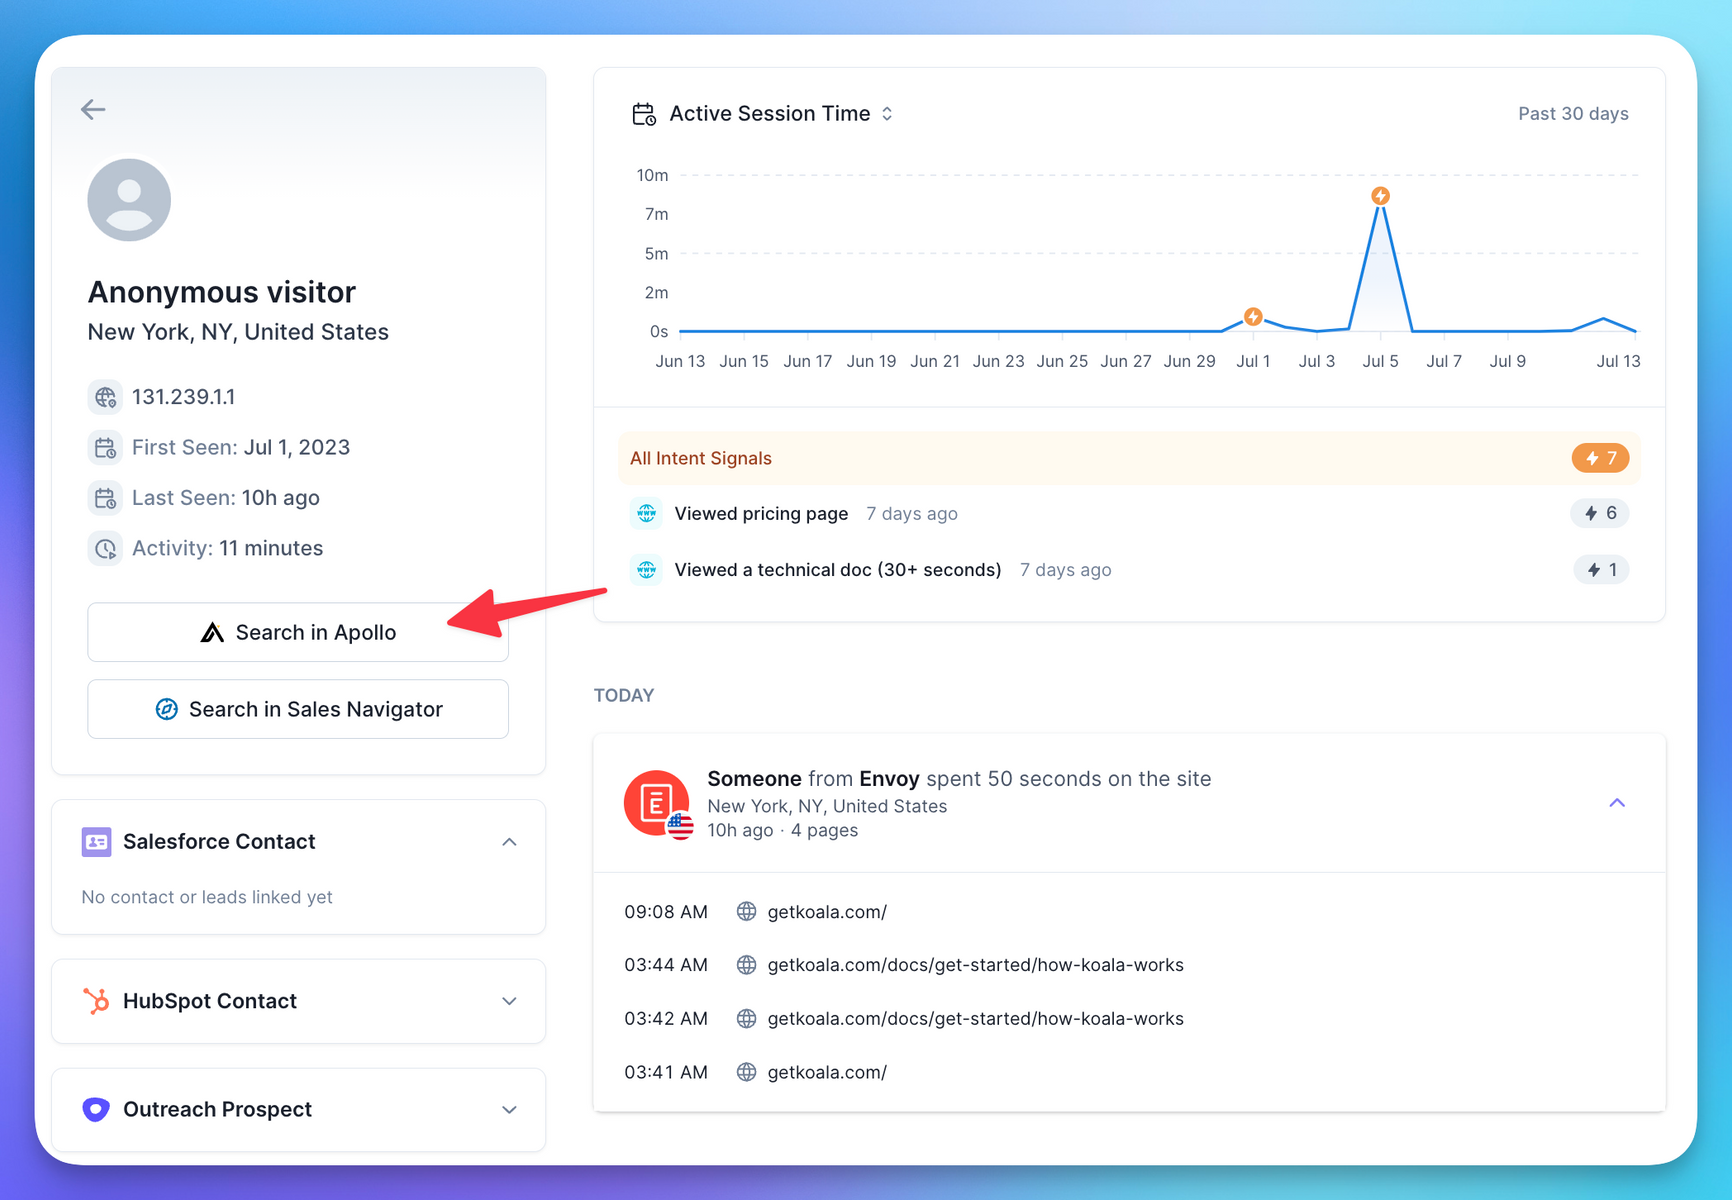
Koala will take you directly to a people search, with the company and location already filled out:
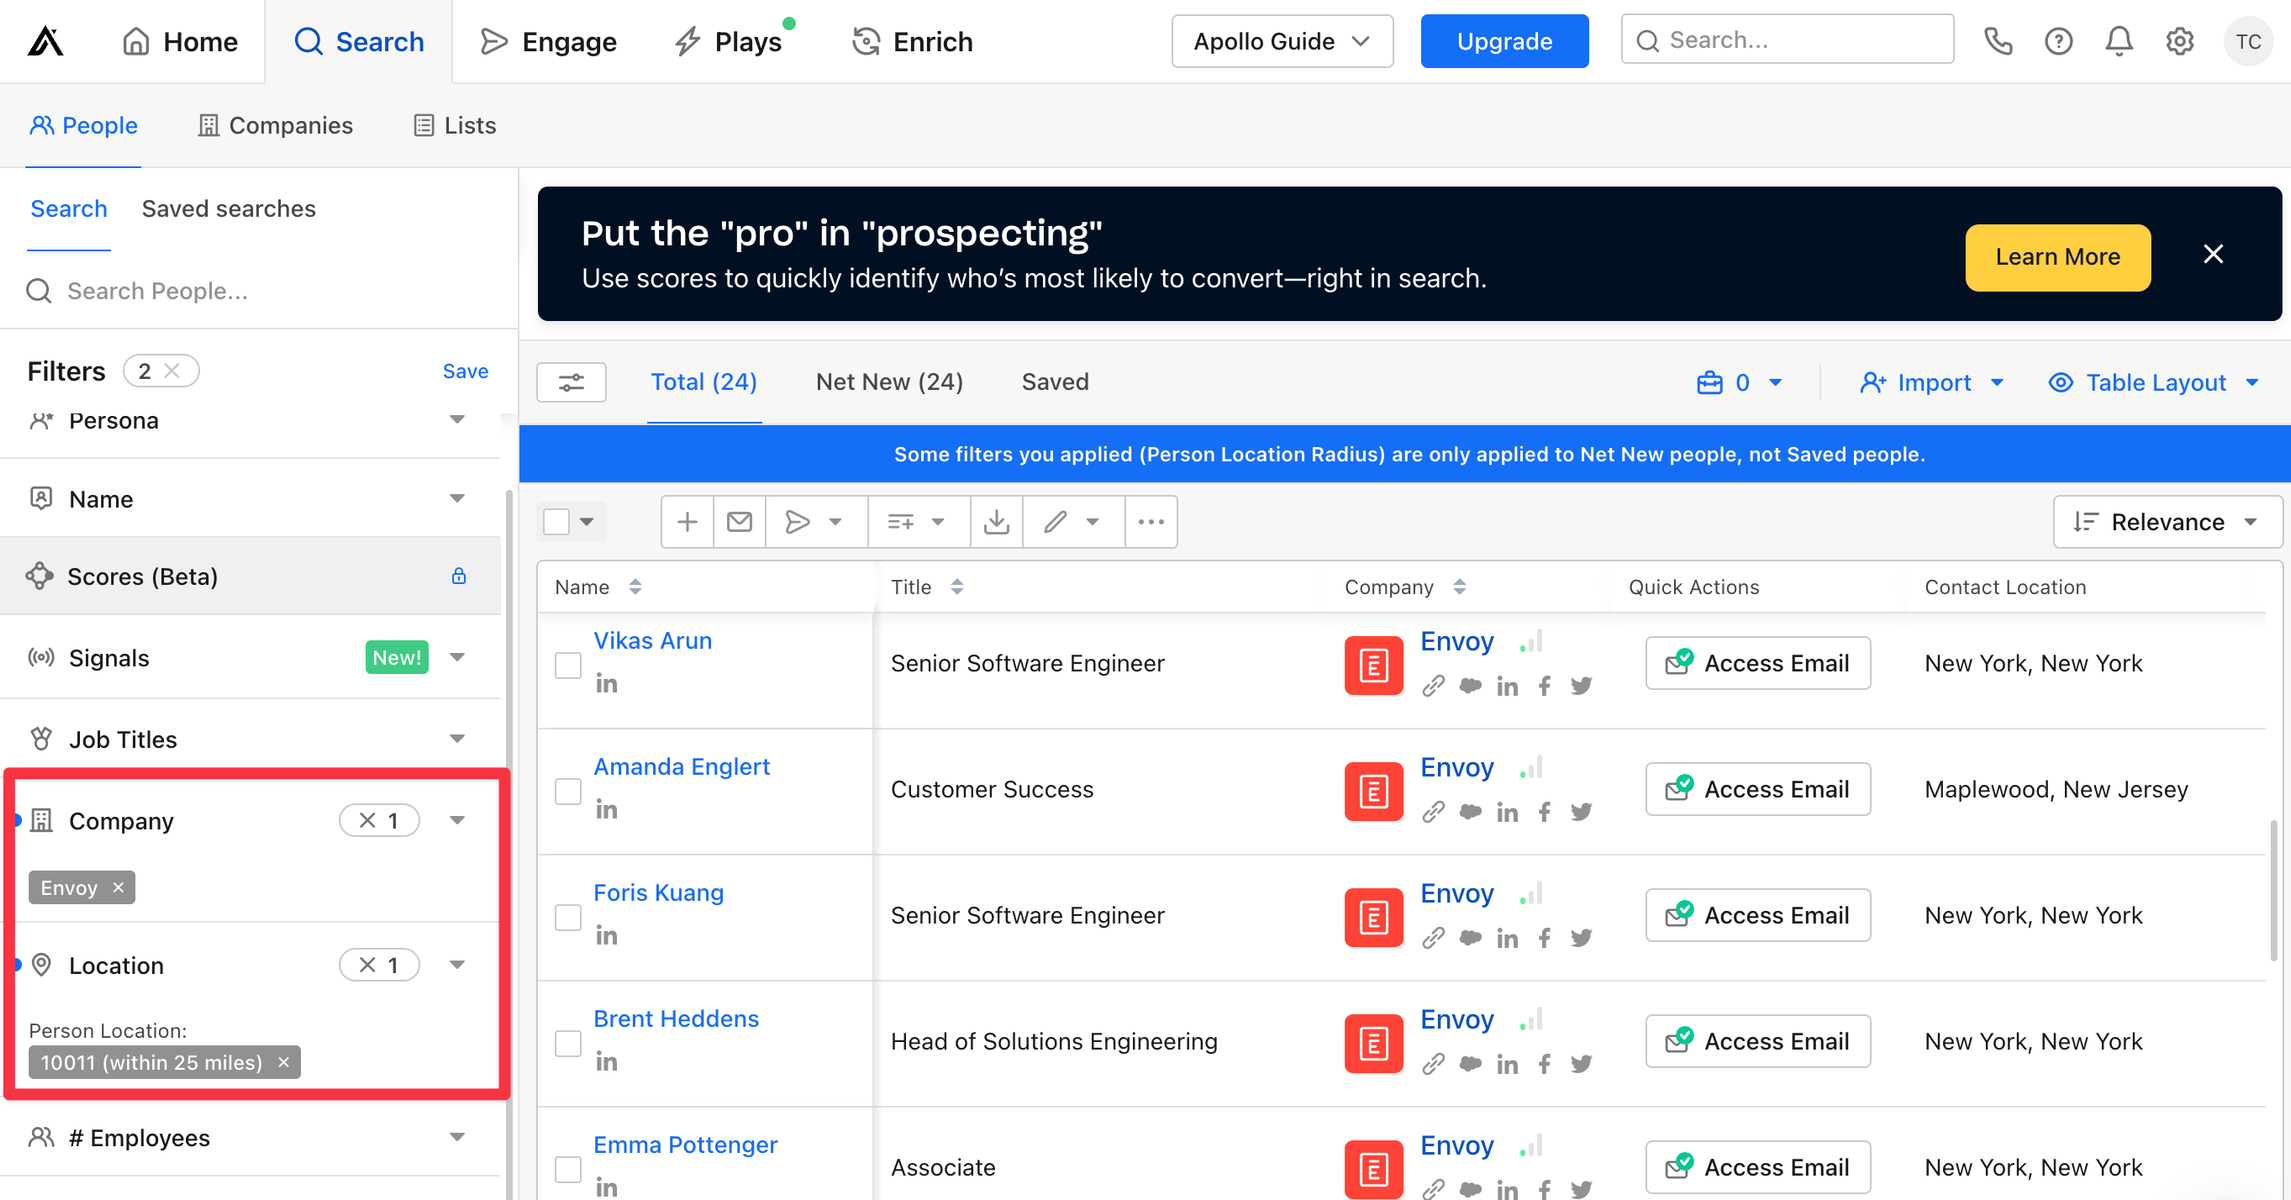
# Take action in Apollo
From any Koala profile, you can take action directly in Apollo, or set up an automation based on an intent signal. Koala supports adding to a list (pictured below), adding to a sequence, or creating a task.
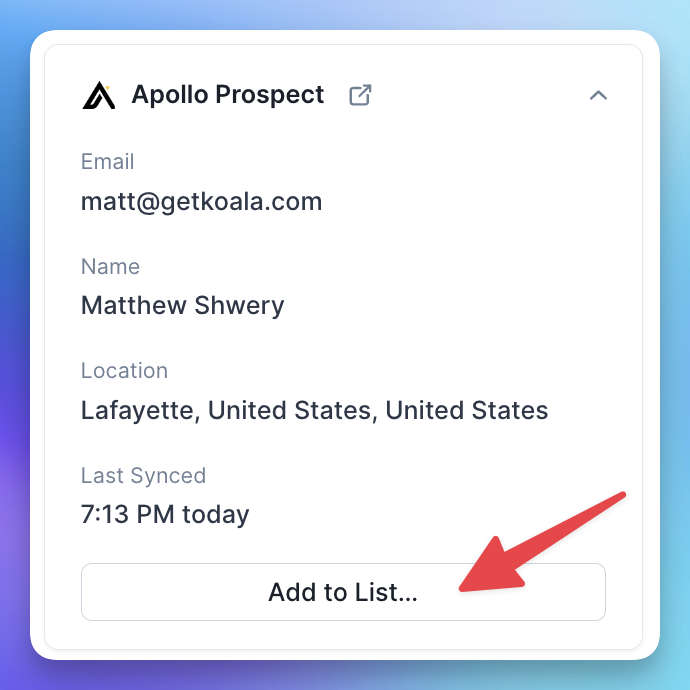
# Setup & manage integration
Manage your Apollo integration from the [Apollo settings page](https://app.getkoala.com/goto/apps/apollo).
# Arcade
Source: https://getkoala.com/docs/integrations/arcade
Capture events coming from Arcade interactive tours.
## Overview
[Arcade](https://arcade.software?ref=koala) is a tool to help you create beautiful demos and interactive tours for your product.
## Automatic Setup
1. [Install the Koala snippet](/get-started/quick-start) on the site where you are embedding Arcade demos.
2. Koala will automatically detect and capture events from Arcade including:
* Flow Rendered
* Hotspot Clicked
* Video Ended
* Flow Restarted
* Progress Bar Nav Clicked
* Step Reached
* Overlay Clicked
* External URL Clicked
* Powered by Arcade Button Clicked
* CTA Clicked
## Manual Setup
If you don't want all Arcade events captured, or need to control when it's turned on, you can manually setup Arcade with Koala. With a small bit of code you can capture key events in Koala as visitors interact with your Arcade demos.
1. [Install the Koala snippet](/get-started/quick-start) on the site where you are also embedding the Arcade demo iframe.
2. Turn off the Arcade plugin in the [Koala settings](https://app.getkoala.com/goto/settings/install).
3. Anywhere *after* the Koala snippet, within the `<body>` tag of your html add this code snippet:
```html
<script>
window.addEventListener(
"message",
function (event) {
if (event.origin === "https://demo.arcade.software") {
if (window.ko && event.data && event.data.eventName) {
window.ko.track("Arcade " + event.data.eventName, event.data);
}
}
},
false
);
</script>
```
This will start capturing all events bubbled from the Arcade tour in Koala, prefixed with the name "Arcade" (e.g. "Arcade CTA Clicked" or "Arcade Hotspot Clicked"). You can see the full list of events in [their docs](https://docs.arcade.software/kb/learn/advanced-features/in-arcade-event-propagation?ref=koala#what-events-are-propagated).
If you only want to capture some of the events you can add a conditional check like this:
```html
<script>
const eventsToCapture = ["CTA Clicked", "Hotspot Clicked"];
window.addEventListener(
"message",
function (event) {
if (event.origin === "https://demo.arcade.software") {
if (
window.ko &&
event.data &&
event.data.eventName &&
eventsToCapture.includes(event.data.eventName)
) {
window.ko.track("Arcade " + event.data.eventName, event.data);
}
}
},
false
);
</script>
```
## Turning off autotracking for Arcade
If you don't want all Arcade events captured, or need to control when it's turned on, you can disable autotracking for Arcade in the [Koala settings](https://app.getkoala.com/goto/settings/install).
# BigQuery
Source: https://getkoala.com/docs/integrations/bigquery
Sync product, usage and event data directly from your data warehouse.
Koala can connect to your BigQuery account and sync data from any of your databases directly into your customer profiles, as well as enrich your customer profiles with data from your BigQuery databases.
## Connecting to BigQuery
To connect Koala to your BigQuery account, you'll need to create a service account and generate a JSON key. Follow the steps below:
### Create a Service Account
* Navigate to the [Google Cloud Console](https://console.cloud.google.com).
* From the navigation panel on the left, select **IAM & Admin**, then choose Service Accounts.
* Click on **Create Service Account**.
* Enter a name for your service account (e.g., koala-bigquery) and click **Create**.
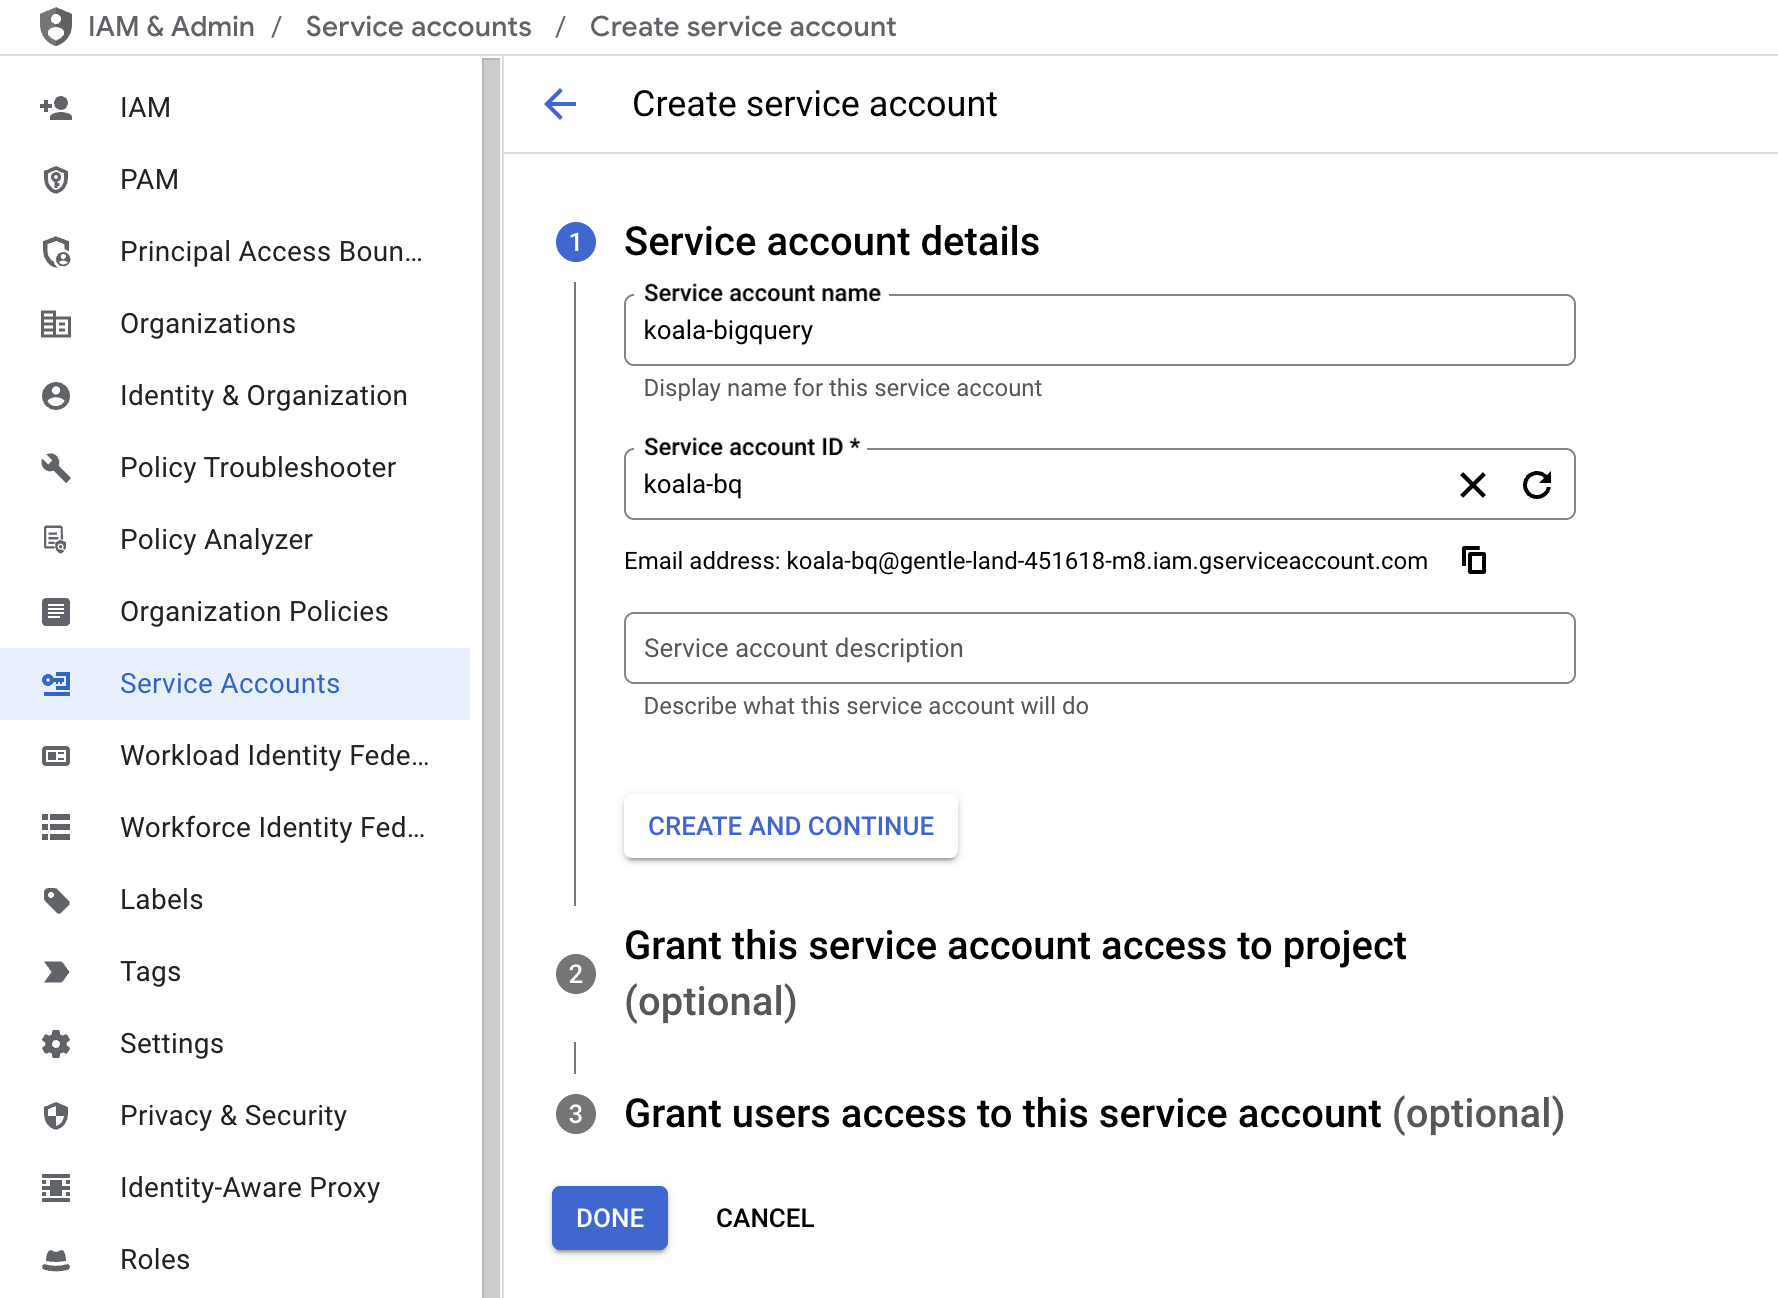
* Assign the following roles to the service account:
* <code>BigQuery Data Owner</code>
* <code>BigQuery Job User</code>
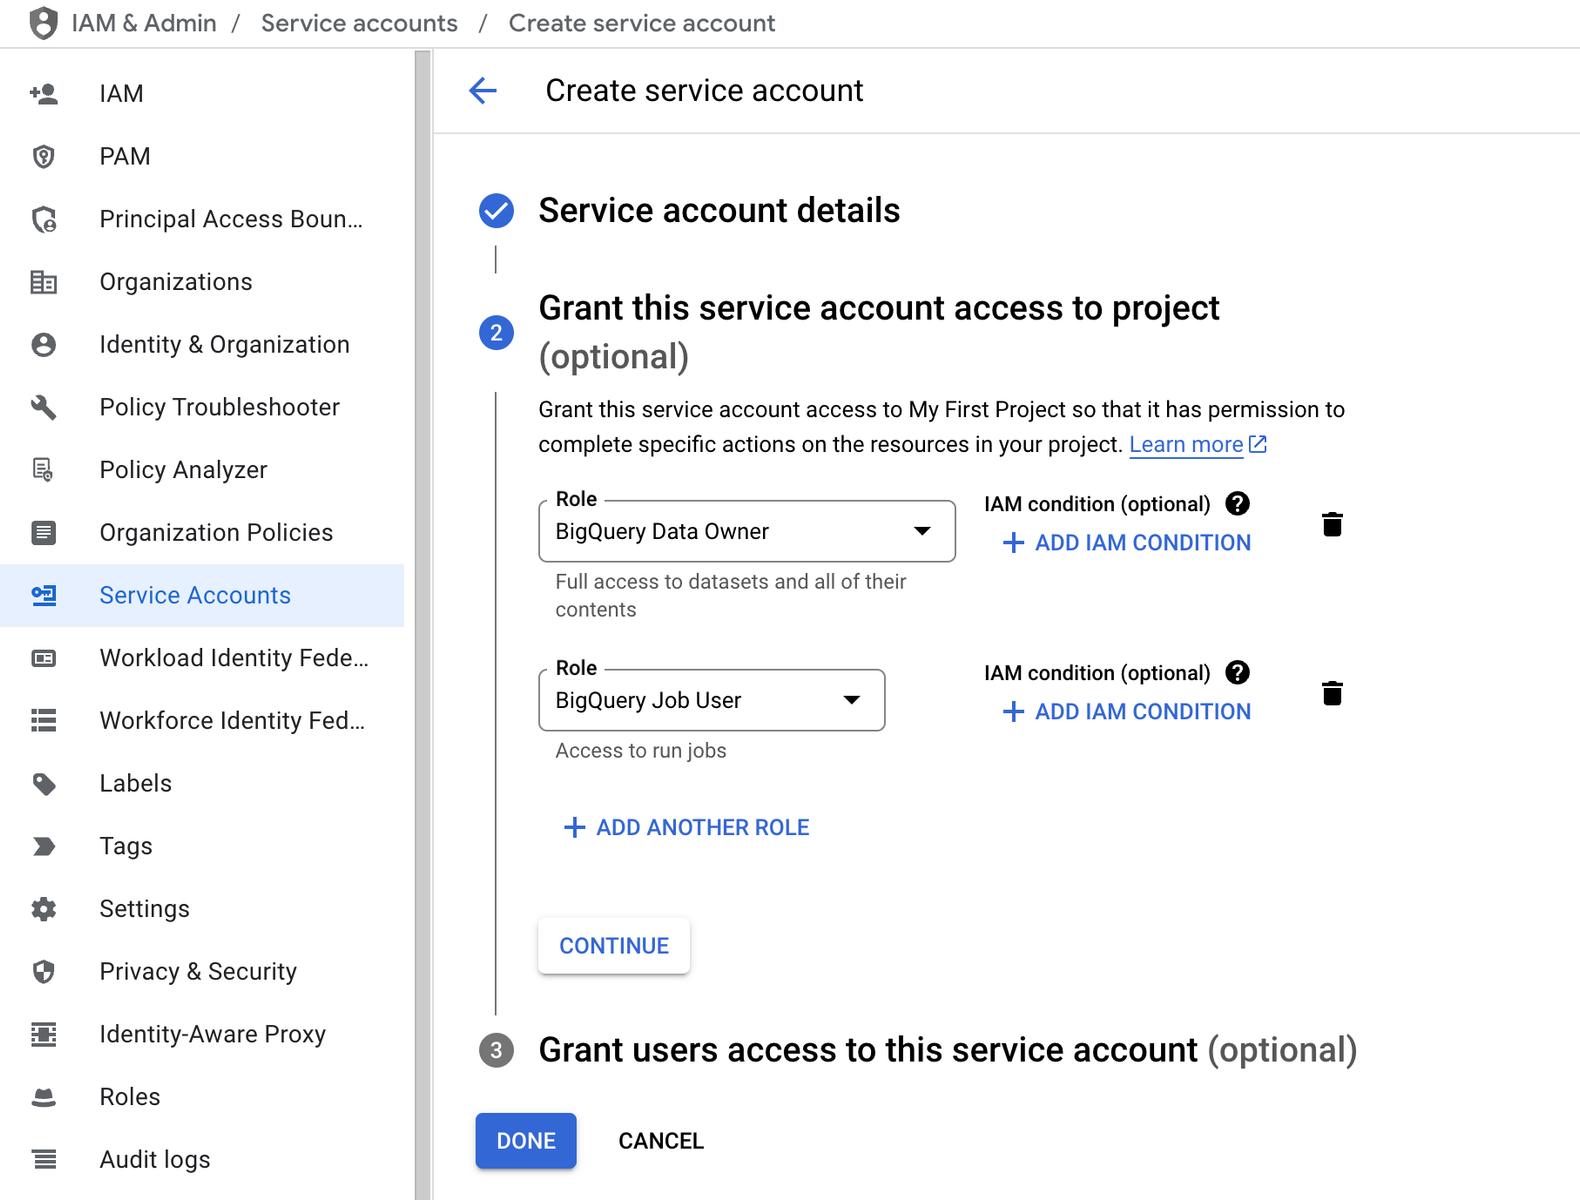
* After assigning roles, click on Done. Then, find your newly created service account in the list, click on the three dots under Actions, and select **Manage keys**.
* Click on **Add Key** > **Create New Key**, select **JSON** as the key type, and click **Create**. A JSON key file will be downloaded to your computer. This file will be used to connect Koala to your BigQuery instance.
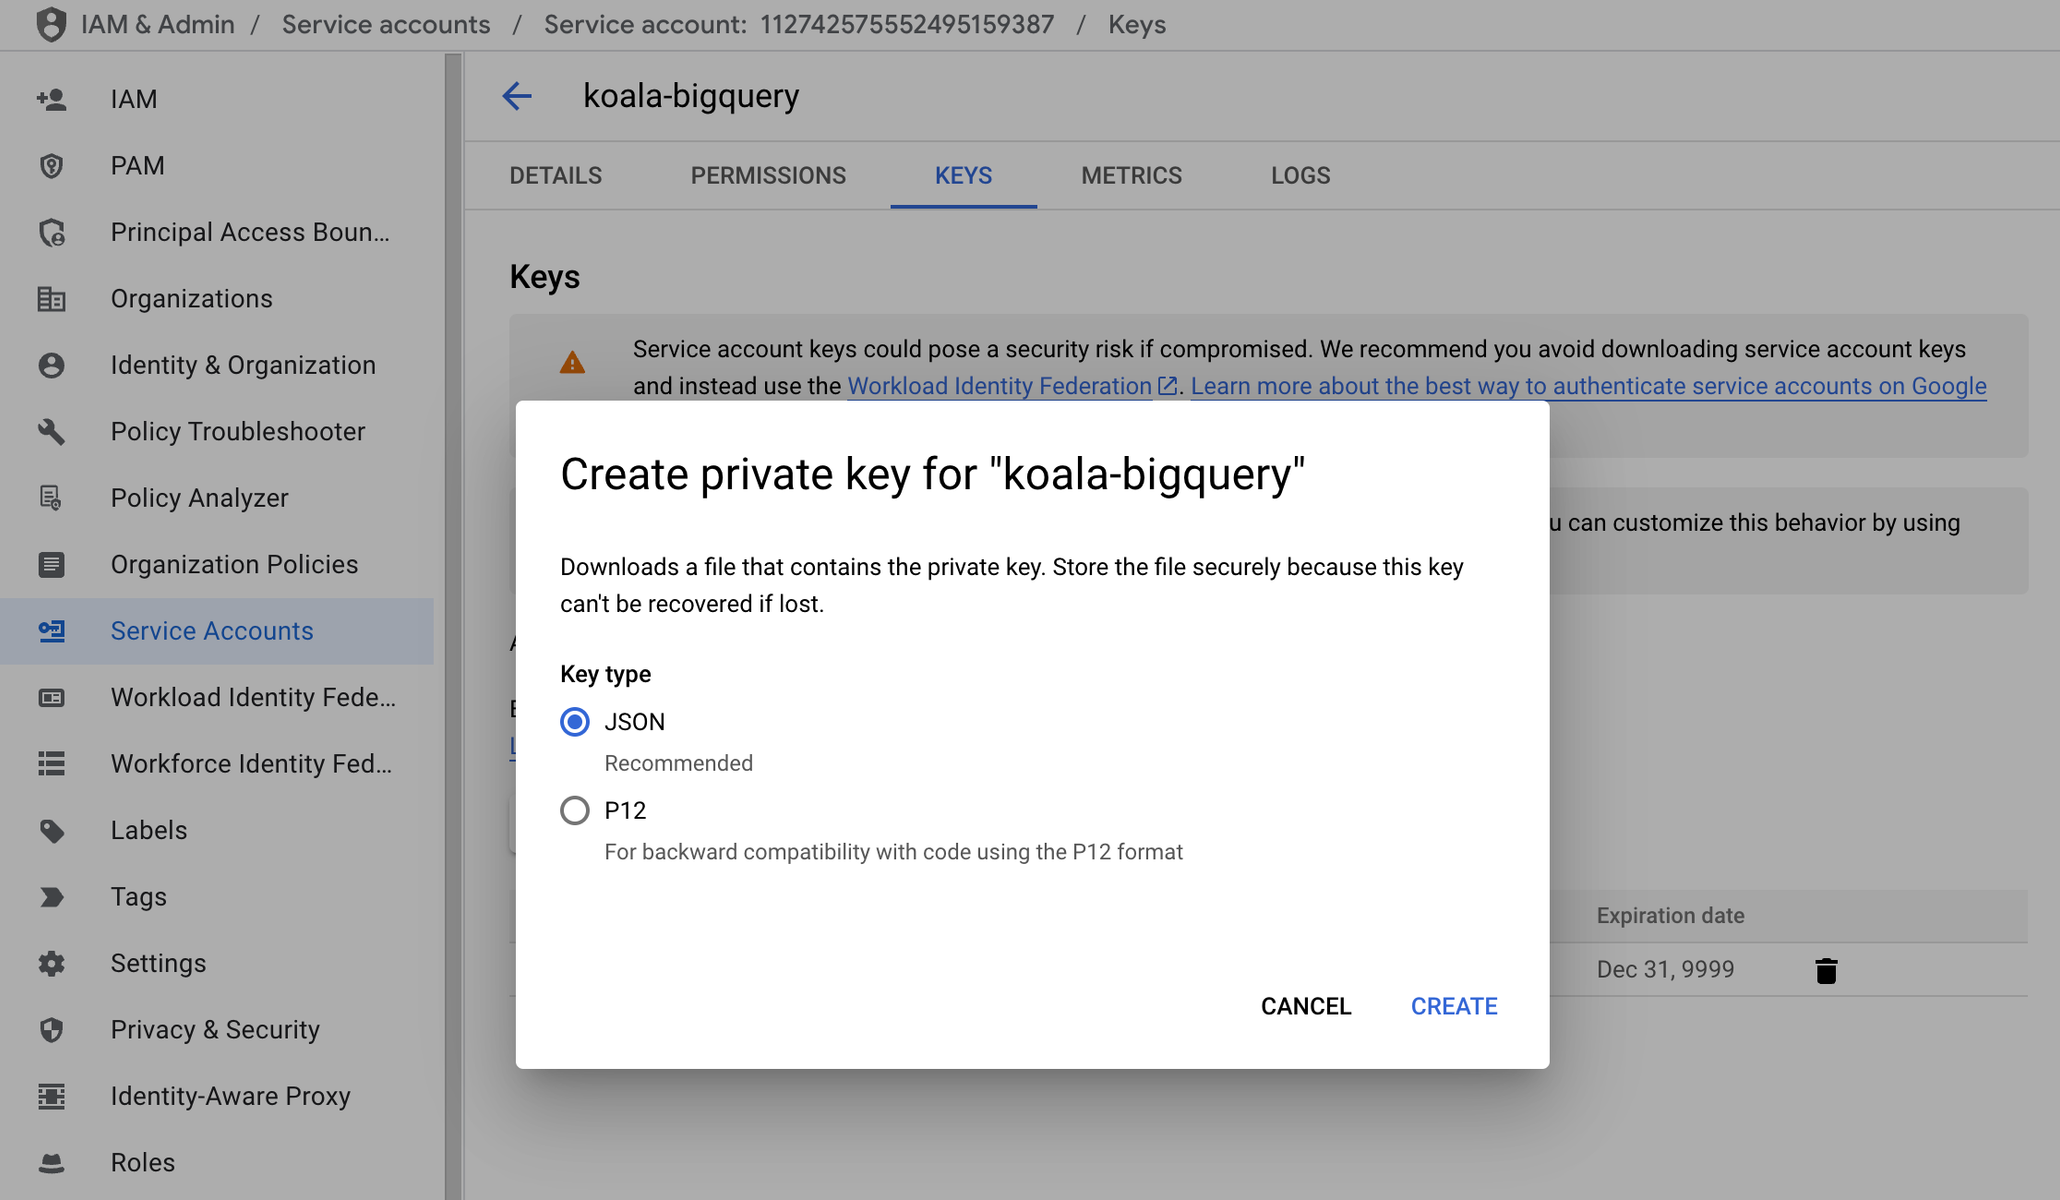
For more detailed information on creating service accounts, refer to the [Google Cloud documentation](https://cloud.google.com/docs).
### Connect Koala to BigQuery
* Access your [Koala dashboard](https://app.getkoala.com).
* Go to **Settings** > **Sources & Integrations**.
* Locate the **BigQuery** app and click on **Connect**.
* Paste credentials from **JSON Key** file into corresponding fields: `project_id`, `client_email` and `private_key`.
* Click **Save** to establish the connection.
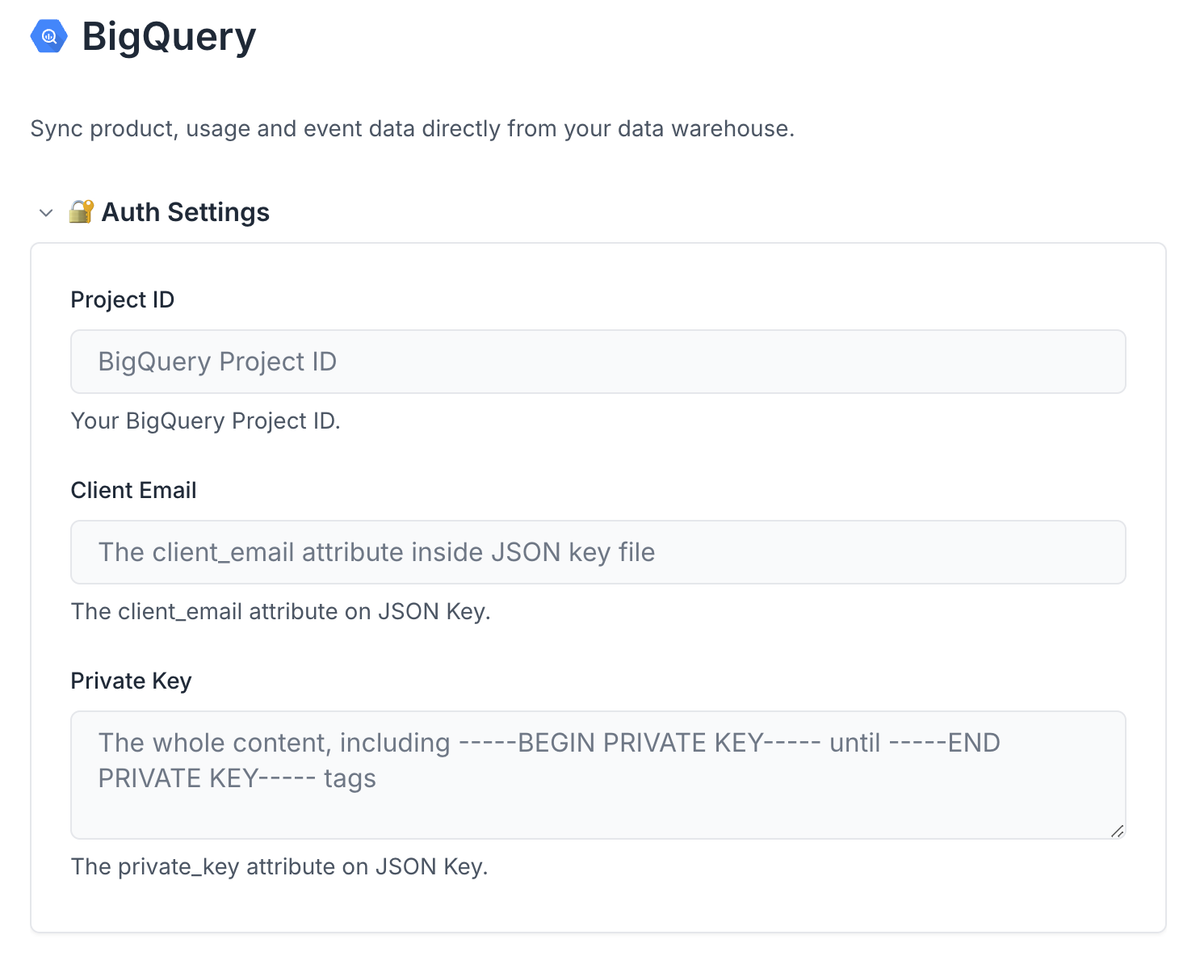
## Reading Data from BigQuery into Koala
Once the connection is established, you can sync data from BigQuery into Koala:
* In **BigQuery** settings, navigate to **Read data from BigQuery** and click on **Add New Model**.
* Select the corresponding **Object Type** (`Account` or `Profile`) and **Data Type** (`Traits` or `Events`) you want to read from **BigQuery**.
* Write the **SQL query** to select the data you want to import from **BigQuery**. Ensure that your query includes a unique identifier (e.g., email) to map data correctly to the data model in Koala.
* You can preview the data returned by the **SQL Query** by clicking on **Test Model**. Make sure to address the **validation errors** if there are any.
* Click **Save** to confirm the changes.
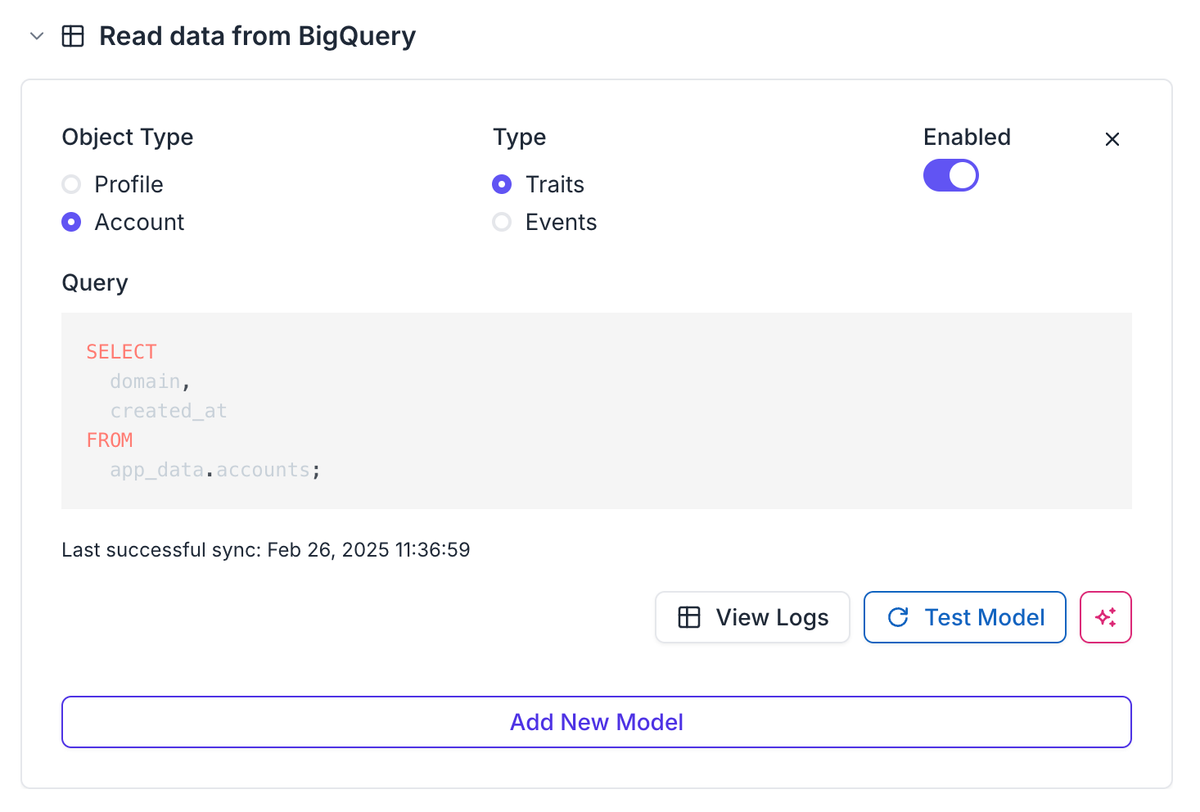
Once the **Data Model** is correctly configured, the data will be synced to Koala in the next sync window, at 2:15 am and 2:15 pm.
The **last successful sync** timestamp will be shown at the bottom of **Data Model** once the process runs correctly.
## Sending Data from Koala to BigQuery
Koala maintains an automated replication process that continuously syncs data from your Koala workspace to designated tables in your BigQuery instance. This ensures your BigQuery database always has the most current information from Koala.
### Available Data Exports
The following data sets can be automatically exported to your BigQuery instance:
* Raw feed of page views
* Raw feed of events
* Raw feed of form submissions
* Profile snapshots
* Account snapshots
* Account scores
### Ensuring Data Transfer permissions
Koala relies on [BigQuery Data Transfer Service](https://cloud.google.com/bigquery/docs/dts-introduction) to automate the data load configuration and synchronization.
You must ensure the following permissions on the configured user:
* `bigquery.transfers.get`
* `bigquery.transfers.update`
You need to create a custom role to assign these permission following:
* Navigate to the [Google Cloud Console](https://console.cloud.google.com).
* From the navigation panel on the left, select **IAM & Admin**, then choose **Roles**.
* Click on **Create Role**.
* Enter a title, description, and ID for the role, following the example in the image below.
* Assign the `bigquery.transfers.get` and `bigquery.transfers.update` roles by clicking on **Add Permissions**.
* Click on **Create** to confirm the operation.
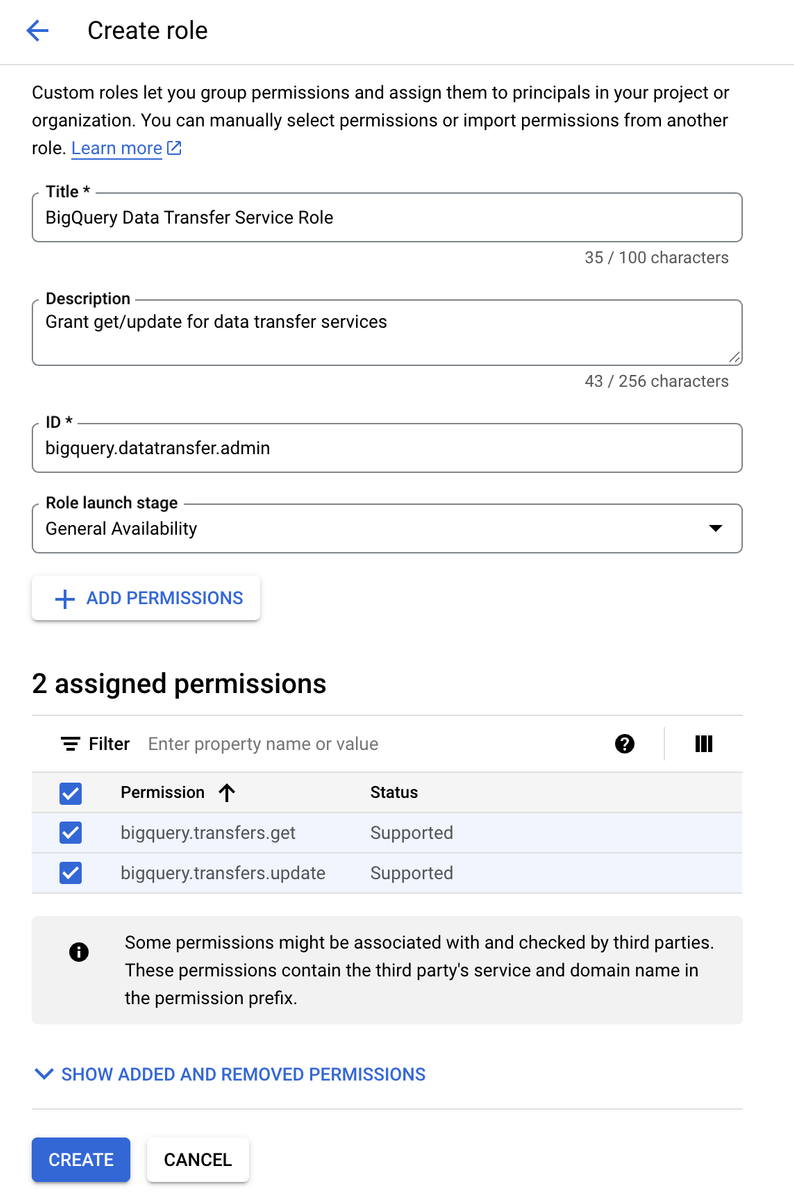
Assign this custom role to the Service Account used on integration:
* Navigate to the [Google Cloud Console](https://console.cloud.google.com).
* From the navigation panel on the left, select **IAM**.
* Locate the Service Account user on the list and click on the *pencil* icon on the right to edit it.
* Click on **Add Another Role** and choose the newly created custom role.
* Click on **Save** to confirm the operation.
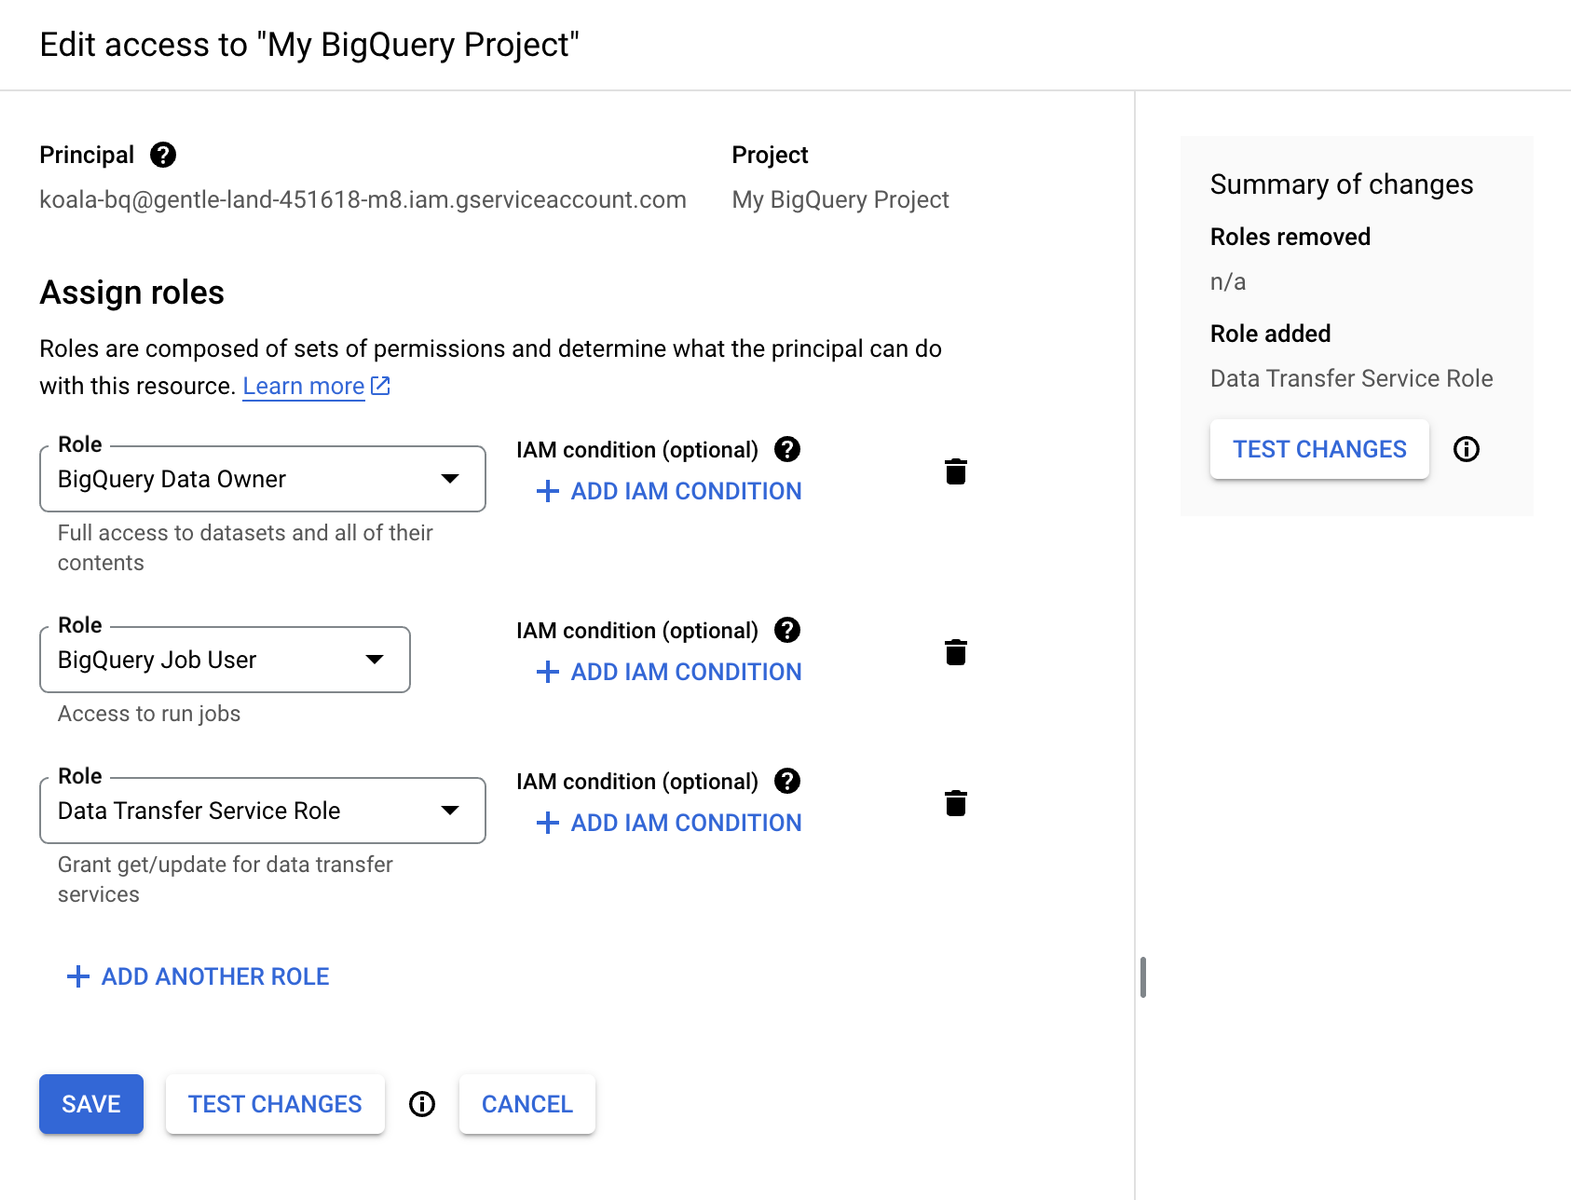
After confirming the new permissions, you could back to Koala settings to continue the configuration and enable the desired Data Exports to be synced to BigQuery dataset.
### Notes
#### **ID columns as `byte` type**
BigQuery has a schema detection logic that converts UUID type columns to `bytes` type ([more info](https://cloud.google.com/bigquery/docs/loading-data-cloud-storage-parquet#parquet_conversions)), which results in wrong result values when querying data from that columns. To avoid this, all you'll need is to convert the IDs columns using the [TO\_HEX()](https://cloud.google.com/bigquery/docs/reference/standard-sql/string_functions#to_hex) function.
For example, selecting the IDs directly will return them as bytes (base64 encoded):
```
select company_id, domain from accounts;
# column_id domain
1 TN4pUk51Sh+d5tCT6EY9pw== domain.com
2 m8IlKhqBRG+qhWASgS1orw== getkoala.com
```
To fetch the real ID value, you need to convert it on the query:
```
select TO_HEX(company_id), domain from accounts;
# column_id domain
1 4cde29524e754a1f9de6d093e8463da7 domain.com
2 9bc2252a1a81446faa856012812d68af getkoala.com
```
This conversion isn't needed on table joins. Use it if you need to retrieve the real column value on your BigQuery views and queries.
For more information on managing BigQuery integrations, refer to the [Google BigQuery documentation](https://cloud.google.com/bigquery/docs).
# Calendly
Source: https://getkoala.com/docs/integrations/calendly
Capture events coming from your embedded Calendly booking.
## Overview
Koala can integrate with [Calendly](https://calendly.com?ref=koala) to capture events coming from your embedded Calendly booking iframe.
## Automatic Setup
1. [Install the Koala snippet](/get-started/quick-start) on the site where you are also embedding the Calendly booking iframe.
2. Leave the Calendly plugin turned on (it's on by default). Koala will automatically detect and capture Calendly events!
Out of the box, Koala will capture the following events:
* Calendly Profile Page Viewed
* Calendly Event Type Viewed
* Calendly Date and Time Selected
* Calendly Event Scheduled
## Manual Setup
With a small bit of code you can capture key events in Koala as visitors interact with Calendly.
1. [Install the Koala snippet](/get-started/quick-start) on the site where you are also embedding the Calendly booking iframe.
2. Anywhere *after* the Koala snippet, within the `<body>` tag of your html add this code snippet:
```html
<script>
function isCalendlyEvent(e) {
return (
e.origin === "https://calendly.com" &&
e.data.event &&
e.data.event.indexOf("calendly.") === 0
);
}
const eventNames = {
"calendly.profile_page_viewed": "Calendly Profile Page Viewed",
"calendly.event_type_viewed": "Calendly Event Type Viewed",
"calendly.date_and_time_selected": "Calendly Date and Time Selected",
"calendly.event_scheduled": "Calendly Event Scheduled",
};
window.addEventListener("message", function (event) {
if (isCalendlyEvent(event) && window.ko) {
const eventName = eventNames[event.data.event] || event.data.event;
if (eventName) {
window.ko.track(eventName, event.data.payload);
}
}
});
</script>
```
This will start capturing all events bubbled from the Calendly widget in Koala, prefixed with the name "Calendly" (e.g. "Calendly Event Scheduled" or "Calendly Date and Time Selected").
<Note>
Calendly does not currently support passing any details about the booking to the parent window where Koala is installed, other than the event that a booking happened.
</Note>
# Census
Source: https://getkoala.com/docs/integrations/census
Koala partners with Census to pull product consumption data and other critical warehouse data into Koala.
You can use Census's <a href="https://docs.getcensus.com/destinations/available-destinations/http-request">HTTP Request API</a> to send any warehouse data as Account Traits or Visitor Traits. Common use-cases include:
* Sending product consumption at account or visitor level
* Sending plan type
* Sending custom ML models (eg., churn prediction, LTV, etc.)
Contact [support@getkoala.com](mailto:support@getkoala.com) and we'll work directly with your Census account team to get this set up.
# Clay
Source: https://getkoala.com/docs/integrations/clay
Send data to Clay via webhooks from Koala's Actions and Auto Outbound frameworks
## Overview
Koala integrates with Clay through webhooks, allowing you to send data from both the Actions framework and Auto Outbound campaigns. This integration enables you to:
* Enrich your Clay tables with intent signals and visitor data
* Trigger enrichment workflows in Clay
* Trigger signal-based plays to be run in Clay
## Integration Methods
### 1. Actions Framework
You can use Koala's Actions framework to send data to Clay via webhook when intent signals happen.
This is the simplest way to integrate.
For detailed setup instructions, see our [Actions](/automations/actions) guide. Actions should be configured to use the "Webhook" destination.
### 2. Auto Outbound
Clay can be used as a destination for Auto Outbound campaigns, allowing you to:
* Leverage Koala to do AI Research, ICP filtering, and Auto Prospecting
* Send qualified prospects to a Clay table for further workflow
For detailed setup instructions, see our [Auto Outbound with Clay](/automations/auto-outbound/clay) guide.
## Setup Instructions
### Via Actions or Auto Outbound
1. Create a new table in Clay using "Import Data from Webhook"
2. Copy the Webhook URL from Clay
3. Paste the URL into your Koala webhook configuration (either Actions or Auto Outbound)
4. Test the integration using the preview panel
## Data Structure
The webhook payload sent to Clay includes all of the data you see in Koala, including:
* Intent Signal
* Details about which intent signal triggered the webhook
* Account context
* Intent summary
* Firmographic enrichment
* Account details from CRM
* Visitor context
* Email
* Name
* Title
* Contact details from CRM
As you set up the webhook, Koala gives you a way to preview the exact payload using historical production data.
# Clearbit
Source: https://getkoala.com/docs/integrations/clearbit
Koala partners with Clearbit to power IP to company intelligence using Clearbit Reveal, and person/company enrichment via Clearbit Enrich.
If you are already a Clearbit customer, you can simply connect Koala to your
Clearbit account using your Clearbit API key.
If you don't yet use Clearbit, you can provision a Clearbit key through Koala
that includes up to 10,000 Reveal calls per month and 250 Enrich calls per
month, with pay-as-you-go plans if you need more.
Manage your Clearbit integration from the
[Clearbit settings page](https://app.getkoala.com/goto/apps/clearbit).
# Discord
Source: https://getkoala.com/docs/integrations/discord
Track activity in your Discord communities.
The Koala App for Discord helps you track engagement signals in your Discord servers.
## Connecting your Discord Server
1. Go to the [Discord app page](https://app.getkoala.com/goto/apps/discord) in Koala.
2. Click **Connect Discord**.
3. Select the server you want to track.
### Verifying Membership
Discord does not disclose any information about server membership, other than the person's username and avatar.
The Koala app allows you to collect personal information from your members, such as email addresses, by asking them to verify their membership.
You can enable this feature by toggling the **Verify Membership** switch in the app settings.
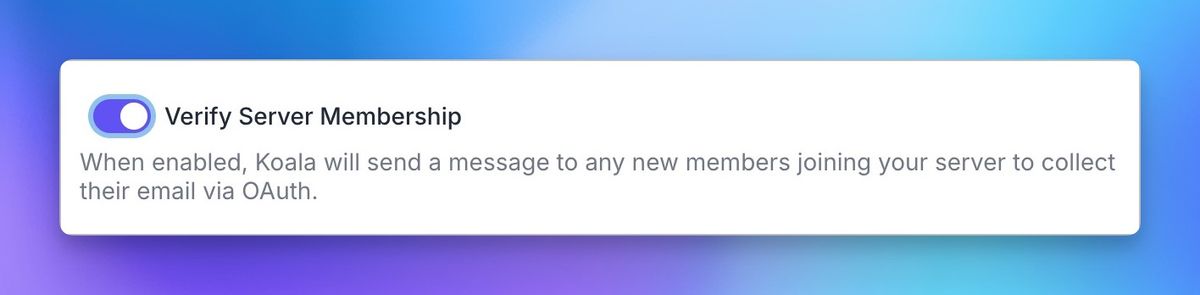
The Koala bot will send a verification message to new members of the server.
Once a member clicks the link and verifies their account, their email address will be sent to Koala.

## Using Discord data in the Koala App
You can use Discord data in the Koala app to create lists, alerts, and more.
A new `Sources` filter will appear in the top left of your lists, allowing you to filter by Discord.
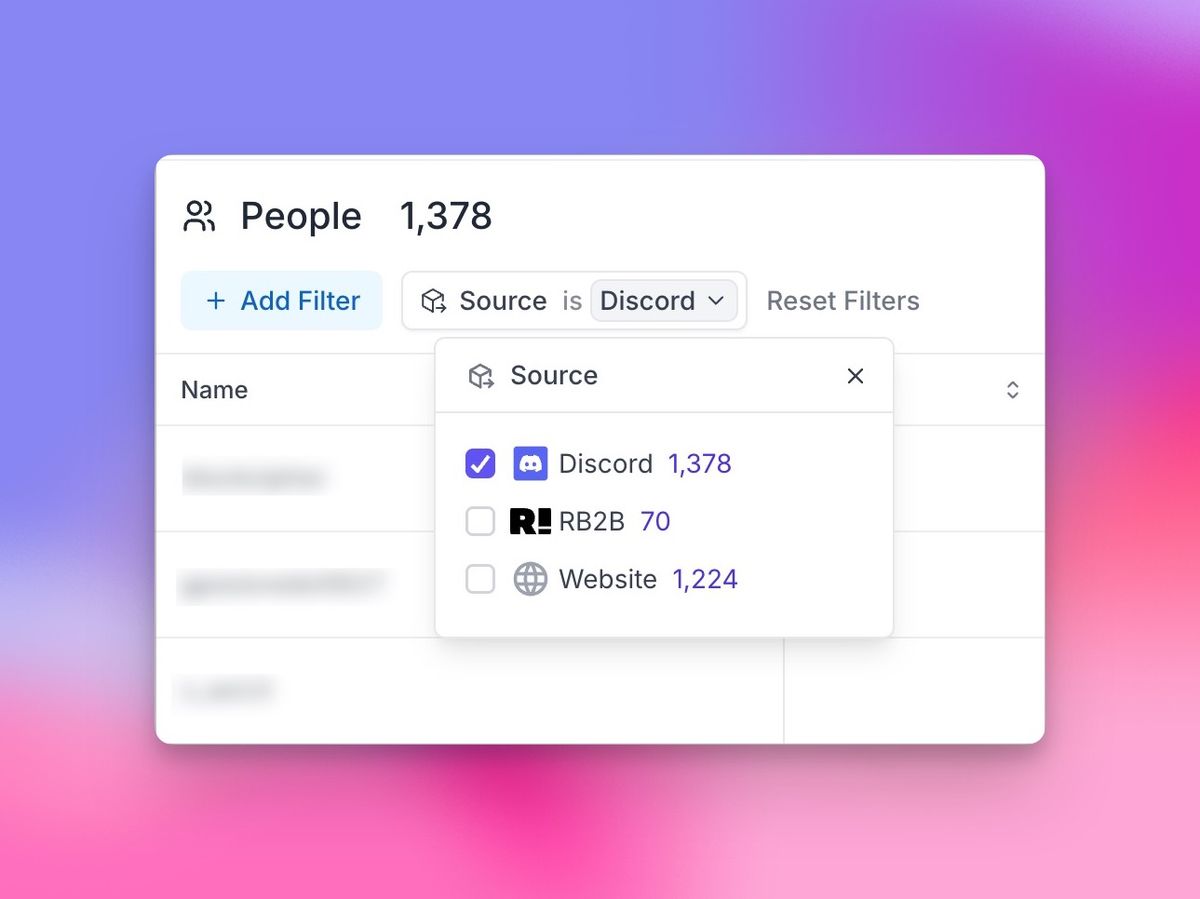
# Discourse
Source: https://getkoala.com/docs/integrations/discourse
Track participants engaging with your Discourse community.
<Note>
The Discourse integration is currently in early access.
Please reach out to [support@koala.com](mailto:support@koala.com) if you'd like to get access to the integration.
</Note>
# Drift
Source: https://getkoala.com/docs/integrations/drift
Capture events and identify users from Drift chat widget.
## Overview
[Drift](https://drift.com?ref=koala) is a conversational marketing platform that helps you connect with customers in real-time through chat.
## Automatic Setup
1. [Install the Koala snippet](/get-started/quick-start) on your site where Drift is installed.
2. Koala will automatically detect and capture events from Drift including:
* Drift Email Captured
* Drift Phone Captured
* Drift Conversation Started
* Drift Meeting Booked
Koala will also automatically identify users from Drift conversations.
## Turning off autotracking for Drift
If you don't want all Drift events captured, or need to control when it's turned on, you can disable autotracking for Drift in the [Koala settings](https://app.getkoala.com/goto/settings/install).
# FullStory
Source: https://getkoala.com/docs/integrations/fullstory
Link Koala events with FullStory session recordings.
## Overview
[FullStory](https://fullstory.com?ref=koala) is a digital experience analytics platform that helps you understand user behavior through session replay and analytics.
## Automatic Setup
1. [Install the Koala snippet](/get-started/quick-start) on your site where FullStory is installed.
2. Koala will automatically detect and link with FullStory sessions, allowing you to:
* Link to session replays directly from Koala
* Track rage clicks
## Turning off autotracking for FullStory
If you don't want FullStory integration enabled, or need to control when it's turned on, you can disable autotracking for FullStory in the [Koala settings](https://app.getkoala.com/goto/settings/install).
# G2
Source: https://getkoala.com/docs/integrations/g2
Connect G2 to sync buyer intent data into Koala
# Important Details
* In order to use the G2 integration, you must have G2's [Buyer Intent Subscription](https://sell.g2.com/g2-buyer-intent-data).
* You must currently be on the business-tier of Koala — if you're interested in exploring, [book time with us](https://calendly.com/nick-koala/koala-intro) to learn more.
# Syncing from G2
Upon connecting your G2 account to Koala, we will start to sync the buyer intent and page views from G2 into Koala and transform them into events.
# Intent Signals
Create intent signals from G2 events by accessing the [Intent Signals settings](https://app.getkoala.com/goto/signals) page.
* Click on the upper right corner on `New Intent Signal`.
* Select the type of signal as `G2`.
* Configure the event matching rules.
* Give a name to your signal.
And you are good to go. You can use the signal for any notification, automation, or filter on Koala.
# Koala & G2 - Keywords and Event Mappings
Koala matches the [G2 Signal Types](https://documentation.g2.com/docs/buyer-intent) and translates them into events on our side. Here is the mapping:
| G2 Keywords | Koala Events | Description |
| ----------------------- | ---------------------------------- | ---------------------------------------------------------------------- |
| `*comparisons*` | Viewed a comparison | The user compared you with one of your competitors |
| `*categories*` | Viewed a category | The user viewed a category page |
| `*competitor*` | Featured as competitor alternative | Your product has been listed as alternative as one of your competitors |
| `*ad.sponsored*` | Listed as sponsored product | The user viewed a sponsored ad of your product |
| `*products.discss*` | Viewed discussions page | The user viewed a discussions page of your product |
| `*product_reference*` | Viewed product reference | The user viewed a product reference page |
| `products.features` | Viewed features page | The user viewed a features page of your product |
| `products.pricing` | Viewed pricing page | The user viewed a pricing page of your product |
| `products.reviews` | Viewed reviewes page | The user viewed a review page of your product |
| `reviewers.take_survey` | Survey taken | Someone took a survey about your product |
# GitBook
Source: https://getkoala.com/docs/integrations/gitbook
Capture intent signals coming from your GitBook technical docs.
## Installation
### Step 1
Find your Public API Key here: [https://app.getkoala.com/goto/settings/install](https://app.getkoala.com/goto/settings/install)
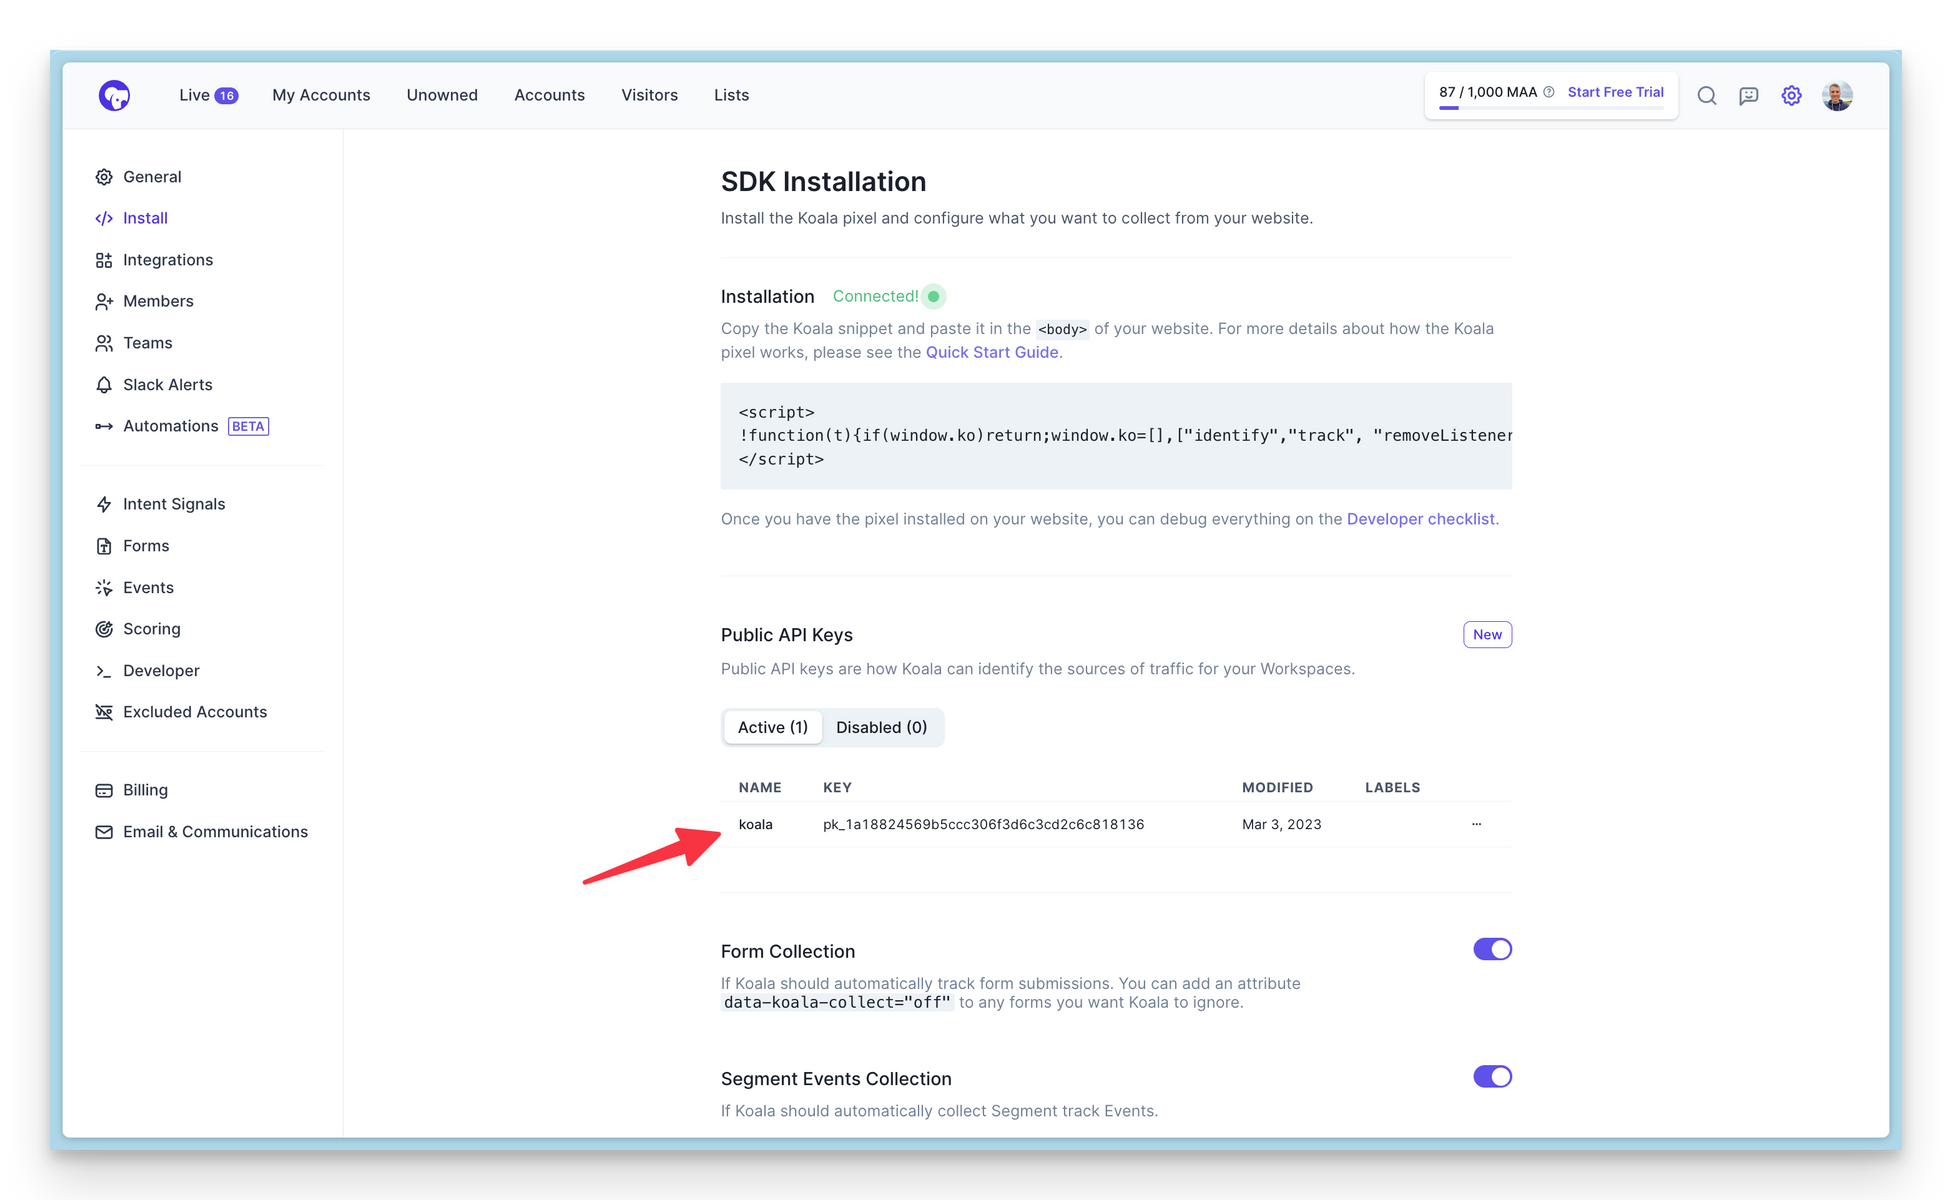
### Step 2
Install the Koala integration in GitBook:
```
https://app.gitbook.com/o/<organizationID>/integrations/koala
```
Go to the configuration page, paste in your Koala key, and hit save.
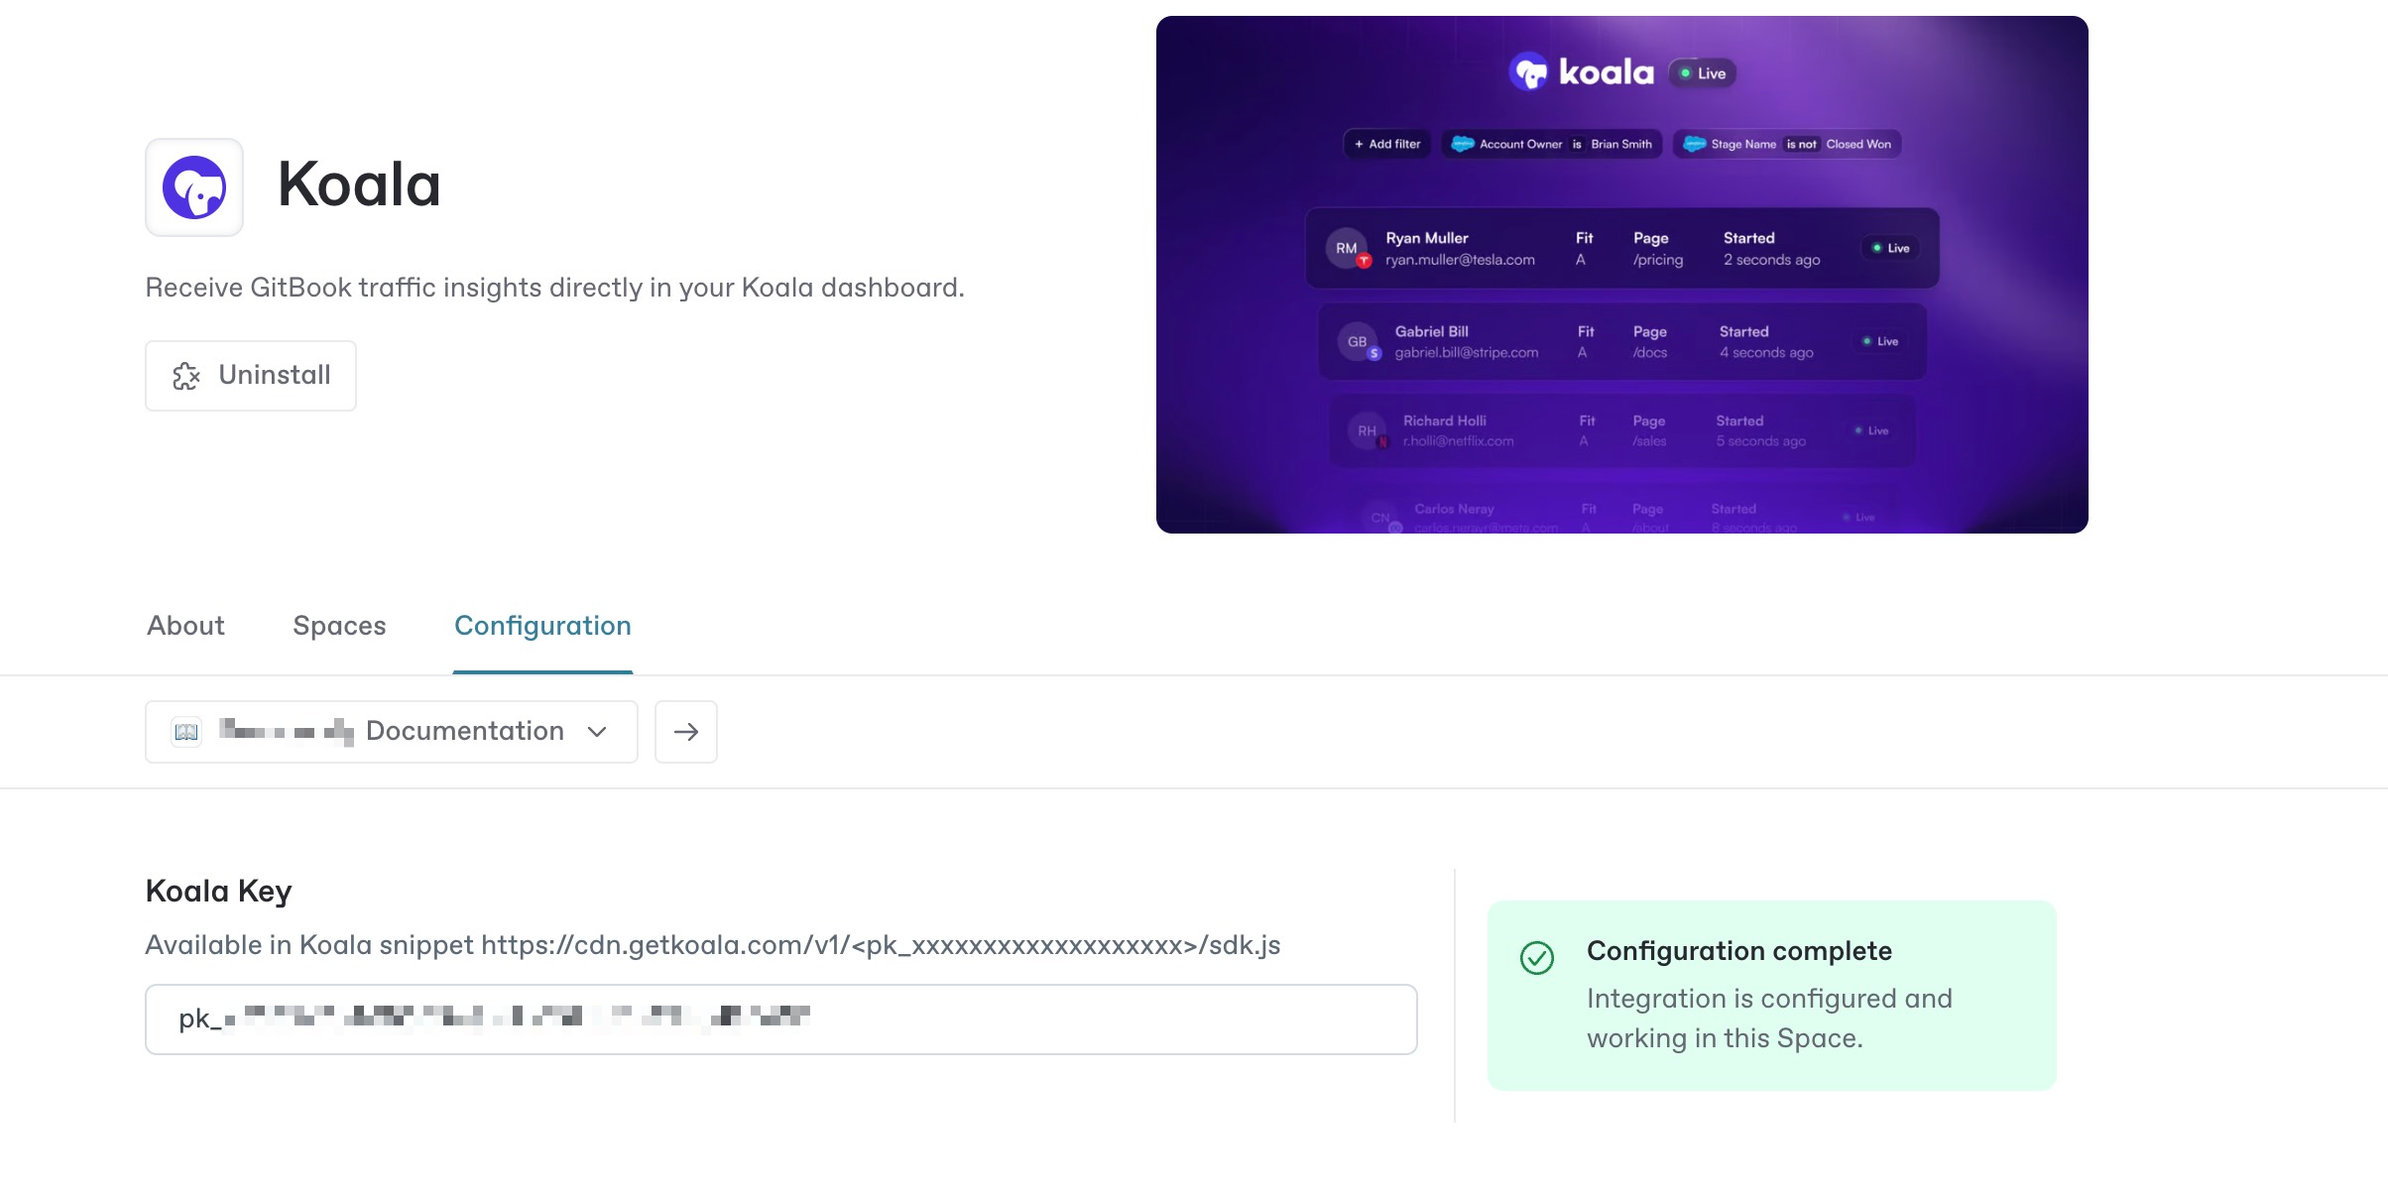
# GitHub
Source: https://getkoala.com/docs/integrations/github
Capture signals from people interacting with any public GitHub repo.
## Connecting your GitHub account
Connect your GitHub account to pull in issues and pull requests from your watched repositories.
1. Go to the [GitHub app page](https://app.getkoala.com/goto/apps/github) in Koala.
2. Click **Connect GitHub**.
3. Select the "Profile Identity Tracking" option that best suits your use case.
* Strict: only track users that can be associated with an email address, or a company.
* Track everyone: track all users, even if they can't be associated with an email address or company.
3. Add any number of repositories to watch.
* Add repositories by entering the full URL, or by searching for the repository name.
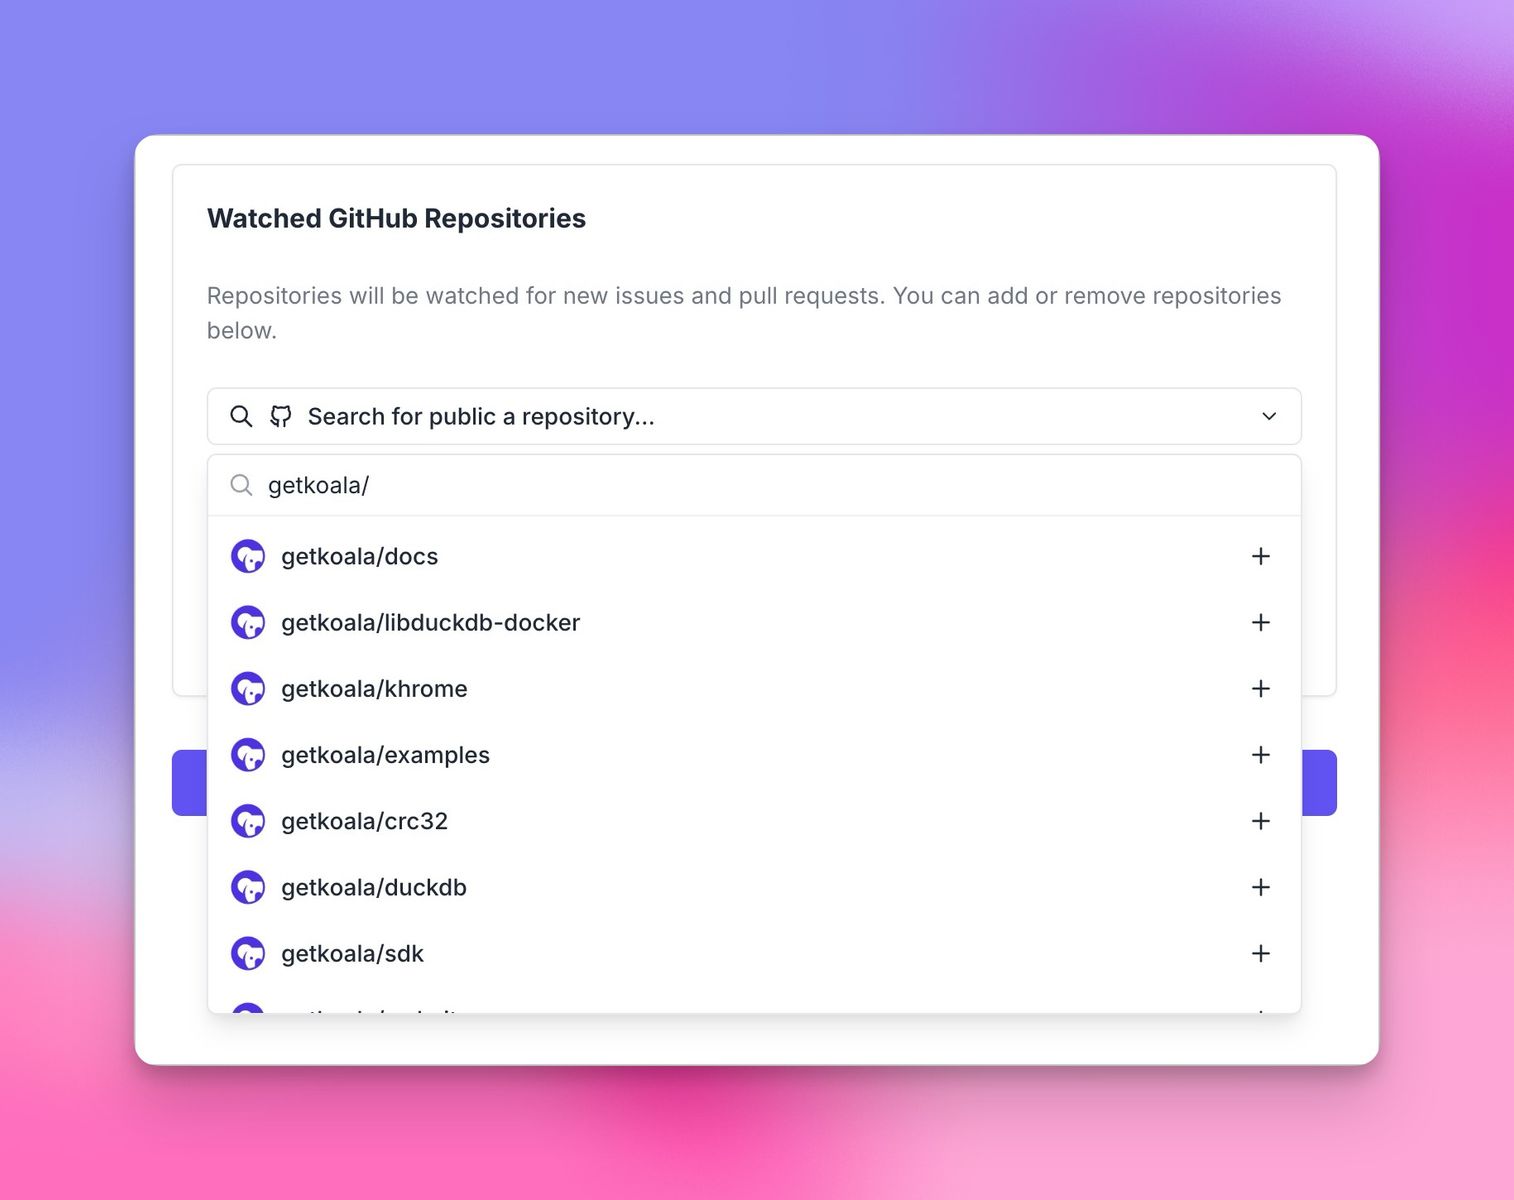
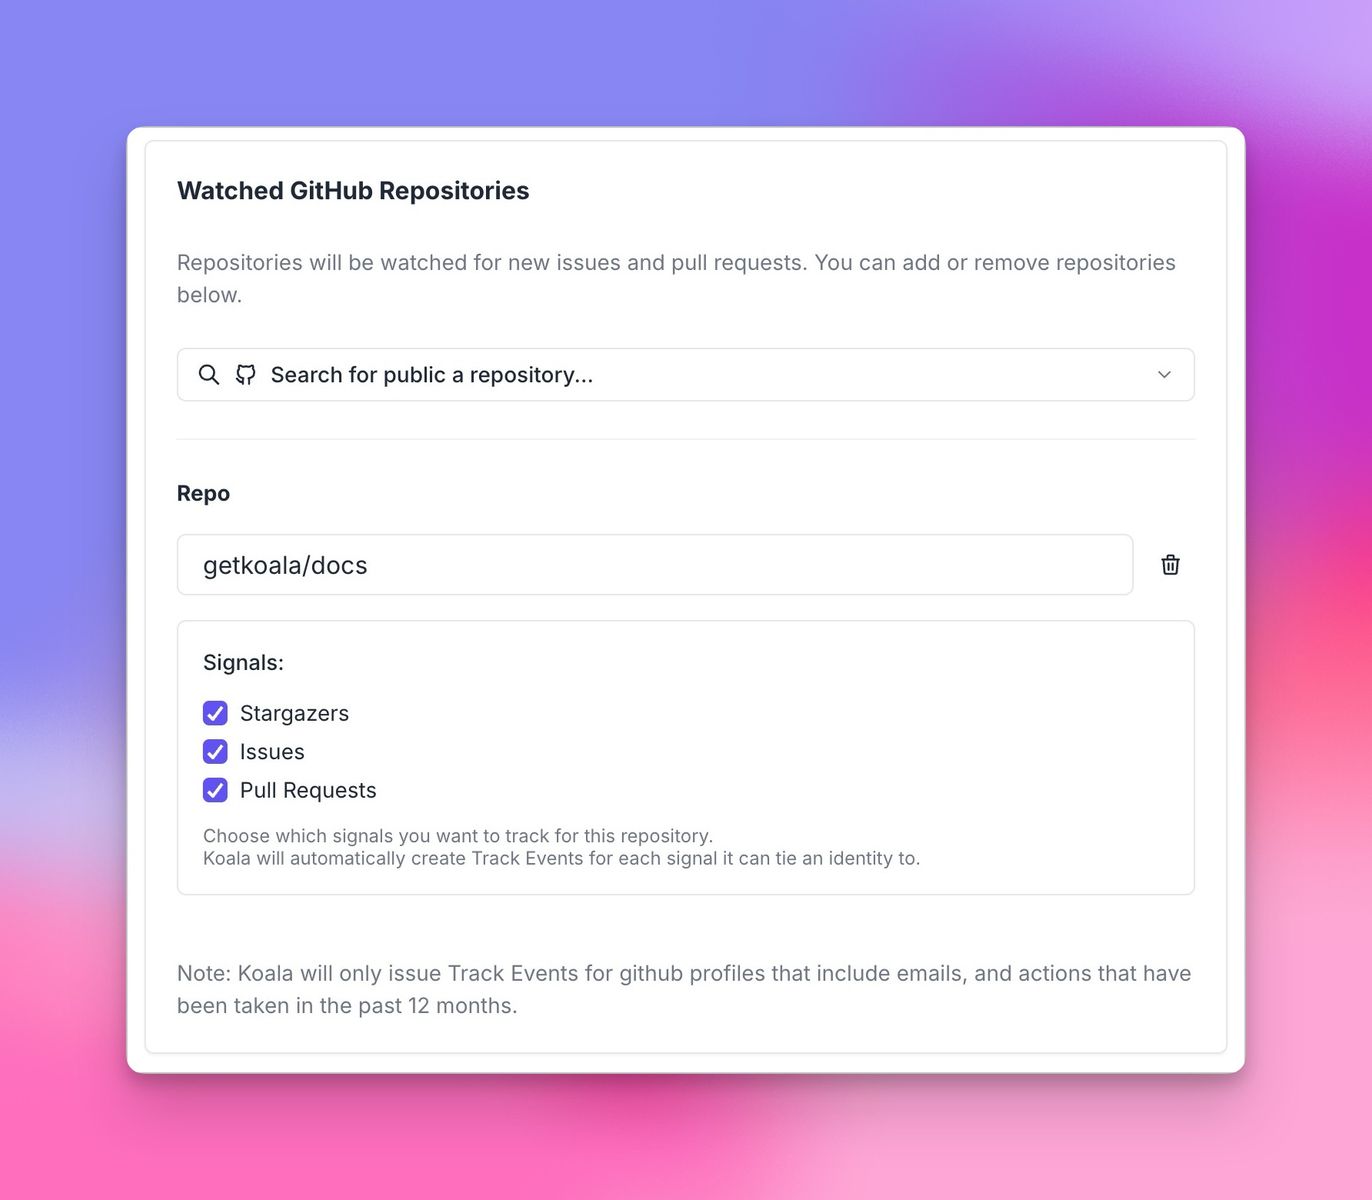
## Best practices
Here are some tips to get started:
* Start by mapping out all the repositories your company owns that are most relevant. That can give you insight from a bottoms up perspective from how a company is starting to research your product. We do a historical sync here up to 12mo, so it can also give you visibility into who's a few months into the research journey. Which we're finding to be a pretty effective play.
* Map out other OSS projects in your space that are complementary or related to your product.
* Track your competitor's repos to understand what else is being considered.
## Using GitHub data in the Koala App
You can use GitHub data in the Koala app to create lists, alerts, and more.
A new `Sources` filter will appear in the top left of your lists, allowing you to filter by GitHub.
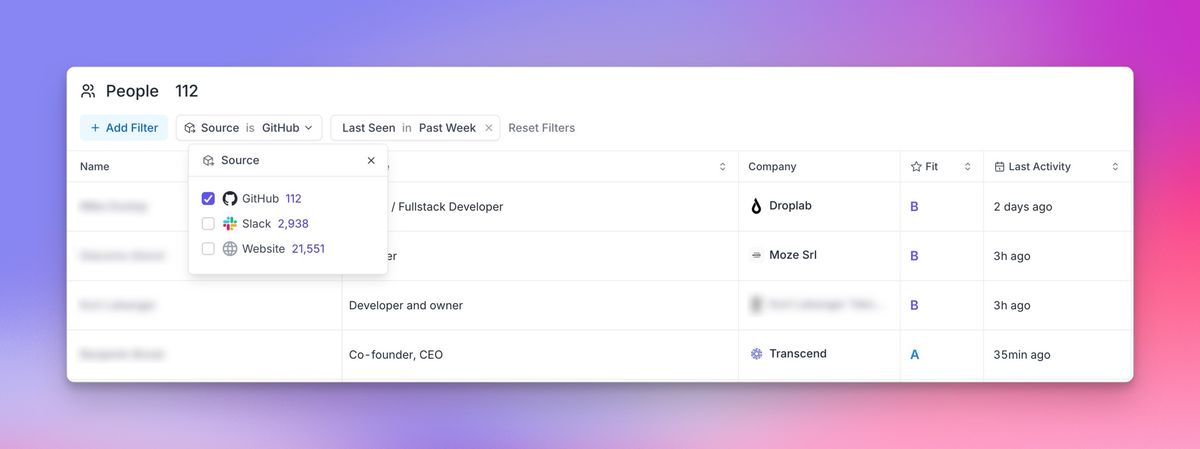
A new `GitHub` section will appear in your filters menu, allowing you to view and filter GitHub data.
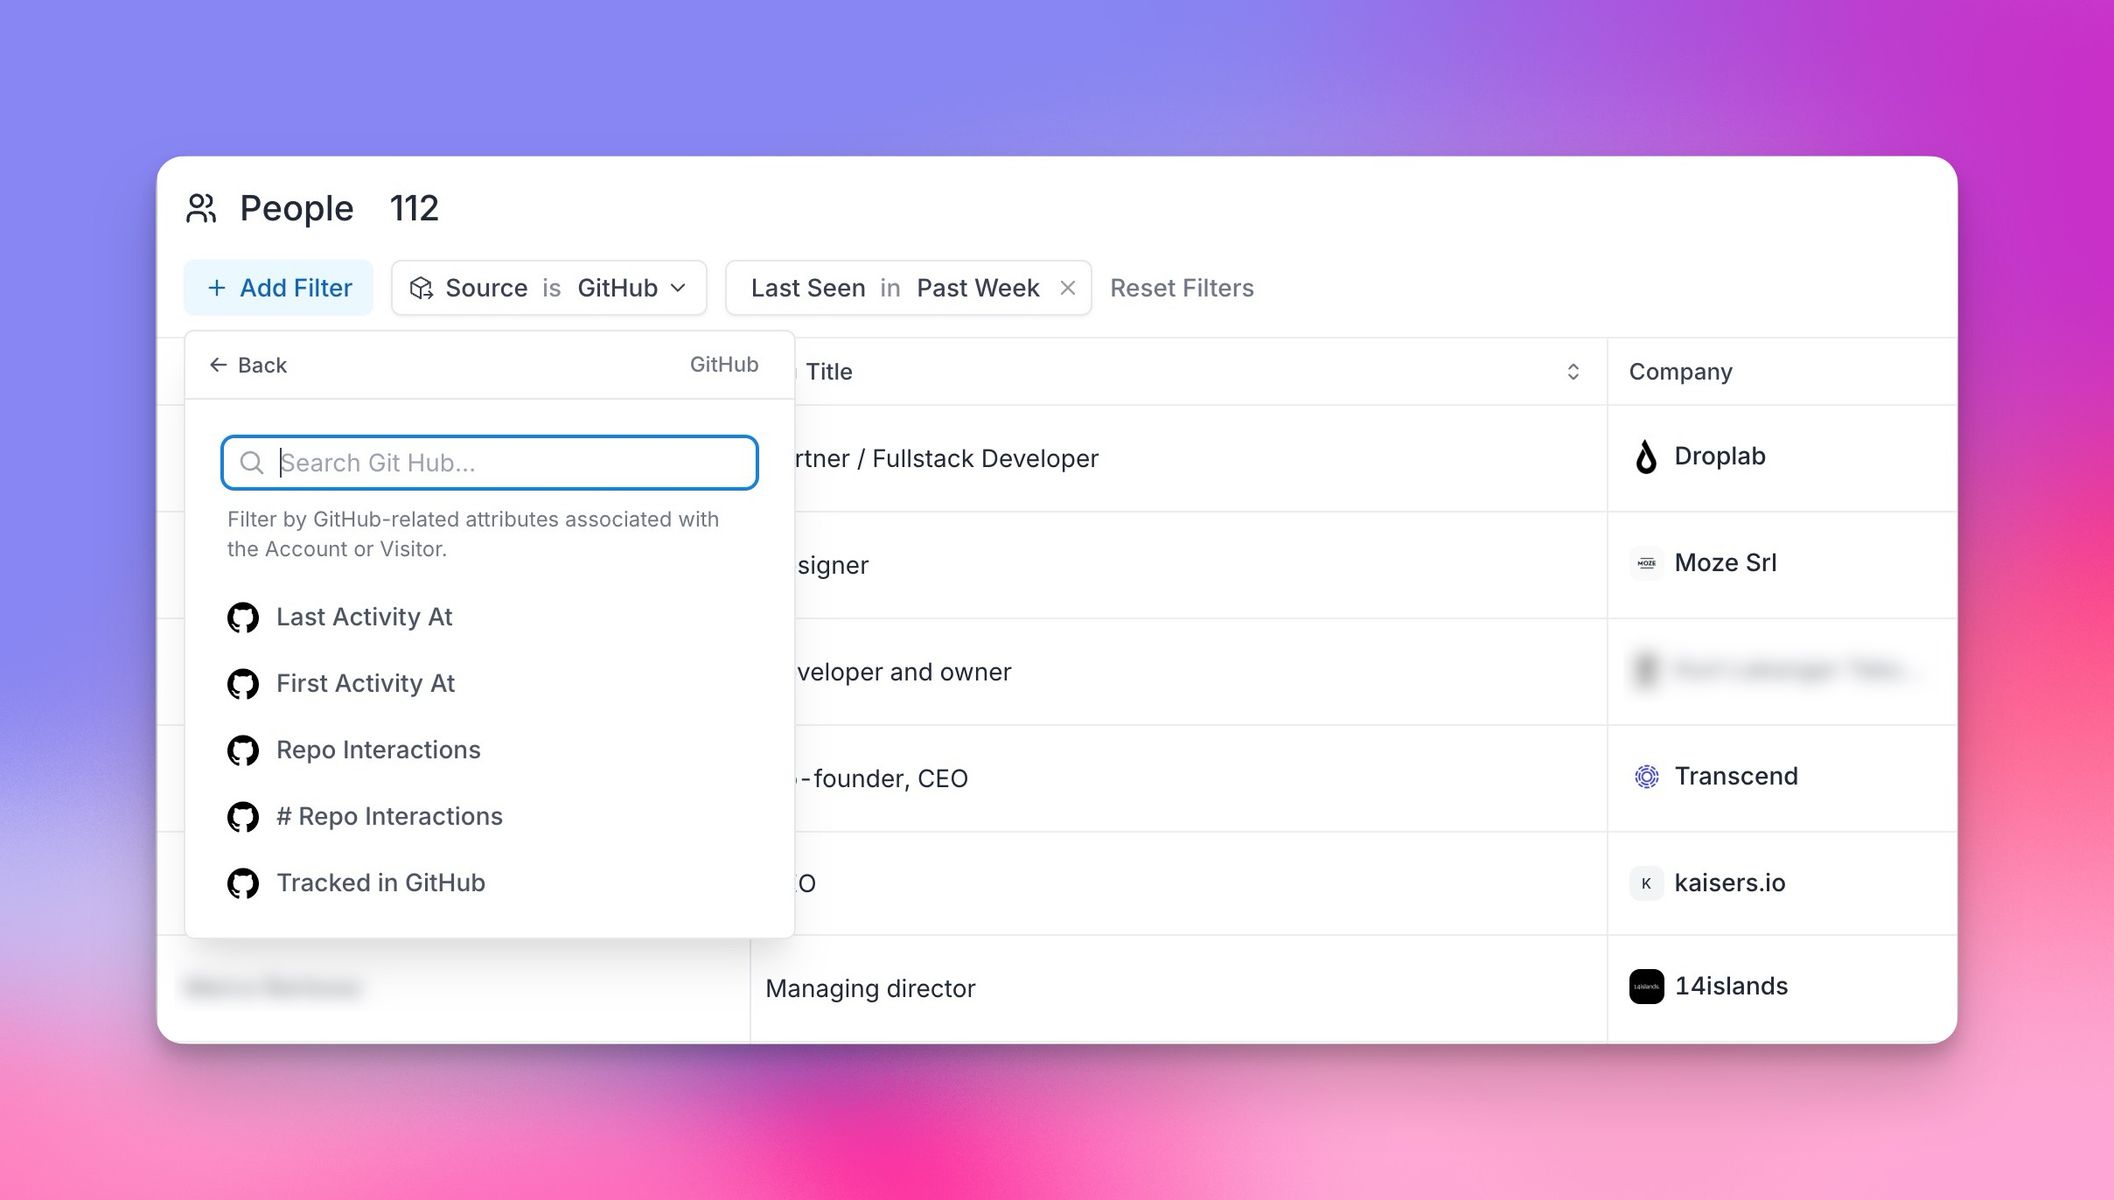
# Google Tag Manager
Source: https://getkoala.com/docs/integrations/google-tag-manager
<Note>
While Koala can be added to your website with Google Tag Manager (GTM), you
may want to directly [embed the JavaScript snippet](/get-started/quick-start)
because GTM is commonly disabled by ad blockers.
</Note>
Google Tag Manager (GTM) is a simple solution for managing tags and JavaScript
snippets that send data to third parties (like Koala) from your website or app.
You can easily add, remove and manage snippets without requiring a developer to
update code.
### Step 1: Navigate to the “Tags” section of your GTM account, and click “New” to create a new tag:
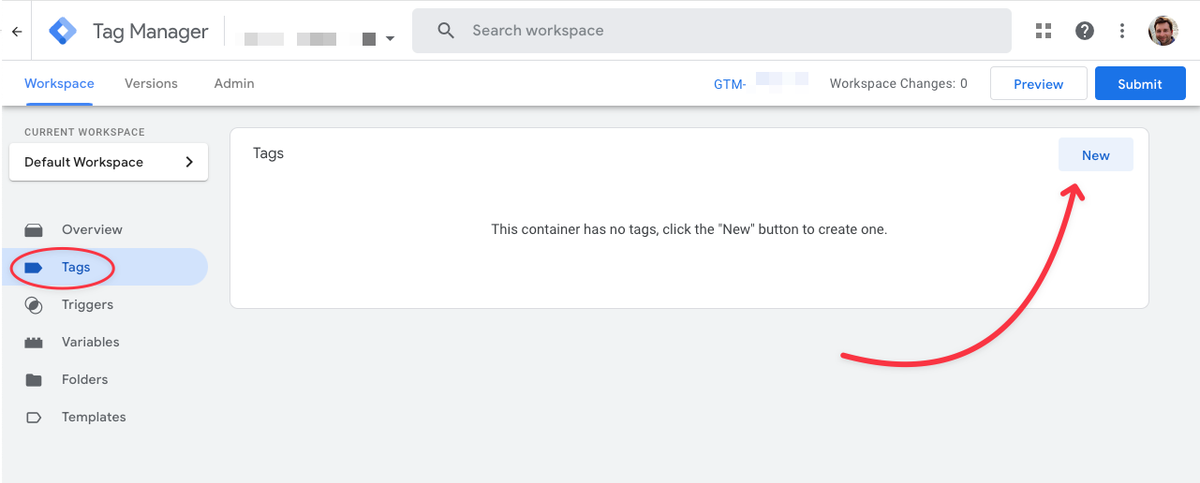
### Step 2: Give your tag a name, like “Koala”, then edit the Tag configuration:
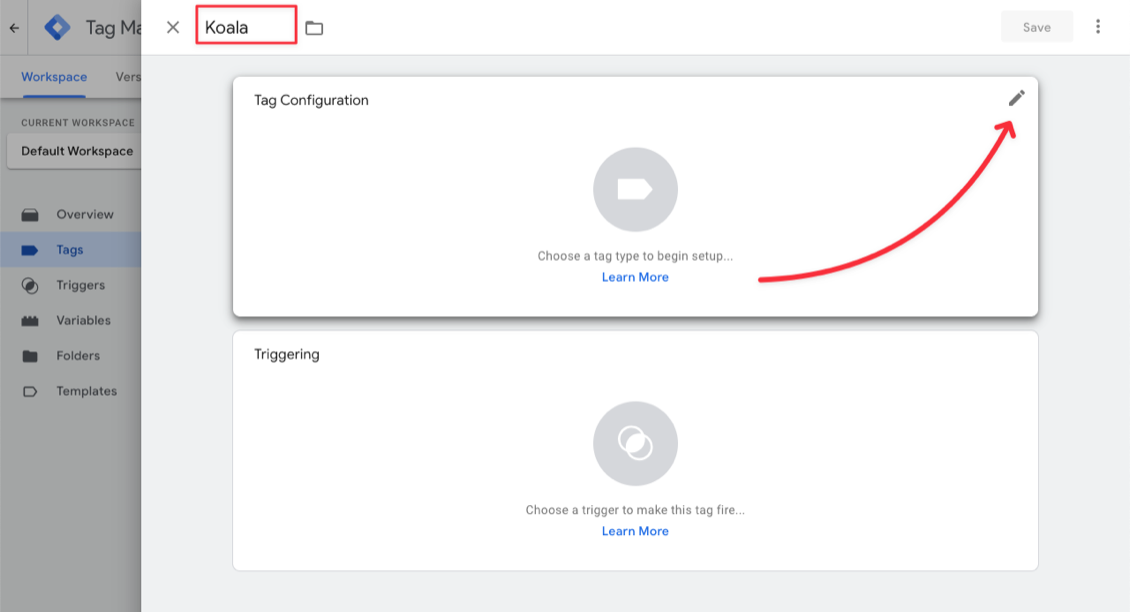
Next, search for “HTML” and select “Custom HTML” as the tag type:
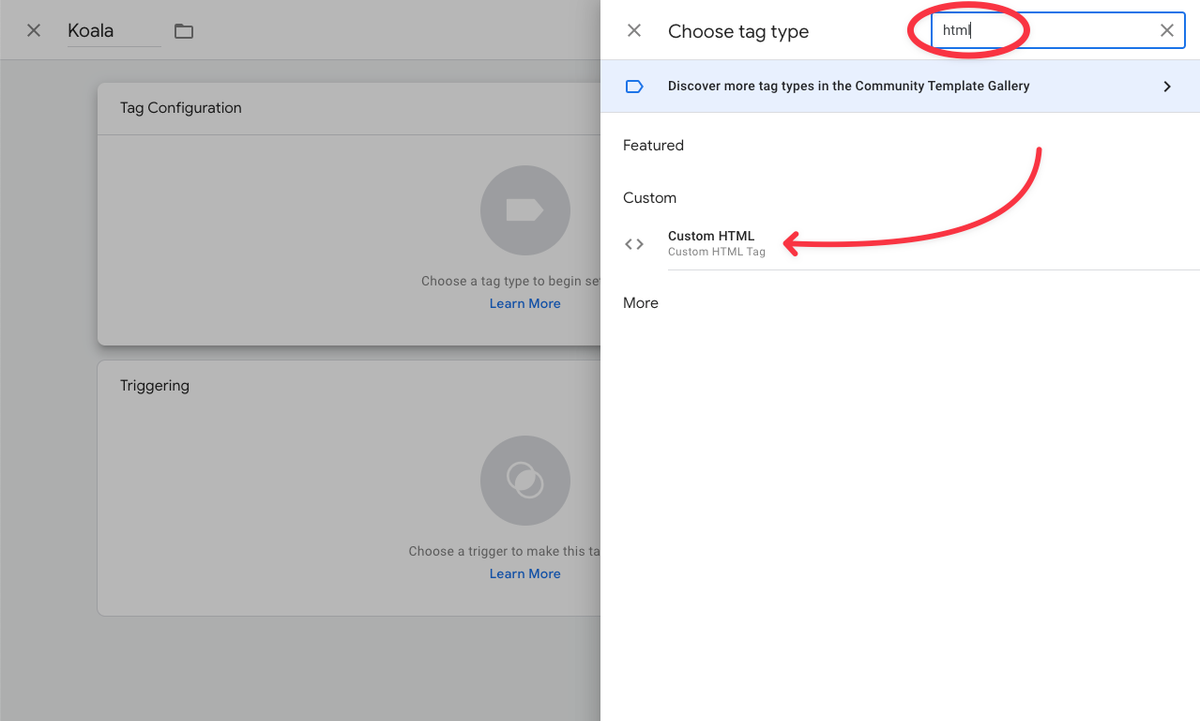
### Step 4: Click in the “HTML” text box and paste the script tag from your project settings in Koala:
You can read instructions on where to find your project's snippet in the quick
start guide.
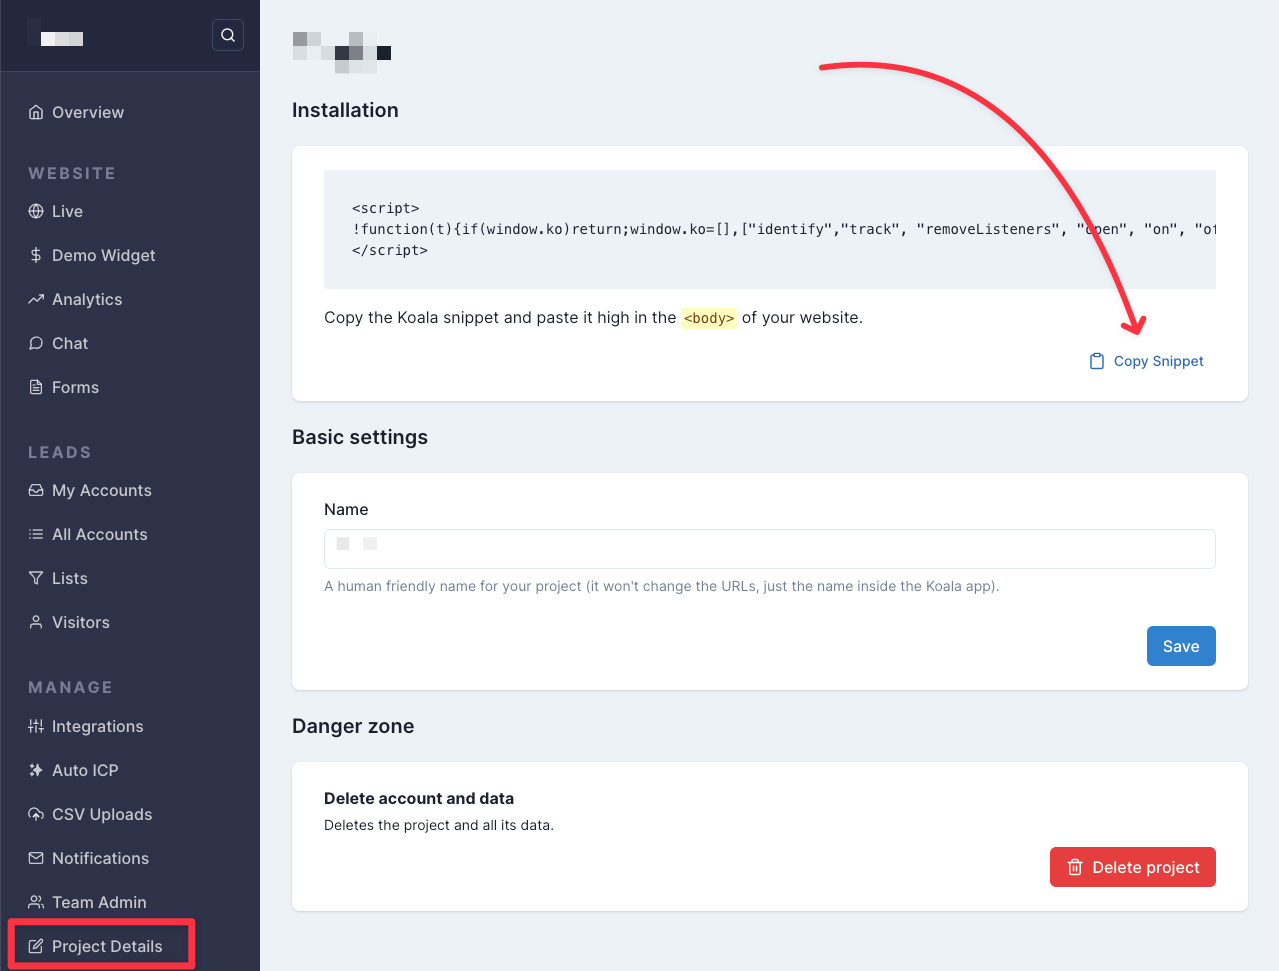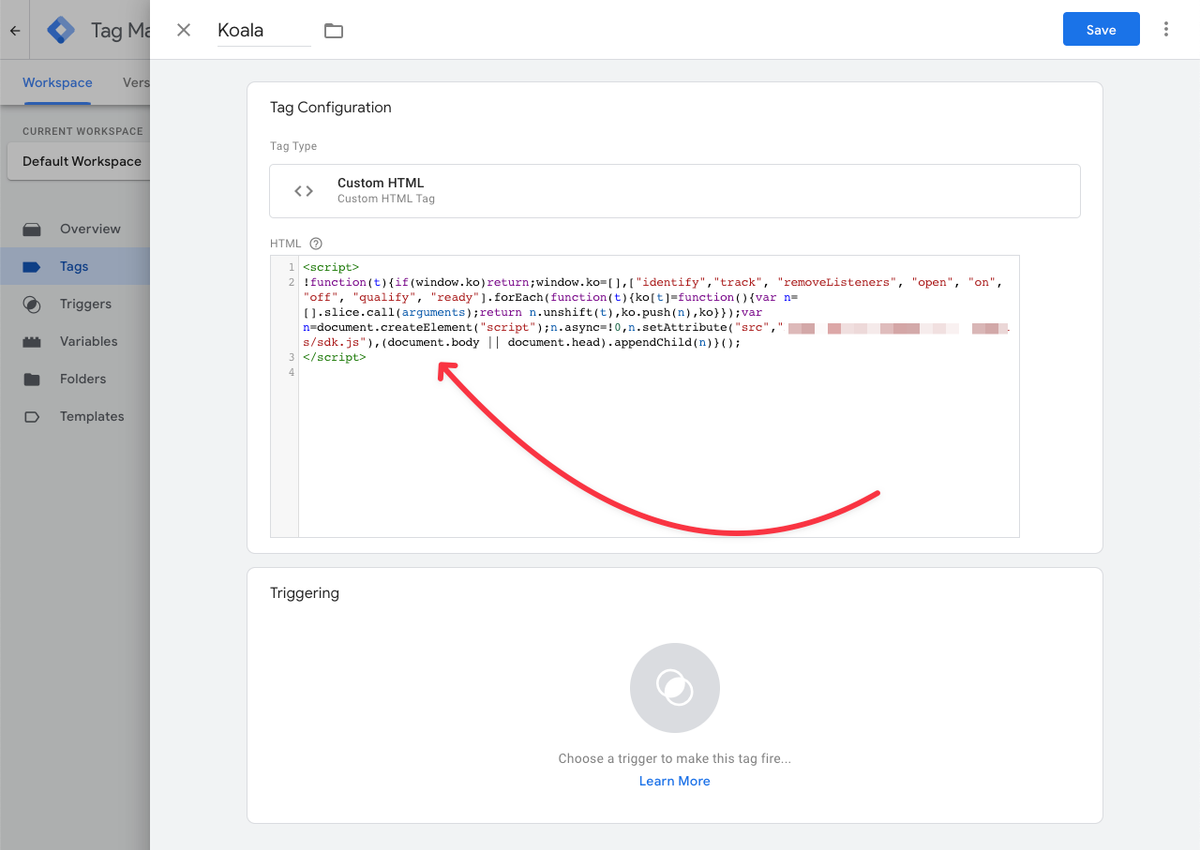
### Step 5: Now add a trigger for “All Pages: Page View”:
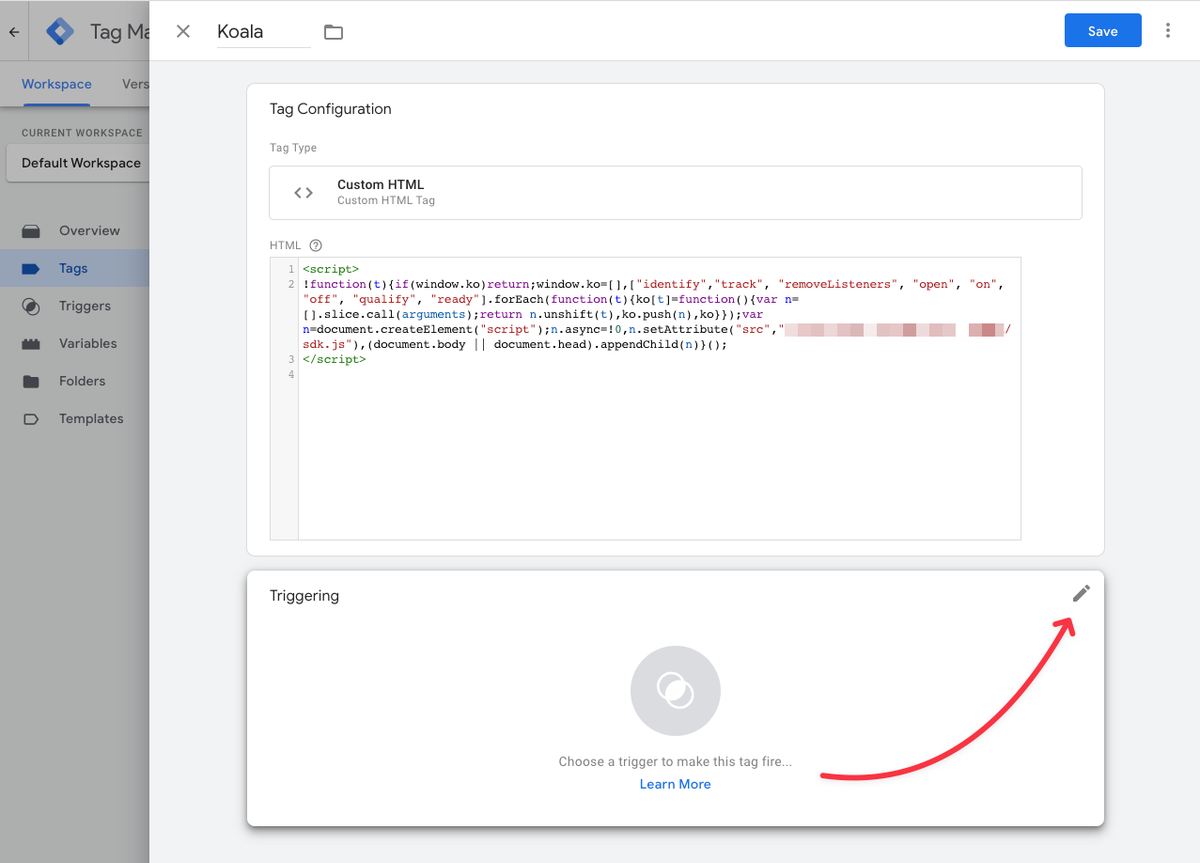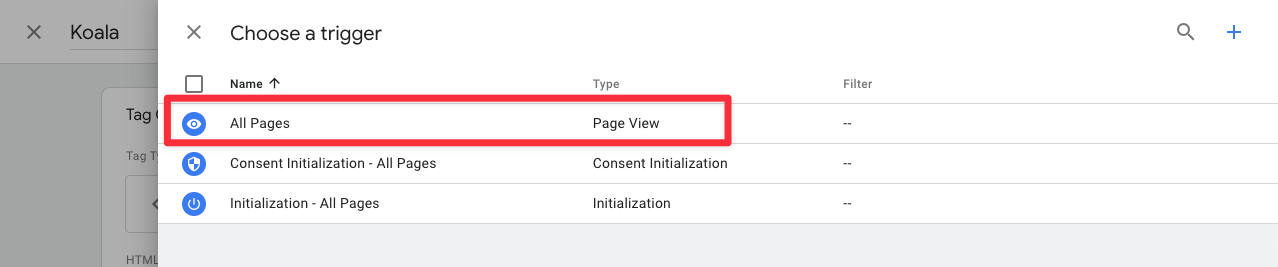
### Step 6: Next, click “Save” and Publish your changes:
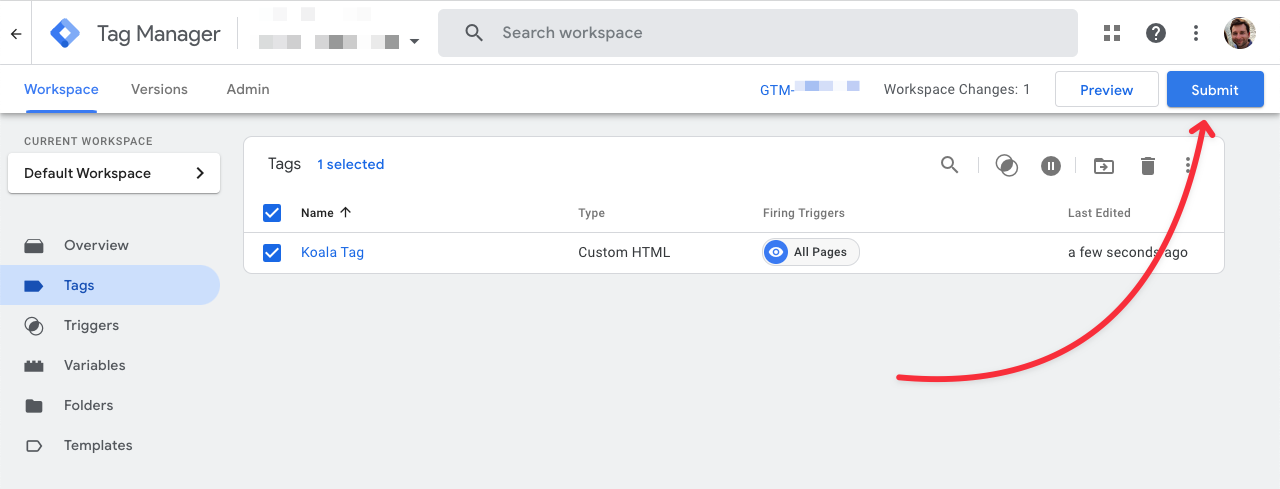
### Step 7: Identify Users (Optional, but recommended!)
Now you can [identify users](/sdk/identify).
# Hightouch
Source: https://getkoala.com/docs/integrations/hightouch
Koala partners with Hightouch to pull product consumption data and other critical warehouse data into Koala.
You can use Hightouch's HTTP Request destination to send any warehouse data as Account Traits or Visitor Traits. Common use-cases include:
* Sending product consumption at account or visitor level
* Sending plan type
* Sending custom ML models (eg., churn prediction, LTV, etc.)
Self-service docs are available <a href="https://docs.google.com/document/d/1O-m3sShBivXEpuVwqEKvHiC-dGGkKnbGhOzrSl2FwO4/edit#heading=h.1mp89oem2vcf">here</a>.
If you need help, don't hesitate to contact [support@getkoala.com](mailto:support@getkoala.com).
# HubSpot
Source: https://getkoala.com/docs/integrations/hubspot
Connect HubSpot's CRM to see HubSpot Companies, Deals, and Contacts in Koala. Optionally, write intent signals back to HubSpot.
## Installation
You must have an active Koala account [Koala](https://app.getkoala.com)
before proceeding. If you don't have a Koala account,
[sign up for free](https://app.getkoala.com/signup).
## Reading from HubSpot
Upon connecting Koala to HubSpot's CRM, Koala will sync all Companies, Deals, and Contacts. Koala will automatically refresh HubSpot CRM data every hour, so we always have fresh data about who owns which Companies and which Companies have active Deals attached. [Account Scores](#account-score-sync-into-hubspot-business-plan) are synced into the CRM nightly when enabled.
## Importing to HubSpot
There are three actions you can take from Koala to manually write data to HubSpot's CRM:
1. Import Companies
2. Import Contacts
3. Claim Account (rewrite the Company owner to be the current Koala user)
These actions can be enabled/disabled by a Koala admin if you don't wish to enable writing to HubSpot.
## Automating actions into HubSpot (Business Plan)
Every time an intent signal happens for a qualifying list that you specify, there are five actions Koala can automate in HubSpot:
1. **Import Company.** Import an Account as a Company in HubSpot if it doesn't already exist. Supports custom field mappings.
2. **Import Contact.** Import a Visitor as a Contact in HubSpot if it doesn't already exist. (Supports custom field mappings.)
3. **Adding to a Contact List.** Adds a Contact to a Contact List.
4. **Create Task.** Assign a task to a specific person. (Supports custom subjects, types, priority, due date, and task owner.)
5. **Add Timeline Entry.** Create a Timeline Entry for the current Visitor or Account.
## Account Score Sync into HubSpot (available on Koala's Business Plan)
Koala can send a snapshot of Account Scores that includes `Intent Score`, `Intent Strength`, `Intent Trend`, `ICP Score` and `ICP Grade` into your CRM .
This feature can be enabled in the settings page and each night around 10pm PST will send the scores that changed during the day.
The settings page provides the setup instructions to follow to have everything setup and mapped.
The fields can be automatically added to a Koala Managed Scores property group during the setup or they can be manually added following these definitions:
### Koala Scores Fields Definitions
| **Field Label** | **Field Name** | **Type (Field Type)** | **Details** |
| --------------------- | ----------------------- | --------------------- | --------------------------------------------- |
| Koala Intent Score | koala\_intent\_score | number (number) | |
| Koala Intent Strength | koala\_intent\_strength | enumeration (select) | Very High, High, Medium, Low, None |
| Koala Intent Trend | koala\_intent\_trend | enumeration (select) | Surging, Heating, Neutral, Cooling, New, None |
| Koala ICP Fit Score | koala\_icp\_fit\_score | number (number) | |
| Koala ICP Fit Grade | koala\_icp\_fit\_grade | enumeration (select) | A, B, C, D, -- |
If you want to use existing fields that are compatible, you can use the custom mapping in the settings to map each Koala Score field to your CRM field.
The integration sends scores to the CRM in groups of `~100_000` records, so you can see more than one entry per day in the `Import` page if there are more than that amount of scores to send.
The sync happens in two modes: `full` and `delta` (incremental) syncs. The `full` sync is executed the first time the feature is enabled and all subsequent syncs are `delta` syncs. The `delta` sync only sends scores that changed during the day against what is already in your CRM. This generally accounts to `6-10%` of the full amount of scores sent in a `full` sync.
You can access the `Import` page in the CRM (button in top right besides `Create Company`) to view the latest sync information.
## FAQ
### How do you match Koala accounts to HubSpot Companies?
For every account on your site, Koala has a list of a domain (eg., `dropbox.com`) and all associated domain aliases (eg., `getdropbox.com`, `dropbox.jp`, `dash.ai`, etc.). We will search your CRM for the primary domain and all aliases, trying to find matches to the Account object's `domain` field. If that isn't set, Koala will use `website` instead.
If Koala finds multiple Company objects matching a domain, we'll pick the Company in the following order:
1. Pick the Company with most Deals
2. Pick the Company with most Contacts
3. Pick the Company modified most recently
### How do you match Koala contacts to HubSpot Contacts?
Contacts will be matched when an example email match happens between the Contact object and the Koala profile email.
## Support
Having issues with the HubSpot integration? Email the Koala team with your
questions at [support@getkoala.com](mailto:support@getkoala.com)!
# HubSpot Meetings
Source: https://getkoala.com/docs/integrations/hubspot-meetings
Capture events from HubSpot Meetings scheduling.
## Overview
[HubSpot Meetings](https://www.hubspot.com/products/sales/schedule-meeting?ref=koala) is a meeting scheduler that makes it easy for prospects to book time with your team.
## Automatic Setup
1. [Install the Koala snippet](/get-started/quick-start) on your site where HubSpot Meetings is installed.
2. Koala will automatically detect and capture Meeting Booked events from HubSpot Meetings.
Koala will also automatically identify users when they book meetings.
## Turning off autotracking for HubSpot Meetings
If you don't want HubSpot Meetings events captured, or need to control when it's turned on, you can disable autotracking for HubSpot Meetings in the [Koala settings](https://app.getkoala.com/goto/settings/install).
# Intercom
Source: https://getkoala.com/docs/integrations/intercom
Identify users from Intercom messenger.
## Overview
[Intercom](https://intercom.com?ref=koala) is a customer messaging platform that helps you communicate with customers through chat, email, and more.
## Automatic Setup
1. [Install the Koala snippet](/get-started/quick-start) on your site where Intercom is installed.
2. Koala will automatically detect and identify visitors interacting with your Intercom messenger.
## Turning off autotracking for Intercom
If you don't want all Intercom identity captured, or need to control when it's turned on, you can disable autotracking for Intercom in the [Koala settings](https://app.getkoala.com/goto/settings/install).
# LinkedIn Chrome Extension
Source: https://getkoala.com/docs/integrations/linkedin-chrome-extension
Track people reacting and commenting on LinkedIn posts.
The Koala Chrome Extension makes it easy to track reactions and comments on any LinkedIn post.
1. Install the extension in your browser from the [Chrome Web Store](https://chromewebstore.google.com/detail/koala/ejgkoecoplficfiknpppeppjlendbnph)
2. Once installed, you'll see a Koala icon in the top right corner of your browser or in the extensions menu.
3. Clicking the icon while browsing LinkedIn will open the extension, prompting you to input a post URL to track.
4. The extension will automatically detect when you are on a LinkedIn post page to let you seamlessly track the people interacting with it.

5. Tracked posts can be synced to a list in Koala, allowing you to view all interactions on a post in one place.
* You can see the list of tracked posts on the [LinkedIn app page](https://app.getkoala.com/goto/apps/linkedin_xt) in Koala.
<Note>
Note: for the extension to work, you must be logged in to LinkedIn when you use it, and you must also be logged in to your Koala workspace.
</Note>
# Mintlify
Source: https://getkoala.com/docs/integrations/mintlify
Capture intent signals coming from your Mintlify technical docs.
## Installation
### Step 1
Find your Public API Key here: [https://app.getkoala.com/goto/settings/install](https://app.getkoala.com/goto/settings/install)

### Step 2
Add the following to your `mint.json` file:
```json
{
"navigation": [...],
"logo": [...],
[...],
[...],
[...],
"analytics": {
"koala": {
"publicApiKey": "pk_YOURKEYHERE"
}
}
}
```
# Navattic
Source: https://getkoala.com/docs/integrations/navattic
Capture events coming from Navattic interactive demos.
## Overview
[Navattic](https://www.navattic.com?ref=koala) is a tool to build interactive demos of your product.
## Automatic Setup
1. [Install the Koala snippet](/get-started/quick-start) on the site where you are embedding Navattic demos.
2. Koala will automatically detect and capture events from Navattic including:
* View Step
* Start Flow
* Complete Flow
* Start Checklist
* Open Checklist
* Close Checklist
* Identify User
* Converted
* Navigate
* Complete Task
Koala will also automatically identify users from Navattic forms and interactions.
## Turning off autotracking for Navattic
If you don't want all Navattic events captured, or need to control when it's turned on, you can disable autotracking for Navattic in the [Koala settings](https://app.getkoala.com/goto/settings/install).
## Manual Setup
With a small bit of code you can capture key events in Koala as visitors interact with your Navattic demos.
1. [Install the Koala snippet](/get-started/quick-start) on the site where you are also embedding a Navattic demo iframe with Embed Events installed.
2. Turn off the Navattic plugin in the [Koala settings](https://app.getkoala.com/goto/settings/install).
3. Anywhere *after* the Koala snippet, within the `<body>` tag of your html add this code snippet:
```html
<!-- On a page with a Navattic demo and Navattic embed events -->
<script>
var navattic_events = {
VIEW_STEP: "Step Viewed",
START_FLOW: "Flow Started",
COMPLETE_FLOW: "Flow Completed",
START_CHECKLIST: "Checklist Started",
OPEN_CHECKLIST: "Checklist Opened",
CLOSE_CHECKLIST: "Checklist Closed",
COMPLETE_TASK: "Task Completed",
CONVERTED: "User Converted",
NAVIGATE: "User Navigated",
IDENTIFY_USER: "User Identified",
ENGAGE: "User Engaged",
};
if (navattic && typeof navattic.onEvent === "function") {
navattic.onEvent(function (event) {
if (window.ko && event.type) {
window.ko.track(
"Navattic " + (navattic_events[event.type] || event.type),
event
);
}
});
}
</script>
```
This will send all Navattic events to Koala, prefixed with the name "Navattic" (e.g. "Navattic View Step" or "Navattic Navigated"). You can see the full list of events in their [docs](https://docs.navattic.com/embed-events#HlKP6).
If you only want to capture some of the events you can add a conditional check like this:
```html
<script>
// only the events you want to capture
var navattic_events = {
START_FLOW: "Flow Started",
COMPLETE_FLOW: "Flow Completed",
CONVERTED: "User Converted",
IDENTIFY_USER: "User Identified",
};
if (navattic && typeof navattic.onEvent === "function") {
navattic.onEvent(function (event) {
if (window.ko && event.type && navattic_events[event.type]) {
window.ko.track("Navattic " + navattic_events[event.type], event);
}
});
}
</script>
```
# Outreach
Source: https://getkoala.com/docs/integrations/outreach
Koala partners with Outreach to activate your high-intent leads in real-time.
## Overview
With the Outreach integration, you can configure the following to happen from Koala into Outreach:
* **Import Accounts**: Import a Koala Account into Outreach
* **Import Prospects**: Import visitors from Koala into Outreach as prospects
* **Claim Account**: Allows a user to claim an account in Outreach
* **View Account**: Go to an Account in Outreach
* **Create Task**: Create a task for an account
You can enable or disable each of these actions as needed for your workflow.
## Features
### Automated Actions into Outreach
You can automate any of the actions described above using Koala's Actions framework. This allows you to:
* Automatically import accounts or prospects into Outreach when intent signals are detected
* Trigger account claiming, viewing, or task creation based on real-time activity
* Build custom workflows that connect Koala's intent data to your Outreach sequences and tasks
For detailed setup instructions and more automation ideas, see our [Actions](/automations/actions) guide.
### Auto Outbound with Outreach
Koala's Auto Outbound feature can automatically send high-intent leads to Outreach sequences. This allows you to:
* Automatically add prospects to Outreach sequences when they show intent
* Configure different sequences based on intent signals
* Set up automated follow-ups based on prospect behavior
For detailed setup instructions, see our [Auto Outbound with Outreach](/automations/auto-outbound/outreach) guide.
### Email Recipient Identification
Koala can identify email recipients from Outreach, helping you:
* Track which prospects are receiving your emails
* Measure engagement with your outreach campaigns
* Connect email activity to intent signals
Learn more about [identifying email recipients from Outreach](/identity-layer/identify-email-recipients#outreach-io).
# PostHog
Source: https://getkoala.com/docs/integrations/posthog
Link Koala events with PostHog session recordings.
## Overview
[PostHog](https://posthog.com?ref=koala) offers session replay functionality that helps you understand user behavior by watching recordings of their sessions.
## Automatic Setup
1. [Install the Koala snippet](/get-started/quick-start) on your site where PostHog is installed.
2. Koala will automatically detect and link with PostHog sessions, allowing you to:
* Connect Koala events with PostHog recordings
* View session replays directly from Koala
* Sync user identification
## Turning off autotracking for PostHog
If you don't want PostHog integration enabled, or need to control when it's turned on, you can disable autotracking for PostHog in the [Koala settings](https://app.getkoala.com/goto/settings/install).
# Qualified
Source: https://getkoala.com/docs/integrations/qualified
Capture events from Qualified's conversational sales platform.
## Overview
[Qualified](https://qualified.com?ref=koala) is a conversational sales platform built for companies using Salesforce to connect with buyers in real-time.
## Automatic Setup
1. [Install the Koala snippet](/get-started/quick-start) on your site where Qualified is installed.
2. Koala will automatically detect and capture events from Qualified including:
* Conversations initiated
* Meetings booked
* User identification
## Turning off autotracking for Qualified
If you don't want all Qualified events captured, or need to control when it's turned on, you can disable autotracking for Qualified in the [Koala settings](https://app.getkoala.com/goto/settings/install).
# RB2B
Source: https://getkoala.com/docs/integrations/rb2b
Person-level identity for web traffic.
The [RB2B](https://rb2b.com?ref=koala) integration allows you to send visitors identified via RB2B into Koala. Once in Koala, we'll join those visitors with the rest of our identity graph so you can see all of their activity and signal data in one place.
## Connecting to RB2B
1. Log in to RB2B and navigate to the [integrations page](https://app.rb2b.com/integrations)
2. Select the Koala integration tile
3. Copy your webhook URL from the [RB2B App in Koala](https://app.getkoala.com/goto/apps/rb2b)
4. Paste it into the Webhook URL field in RB2B
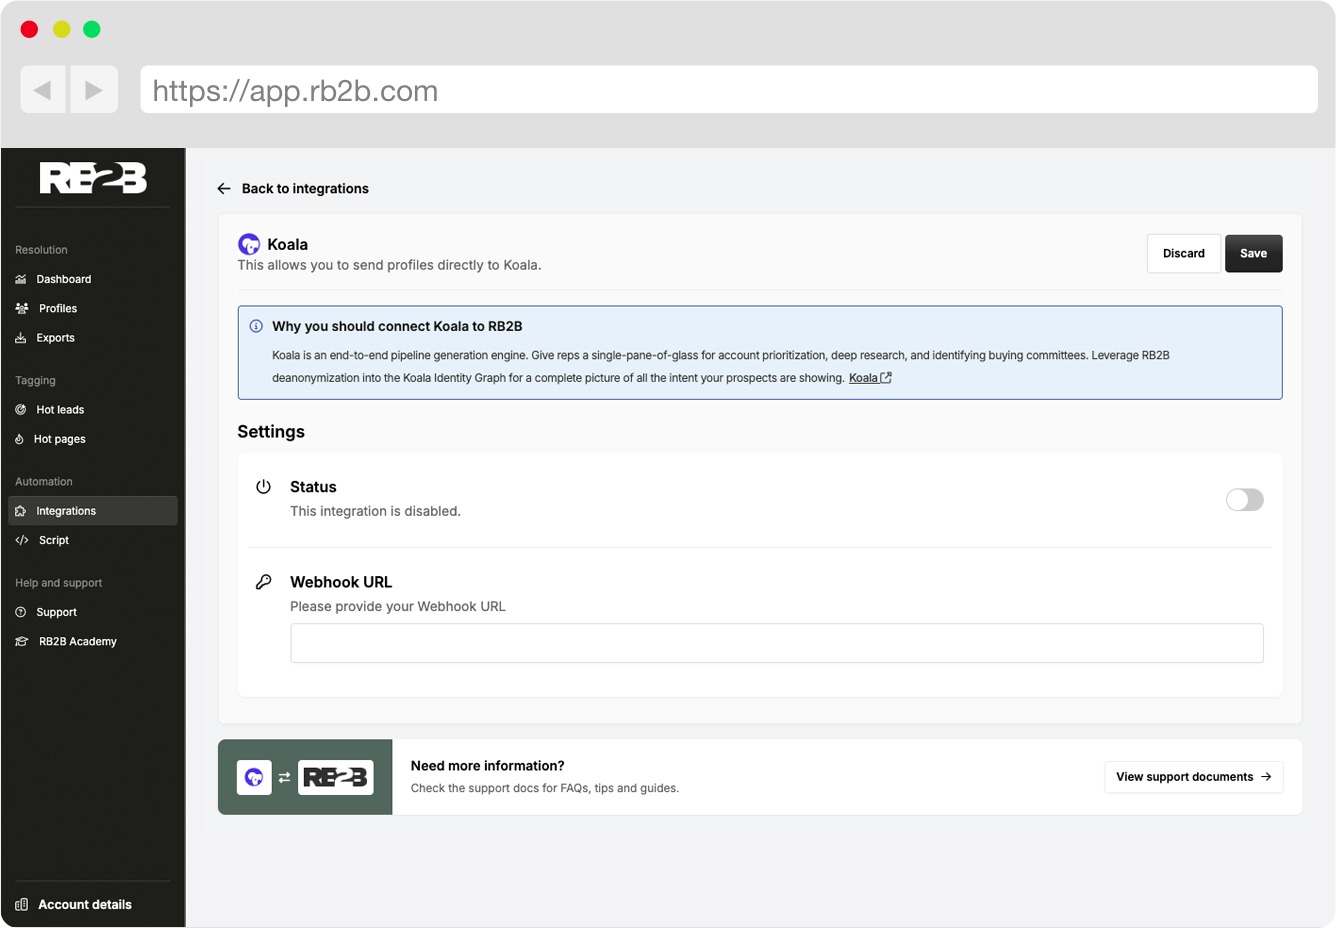
<Note>
Note: It may take up to 1 hour for RB2B profiles to start to appear in Koala
for the first time. R2B2 will only send net new visitors to Koala.
</Note>
# ReadMe
Source: https://getkoala.com/docs/integrations/readme
Capture intent signals coming from your ReadMe technical docs.
## Installation
### Step 1
Find your Public API Key here: [https://app.getkoala.com/goto/settings/install](https://app.getkoala.com/goto/settings/install)

### Step 2
Navigate to the Integrations settings in the <a href="https://dash.readme.com/">ReadMe dashboard</a>, paste in your Koala API key, and click Save.
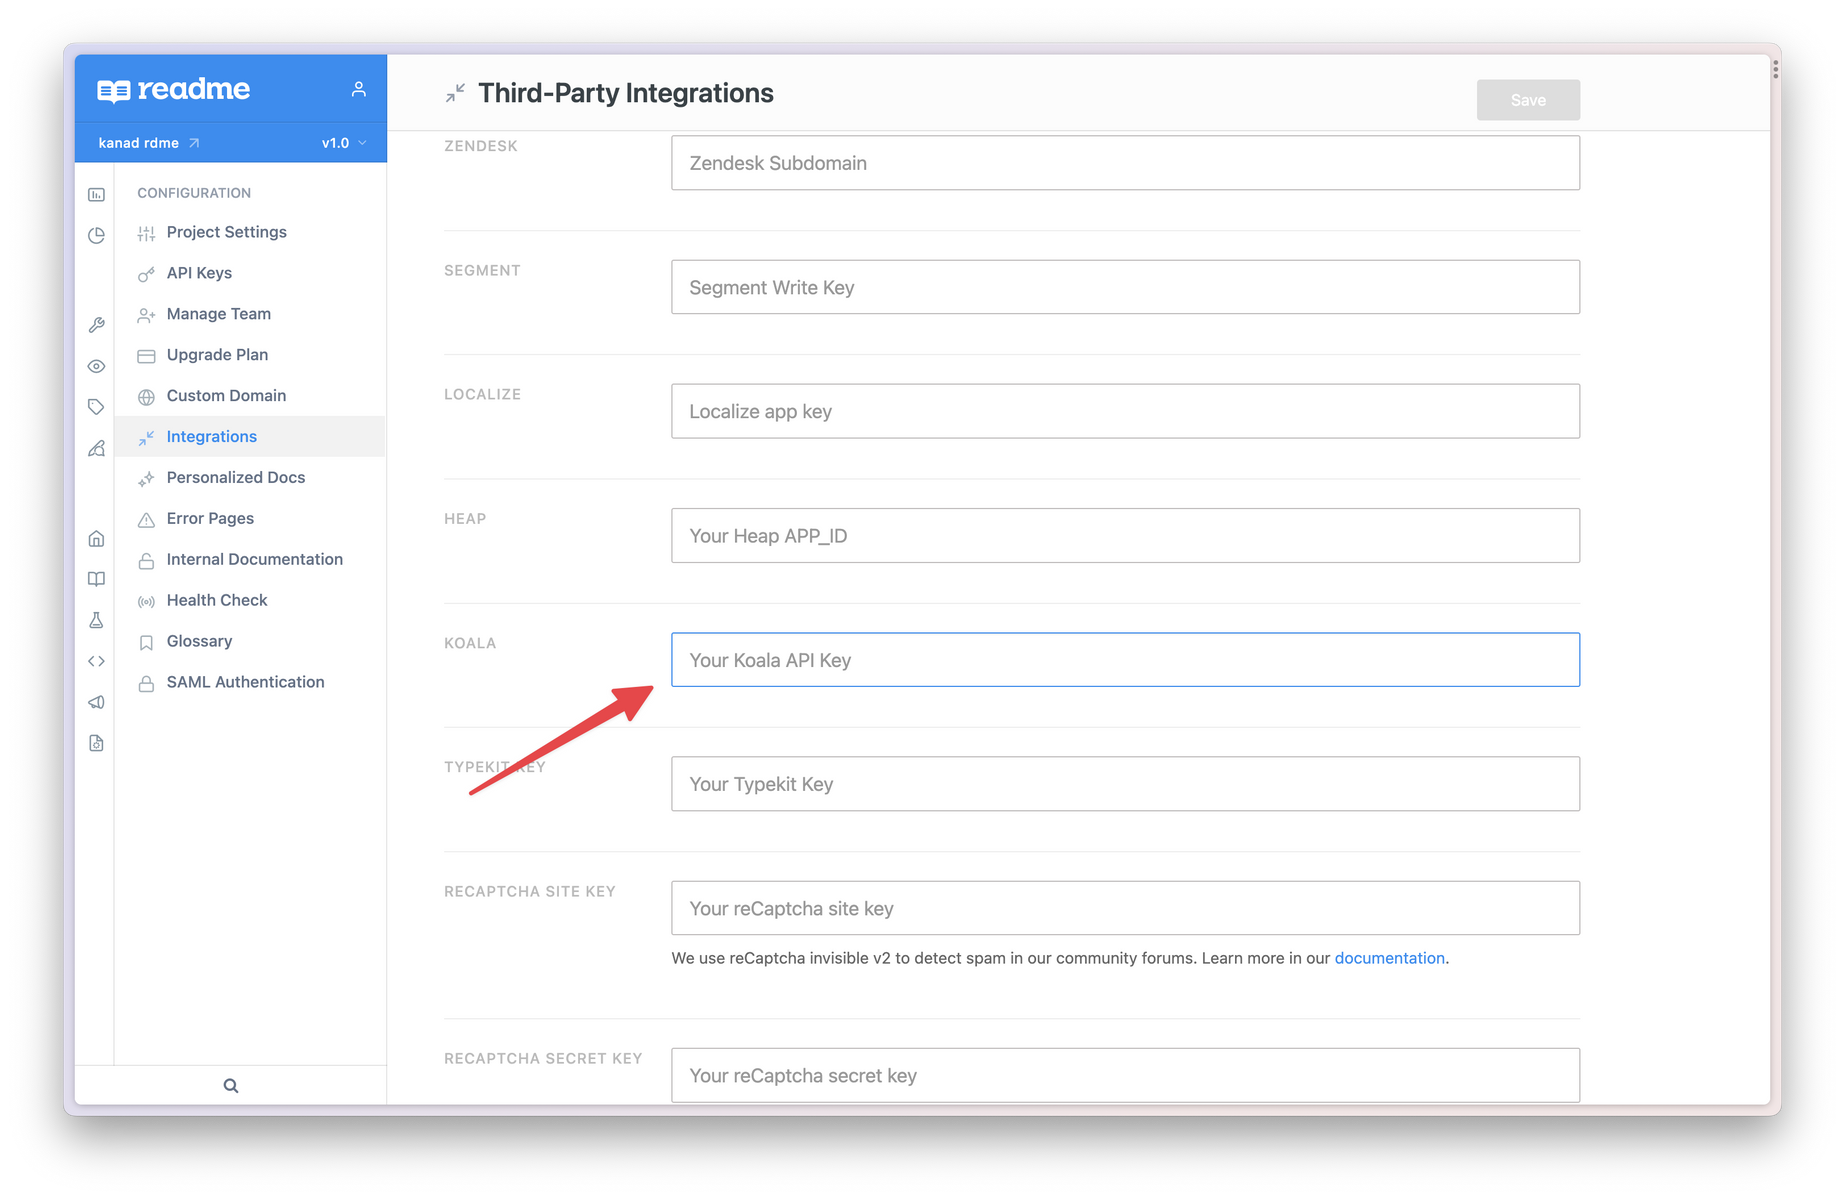
# Rudderstack
Source: https://getkoala.com/docs/integrations/rudderstack
Koala integrates natively with Rudderstack in the browser.
### Setup
Koala can detect the Rudderstack browser SDK natively without any extra code. All you need to do is to make sure both Koala and Rudderstack have been instrumented on your Website.
## How does the integration work?
Koala will automatically detect any `track` or `identify` events that have been issued by Rudderstack, so you don't need to instrument the same events multiple times in your Website or Web App.
### Track Calls
Any client side `rudderanalytics.track` calls will be forward to Koala automatically via `ko.track` calls. Track calls are compatible across both platforms.
<Note>
You can manage all your existing events in the [Event Management Page](https://app.getkoala.com/goto/events/custom) in Koala.
</Note>
### Identify Calls
Any client side `rudderanalytics.identify` call will also be forwarded to Koala along with all traits that are being sent into Rudderstack.
Email traits will be used to pair an Koala Visitor to an existing person in the Koala app, so your team can see more identified prospects.
<Note>
You can manage all your existing Visitor Traits in the [Traits Management Page](https://app.getkoala.com/goto/events/visitor-traits) in Koala.
</Note>
# Salesforce
Source: https://getkoala.com/docs/integrations/salesforce
Connect Salesforce's CRM to see Salesforce Accounts, Opportunities, Contacts, and Leads in Koala. Optionally, write intent signals back to Salesforce.
## Installation
You must have an active Koala account [Koala](https://app.getkoala.com)
before proceeding. If you don't have a Koala account,
[sign up for free](https://app.getkoala.com/signup).
## Reading from Salesforce
Upon connecting Koala to Salesforce's CRM (Salesforce Sales Cloud), Koala will sync all Accounts, Opportunities, Contacts, and Leads. Koala will automatically refresh Salesforce CRM data every hour, so we always have fresh data about who owns which Accounts and which Accounts have active Opportunities attached. [Account Scores](#account-score-sync-into-salesforce-business-plan) are synced into the CRM nightly when enabled.
No data will be written to Salesforce by default, and you can use a read-only user if you'd like. However, there are optional ways to write data back into Salesforce.
## Importing to Salesforce
There are four actions you can take from Koala to manually write data to Salesforce's CRM:
1. Import Accounts
2. Import Contacts
3. Import Leads
4. Claim Account (rewrite the Account owner to be the current Koala user)
These actions can be enabled/disabled by a Koala admin if you don't wish to enable writing to Salesforce. You can also issue custom field mappings for imports.
## Automating actions into Salesforce (Business Plan)
Every time an intent signal happens for a qualifying list that you specify, there are six actions Koala can automate in Salesforce:
1. **Import Account.** Import an Account as an Account in Salesforce if it doesn't already exist. Supports custom field mappings.
2. **Import Contact.** Import a Visitor as a Contact in Salesforce if it doesn't already exist. (Supports custom field mappings.)
3. **Import Lead.** Import a Visitor as a Contact in Salesforce if it doesn't already exist. (Supports custom field mappings.)
4. **Adding to a Campaign.** Add the current Visitor as a Lead or Contact to a campaign in Salesforce.
5. **Create Task.** Creates a task in Salesforce. (Supports custom subjects, priority, due date, and reminder.)
6. **Create Record** Create a record as any custom object. You can also use this to write Koala Intent Signals as events into your CRM as custom objects linked to Contacts, Leads, and/or Accounts in your Salesforce instance.
## Account Score Sync into Salesforce (available on Koala's Business plan)
Koala can send a snapshot of Account Scores that includes `Intent Score`, `Intent Strength`, `Intent Trend`, `ICP Score` and `ICP Grade` into your CRM .
This feature can be enabled in the settings page and each night around 10pm PST will send the scores that changed during the day.
The settings page provides the setup instructions to follow to have everything setup and mapped.
The fields can be automatically added using the provided [Koala Managed Scores (1.1.0.0)](https://login.salesforce.com/packaging/installPackage.apexp?p0=04tak0000001s6PAAQ) managed package
or they can be manually added following these definitions:
### Koala Scores Fields Definitions
| **Field Label** | **Field Name** | **Namespace Prefix** | **API Name** | **Data Type** | **Details** |
| --------------------- | ---------------- | -------------------------------- | --------------------------------- | ------------- | ------------------------------------------------------- |
| Koala Intent Score | intent\_score | getkoala (from the package only) | getkoala\_\_intent\_score\_\_c | Number | Length: 3 Decimal Places: 2 |
| Koala Intent Strength | intent\_strength | getkoala (from the package only) | getkoala\_\_intent\_strength\_\_c | Picklist | Very High, High, Medium, Low, None (default) |
| Koala Intent Trend | intent\_trend | getkoala (from the package only) | getkoala\_\_intent\_trend\_\_c | Picklist | Surging, Heating, Neutral, Cooling, New, None (default) |
| Koala ICP Fit Score | icp\_fit\_score | getkoala (from the package only) | getkoala\_\_icp\_fit\_score\_\_c | Number | Length: 3 Decimal Places: 2 |
| Koala ICP Fit Grade | icp\_fit\_grade | getkoala (from the package only) | getkoala\_\_icp\_fit\_grade\_\_c | Picklist | A, B, C, D, -- (default) |
If you want to use existing fields that are compatible, you can use the custom mapping in the settings to map each Koala Score field to your CRM field.
The integration sends scores to the CRM in groups of `~100_000` records, so you can see more than one entry per day in the Bulk Data jobs log (under `Setup > Environments > Jobs > Bulk Data Load Jobs`) if there are more than that amount of scores to send.
The sync happens in two modes: `full` and `delta` (incremental) syncs. The `full` sync is executed the first time the feature is enabled and all subsequent syncs are `delta` syncs. The `delta` sync only sends scores that changed during the day against what is already in your CRM. This generally accounts to `6-10%` of the full amount of scores sent in a `full` sync.
## FAQ
### How do you match Koala accounts to Salesforce Accounts?
For every account on your site, Koala has a list of a domain (eg., `dropbox.com`) and all associated domain aliases (eg., `getdropbox.com`, `dropbox.jp`, `dash.ai`, etc.). We will search your CRM for the primary domain and all aliases, trying to find matches to the Account object's `domain` field. If that isn't set, Koala will use `website` instead.
If Koala finds multiple Account objects matching a domain, we'll pick the Account in the following order:
1. Pick the Account with most Opportunities
2. Pick the Account with most Contacts
3. Pick the Account modified most recently
### How do you match Koala Visitors to Salesforce Contacts & Leads?
Contacts will be matched when an example email match happens between the Contact/Lead object and the Koala profile email.
## Troubleshooting
If you've received an email that your Salesforce connection had an error or needs to be reauthorized, here are some common errors and how to fix them.
If you are still having issues with the Salesforce integration, email the Koala team with your questions at [support@getkoala.com](mailto:support@getkoala.com).
### API\_DISABLED\_FOR\_ORG: API is not enabled for this Organization or Partner
This error means that your Salesforce organization does not have API access enabled.
**What can I do?**
Make sure that your Salesforce organization has API access. Koala will be unable to sync with Salesforce without API access.
### API\_DISABLED\_FOR\_ORG: limits resource is not enabled
This error means that your Salesforce organization does not have API access properly configured.
**What can I do?**
Reach out to your Salesforce admin to ensure your Salesforce organization has both the API enabled and "View Setup and Configuration" system permission enabled. The Salesforce user authorizing the connection with Koala must have the "View Setup and Configuration" system permission enabled on their Salesforce user profile.
### API\_CURRENTLY\_DISABLED: API is disabled for this User
This error means that Koala is unable to sync with Salesforce because the User that authenticated Salesforce does not have API access in Salesforce.
**What can I do?**
Reauthorize the Salesforce connection with a user that has API access, or you can have your Salesforce admin give your user API access in Salesforce.
### INVALID TYPE ERROR: Object type 'Campaign' is not supported
This error probably indicates that the integration was setup with Salesforce Data Cloud instead of Salesforce Sales Cloud. The former does not support `Campaign` as of the time of the error and therefore fails.
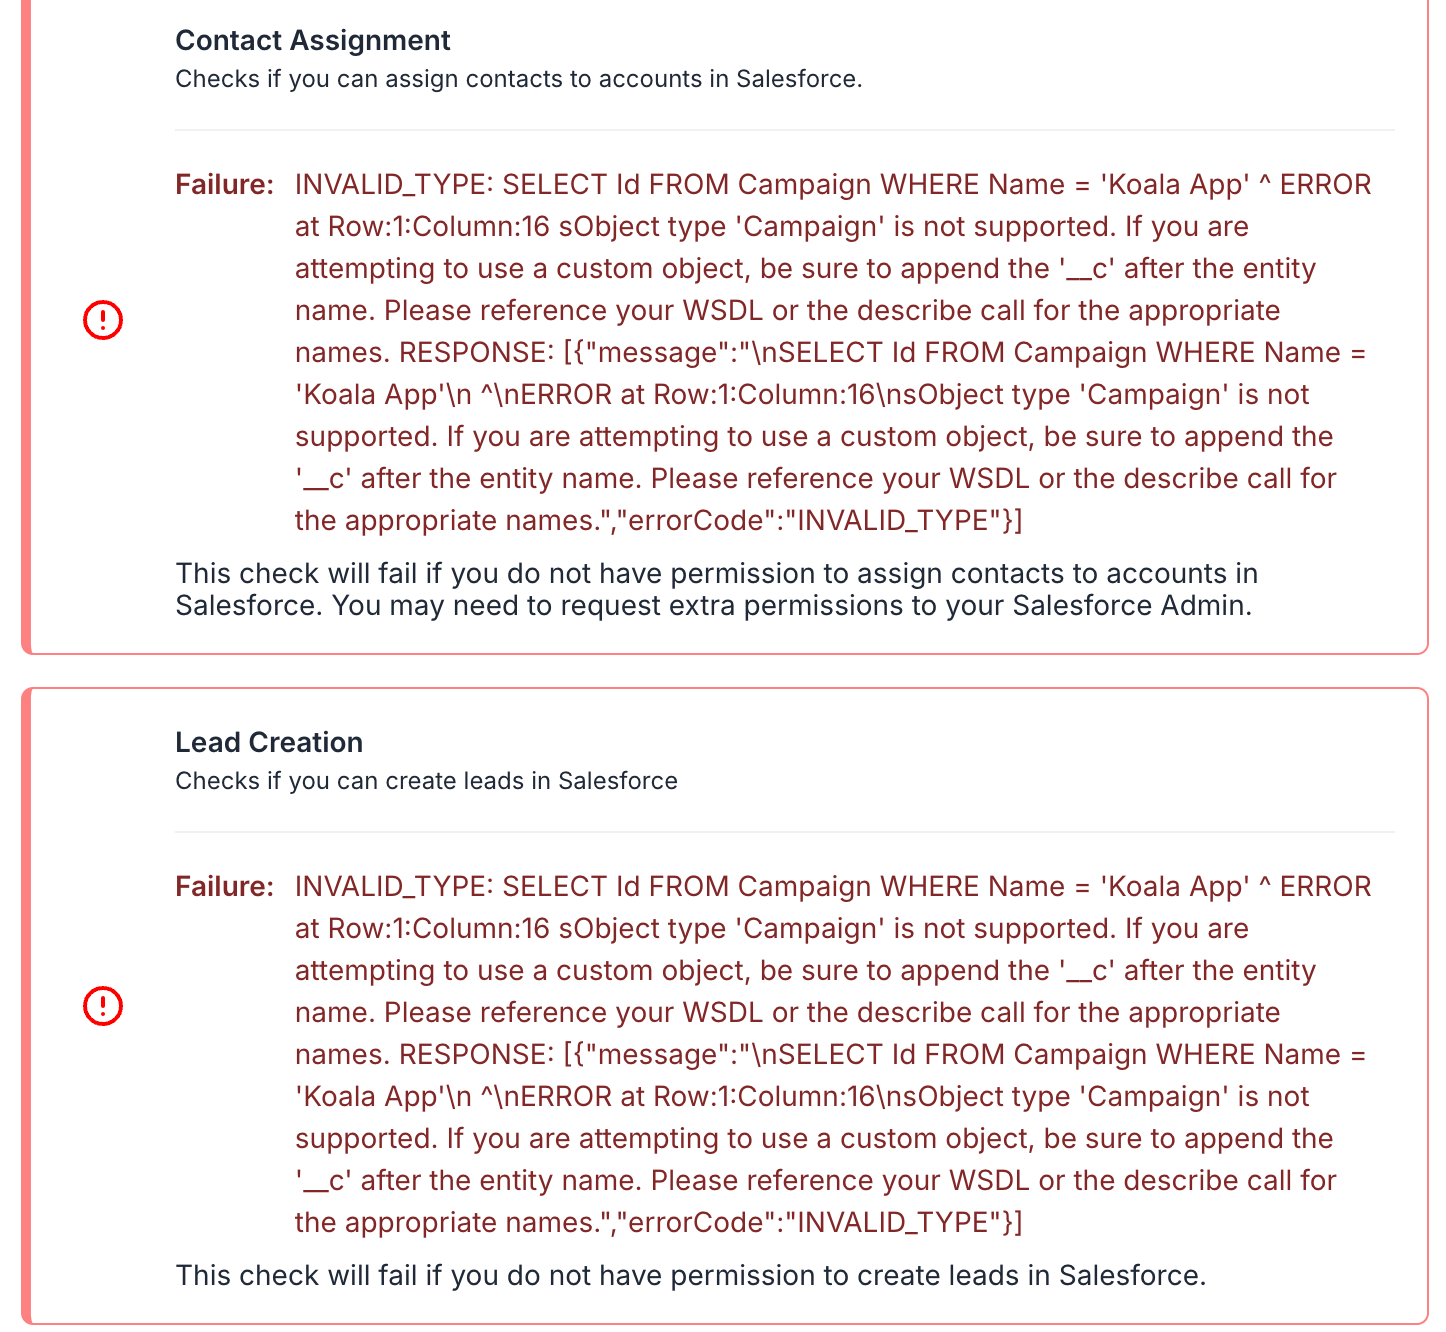
**What can I do?**
Koala integrates with Salesforce CRM for Campaign. If you need that data in Salesforce Data Cloud, it is necessary to integrate Koala with the Salesforce Sales Cloud (CRM) and then pipe that data into Salesforce Data Cloud directly from the CRM.
# Salesloft
Source: https://getkoala.com/docs/integrations/salesloft
Koala partners with Salesloft to activate your high-intent leads in real-time.
You can connect Koala to your Salesloft account via OAuth. Once you connect your Salesloft account, you can:
* Add a prospect to a cadence
* Import an Account
* Import a Prospect
* View an Account
* Create a Task
Admins can configure which one of these actions to allow, and can also configure automation into Salesloft.
# Segment
Source: https://getkoala.com/docs/integrations/segment
Segment is the easiest way to install Koala. If you've already got Segment running on your website, we recommend this approach. With Segment, you can instrument Koala easily without code.
<Note>
Segment's Analytics 2.0 is required for this client-side destination.
</Note>
***
### Step 1: Connect your source to the Koala destination
Navigate to **Connections > Destinations > Add Destination** in the Segment app.
Search for "Koala" and add it to a source.
### Step 2: Enter your destination settings
You'll need to enter your "Public API Key" which can be found in your workspace settings under
[Settings > Install](https://app.getkoala.com/goto/settings/install). Note: the Segment integration calls your Public API Key a "Koala Project Slug", that's where you should enter your Public API Key.
### Step 3: Configure which events to send from Segment (Optional)
Once connected, you can configure how you want to send data to Koala. By
default, Segment will forward track events and identify events to Koala. We
recommend sticking with the defaults!
***
## Optional: Sending events server side with Koala Cloud
You can optionally forward your existing Segment server side events to Koala using the Koala Cloud Destination on Segment.
The Koala Cloud Destination supports forwarding `Track` and `Identify` calls that are tracked server side via one of Segment's server side libraries.
### Step 1: Connect your source to the Koala Cloud destination
Navigate to your Segment workspace. Visit the Koala Cloud Destination in the Segment catalog and click "Configure Koala Cloud".
Select the source you want to forward events from and click "Add Destination".
### Step 2: Enter your destination settings
You'll need to enter your "Public API Key" which can be found in your workspace settings under
[Settings > Install](https://app.getkoala.com/goto/settings/install).
### Step 3: Configure which events to send from Segment
Once connected, you can configure how you want to send data to Koala. You can do that by clicking on the "Mappings" tab in your newly created Segment Koala Cloud destination.
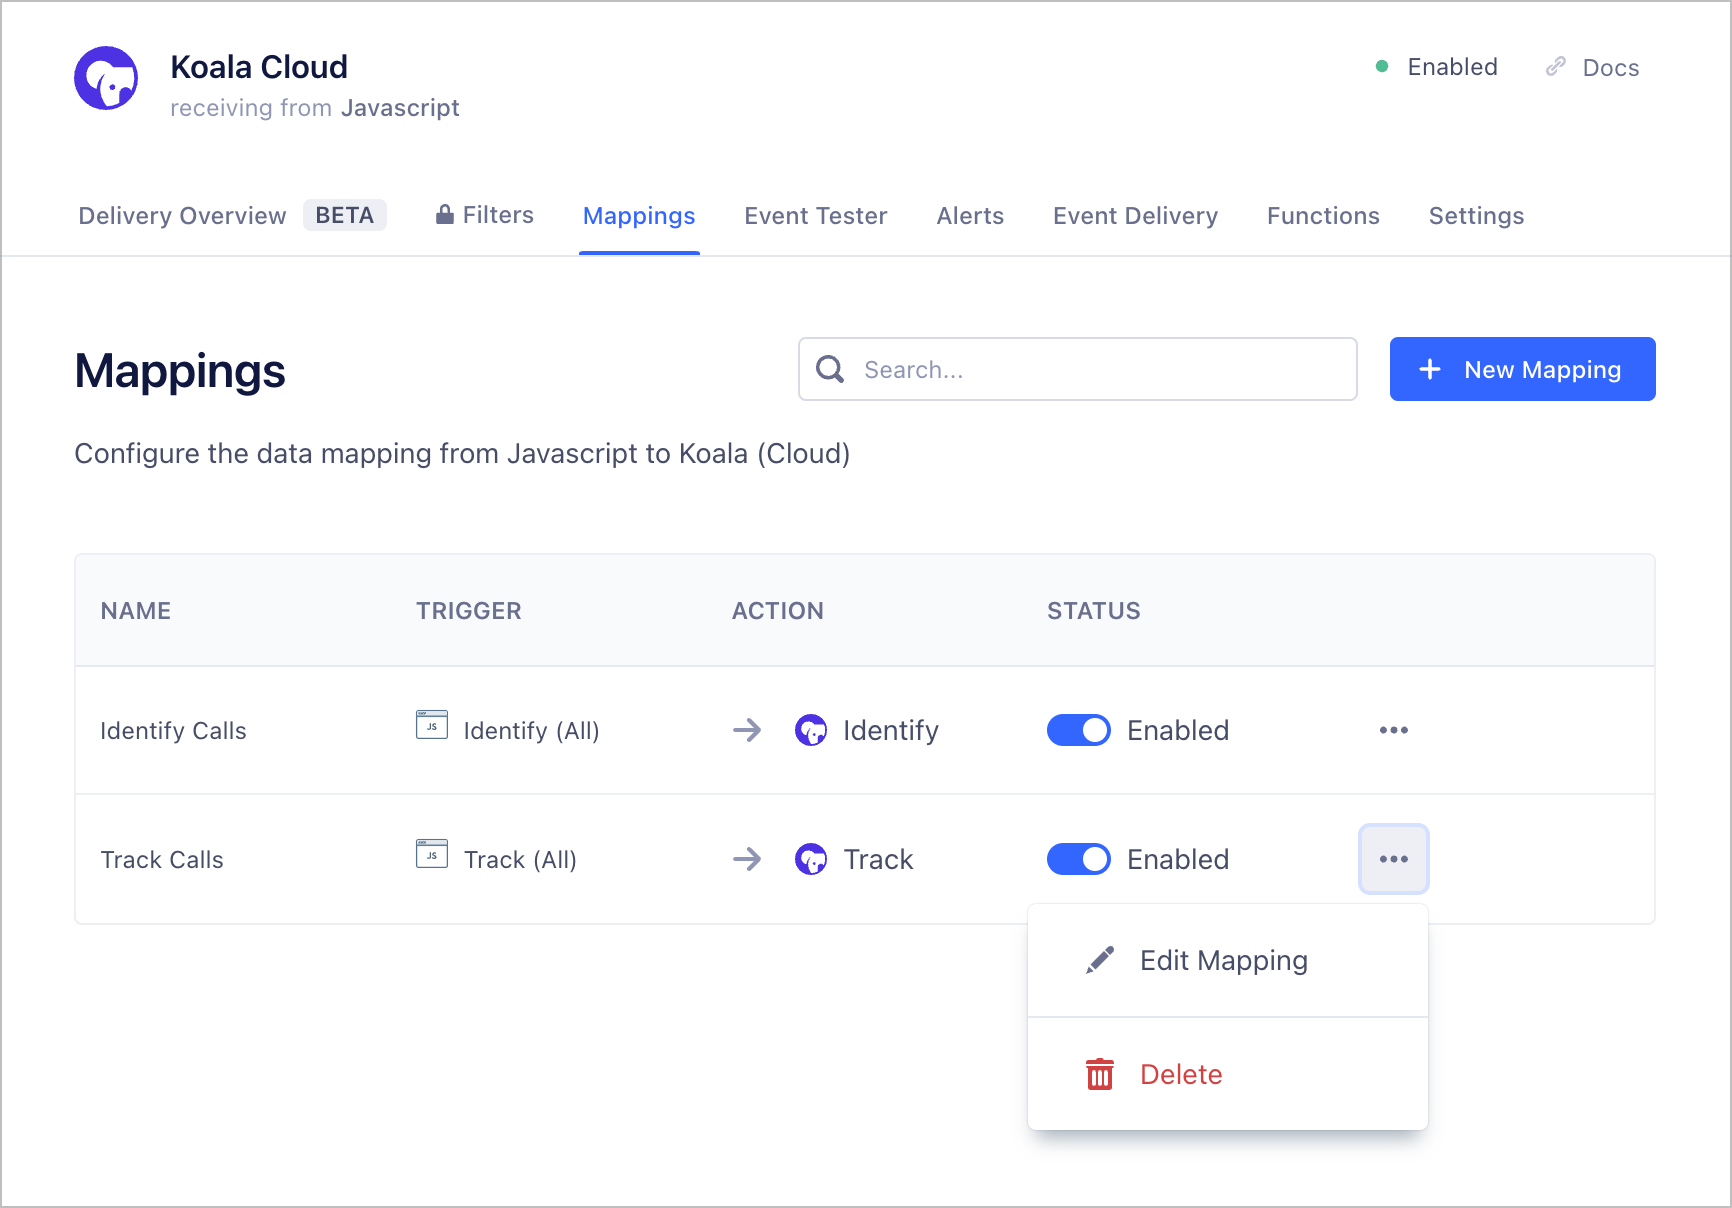
### (Optional) Step 4: Tracking Identified Visitors
By default, Koala will only accept `Track` and `Identify` calls containing an `email` property in the `properties` or `traits` field of the call.
This is because Koala uses the `email` property to match an existing Koala Visitor to a visitor in your App as well as your CRM.
You can configure your existing Segment server side libraries to send the `email` property in the `properties` or `traits` field of the call.
The following code snippet illustrates how to do that with the Segment Node library.
```js
const analytics = new Analytics({ writeKey: '<YOUR_WRITE_KEY>' })
analytics.track("User Signed Up", {
email: "joey@getkoala.com",
selectedPlan: 'team',
...otherProperties
})
analytics.identify(userId, {
email: "joey@getkoala.com",
billingPlan: 'team',
...otherTraits
})
```
### (Optional) Step 5: Tracking Anonymous Visitors
If you'd like to track anonymous visitors, you can do so by sending a `Track` call with the existing `profile_id` provenient from the Koala pixel in the `properties` field of the call.
The Koala `profile_id` is a unique identifier that is generated for each visitor that visits your website with the Koala pixel installed. You can access it by reading
the `ko_id` cookie from the browser.
The following code snippet illustrates how to do that with the Segment Node library when handling an HTTP request.
```js
function requestHandler(req, res) {
// Use your prefered cookie parsing library to read the Koala cookie
const koalaProfileId = getCookie(req.cookies, 'ko_id')
analytics.track("My High Intent Actions", {
profile_id: koalaProfileId,
...otherProperties
})
// ...
}
```
# Slack
Source: https://getkoala.com/docs/integrations/slack
Use the Koala app to get notified about new leads as soon as they express intent in your product.
### Installation
You must have an active account and project in [Koala](https://app.getkoala.com)
before proceeding. If you don't have an account,
[sign up for free](https://app.getkoala.com/signup).
<a href="https://app.getkoala.com/apps/slack" rel="noreferrer" target="_blank" className="inline-flex items-center rounded-md border border-transparent px-4 py-3 text-base font-medium text-white no-underline" style={{ backgroundColor: "#4A154B", height: "48px", display: "flex", alignItems: "center", textDecoration: "none" }}>
<svg xmlns="http://www.w3.org/2000/svg" style={{ height: "24px", width: "24px", marginRight: "12px" }} viewBox="0 0 122.8 122.8">
<path d="M25.8 77.6c0 7.1-5.8 12.9-12.9 12.9S0 84.7 0 77.6s5.8-12.9 12.9-12.9h12.9v12.9zm6.5 0c0-7.1 5.8-12.9 12.9-12.9s12.9 5.8 12.9 12.9v32.3c0 7.1-5.8 12.9-12.9 12.9s-12.9-5.8-12.9-12.9V77.6z" fill="#e01e5a" />
<path d="M45.2 25.8c-7.1 0-12.9-5.8-12.9-12.9S38.1 0 45.2 0s12.9 5.8 12.9 12.9v12.9H45.2zm0 6.5c7.1 0 12.9 5.8 12.9 12.9s-5.8 12.9-12.9 12.9H12.9C5.8 58.1 0 52.3 0 45.2s5.8-12.9 12.9-12.9h32.3z" fill="#36c5f0" />
<path d="M97 45.2c0-7.1 5.8-12.9 12.9-12.9s12.9 5.8 12.9 12.9-5.8 12.9-12.9 12.9H97V45.2zm-6.5 0c0 7.1-5.8 12.9-12.9 12.9s-12.9-5.8-12.9-12.9V12.9C64.7 5.8 70.5 0 77.6 0s12.9 5.8 12.9 12.9v32.3z" fill="#2eb67d" />
<path d="M77.6 97c7.1 0 12.9 5.8 12.9 12.9s-5.8 12.9-12.9 12.9-12.9-5.8-12.9-12.9V97h12.9zm0-6.5c-7.1 0-12.9-5.8-12.9-12.9s5.8-12.9 12.9-12.9h32.3c7.1 0 12.9 5.8 12.9 12.9s-5.8 12.9-12.9 12.9H77.6z" fill="#ecb22e" />
</svg>
<span style={{ color: "white" }}>Add to Slack</span>
</a>
### Introduction
There are two ways that you can receive messages from Koala in Slack.
* Real-time notifications about intent via Slack Alerts
* Share an account to a channel
Each is discussed more in detail below.
### Real-time notifications about intent via Slack Alerts
If you'd like to automatically receive notifications whenever high-intent activities
happen, use Slack Alerts. The easiest way to get started is in the
[Slack Alerts tab](https://app.getkoala.com/goto/slack-alerts).
You can pick which **Intent Signals** you'd like to be notified about, and optionally specify an audience. You can send to any **existing public channel**, or create a **new public channel** inline. Here's how you configure it:
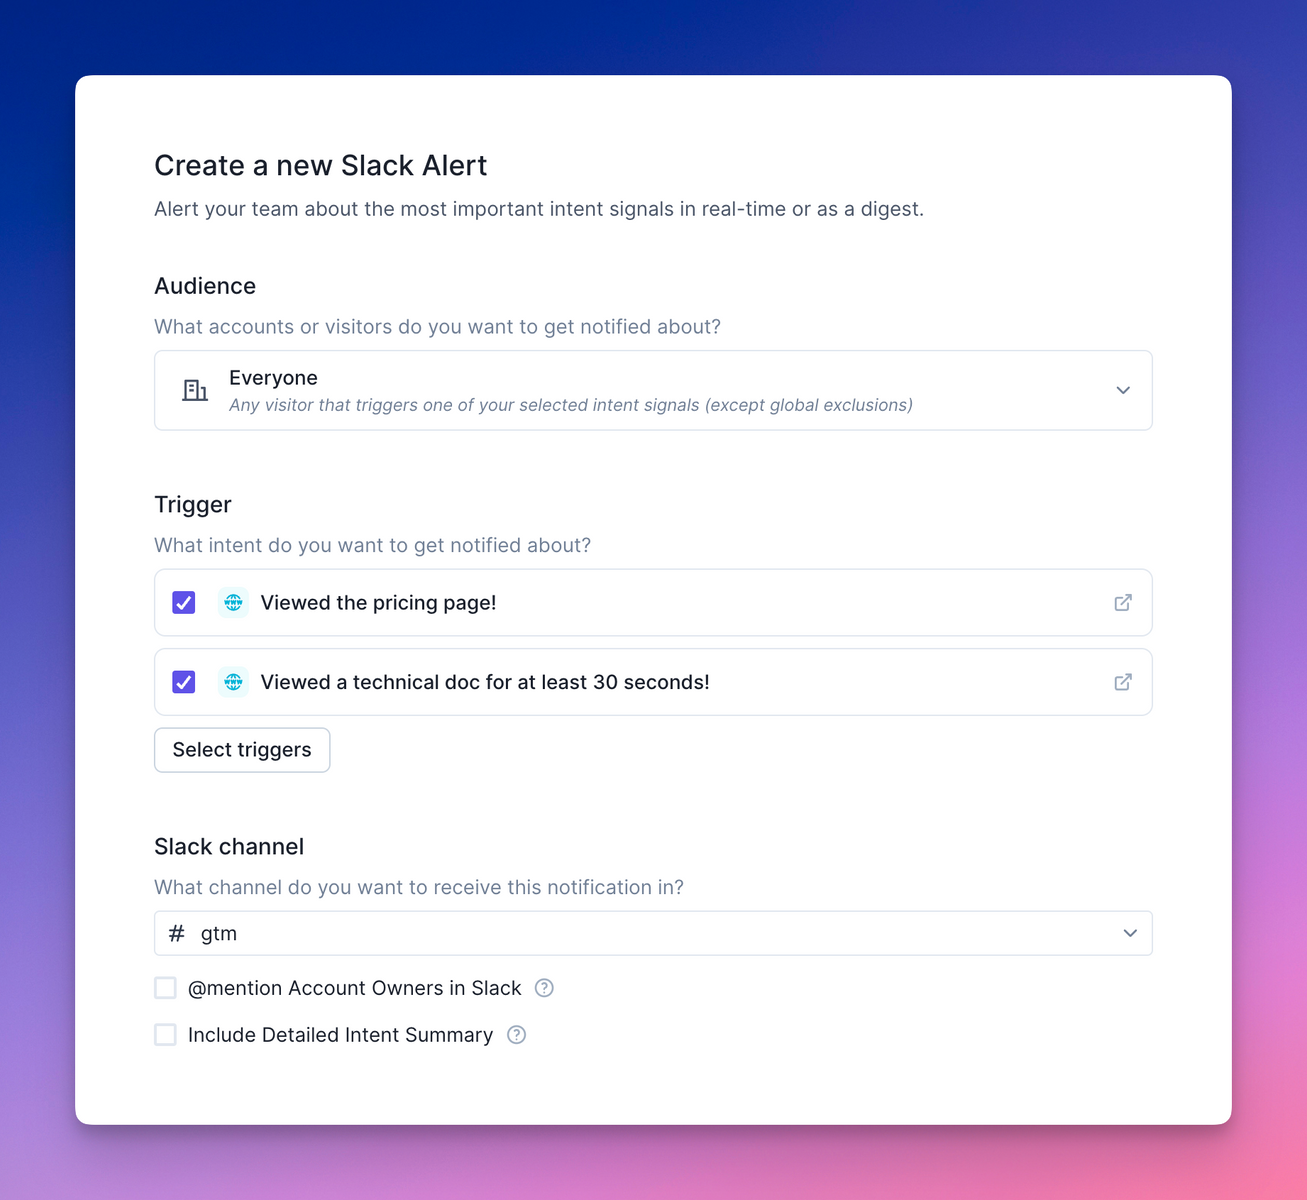
On the other side, once the intent is triggered, you'll get a notification in Slack:
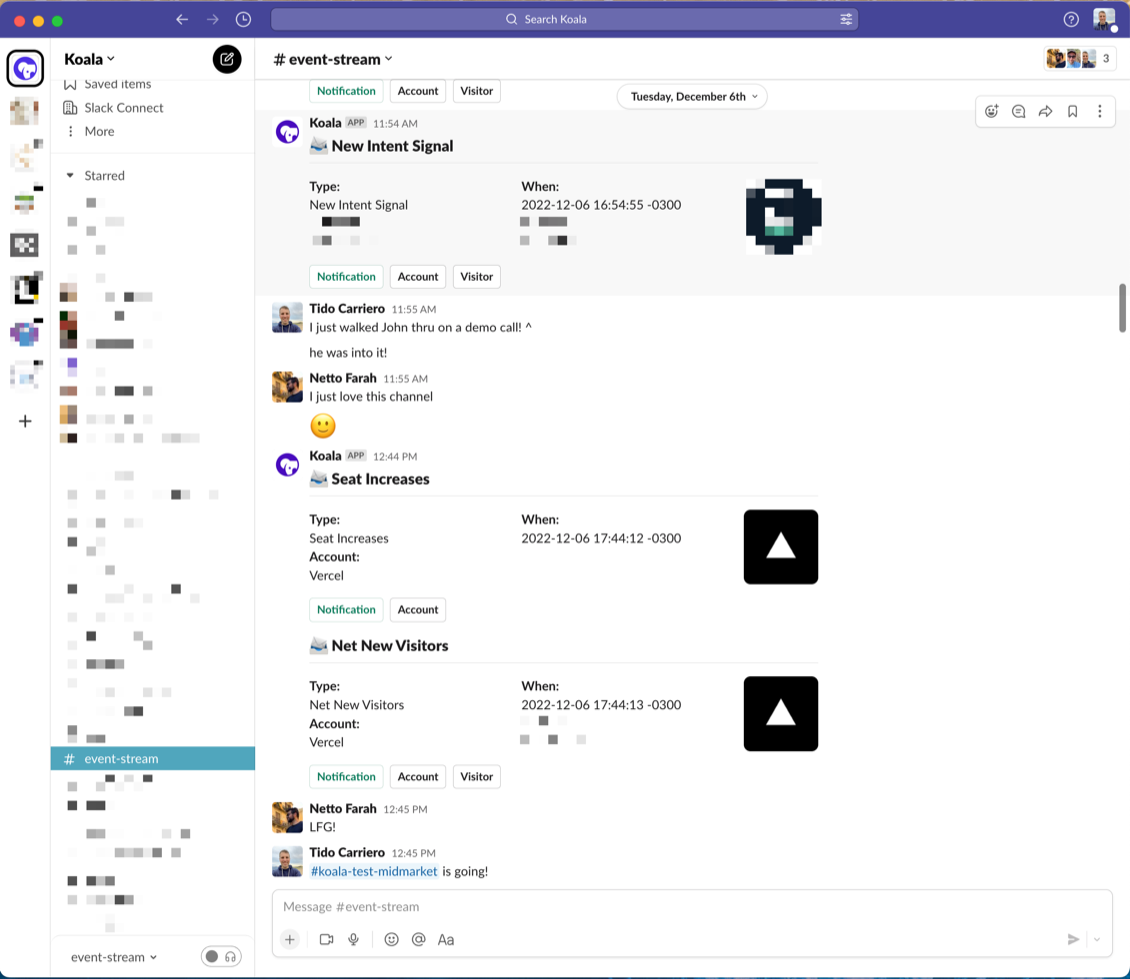
### Share an account to a channel
If you'd like to manually share an interesting account to start a discussion
with the team, you can easily share any account with any channel. Navigate to
any **account profile page** in Koala and look for the Slack icon at the top:
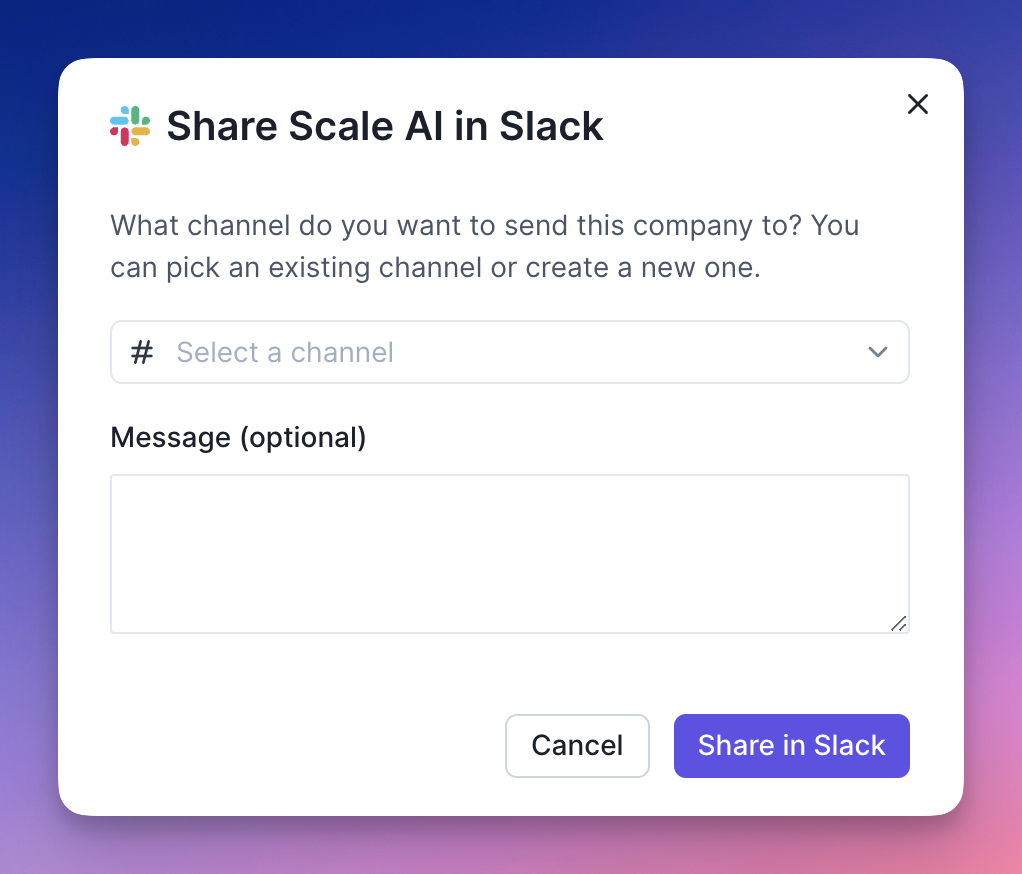
In the Slack channel, it will appear like this:
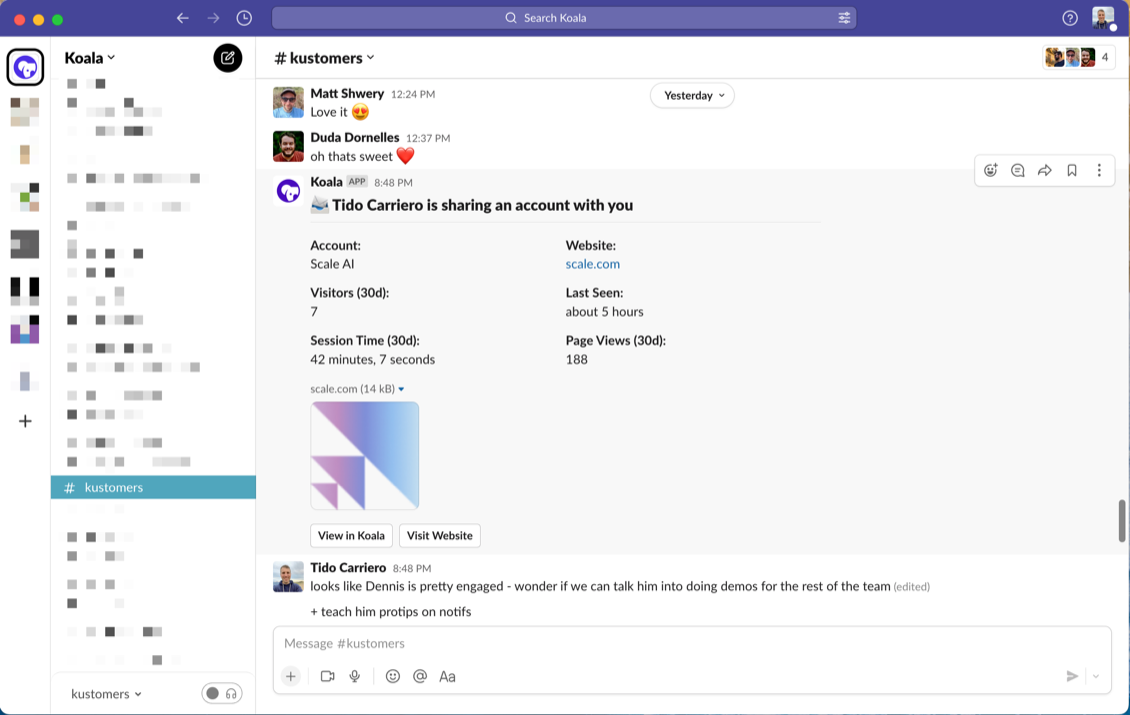
### Subscribe to specific audiences
You can also create Slack Alerts that notify you about intent for specific audiences. You can configure these directly from the Slack Alerts creation flow, or from an audience page.
To set one up, follow these steps:
* Select (or create) an audience [here](https://app.getkoala.com/goto/views)
* Once you have navigated to the audience, click the **"Slack Alerts"** button at the top of the page
* Configure the channel you'd like to send notifications to, and the Intent Signals you want to know about.
* You're all set! Now whenever a new company or person shows the intent you wanted to know about, you'll
get notified.
### Support
Having issues with the Slack integration? Email the Koala team with your
questions at [support@getkoala.com](mailto:support@getkoala.com)!
# Slack Community
Source: https://getkoala.com/docs/integrations/slack-community
Track sales signals in your Slack communities.
## Connecting your Slack Community Workspace
1. Go to the [Slack Community app page](https://app.getkoala.com/goto/apps/slack_community) in Koala.
2. Click **Connect Slack**.
3. Select the Channels you want to track in Koala.
4. Choose which Signals you want to track.
The app will sync data from your Slack workspace into Koala.
## Using Slack Community data in the Koala App
You can use Slack Community data in the Koala app to create lists, alerts, and more.
A new `Sources` filter will appear in the top left of your lists, allowing you to filter by Slack Community.
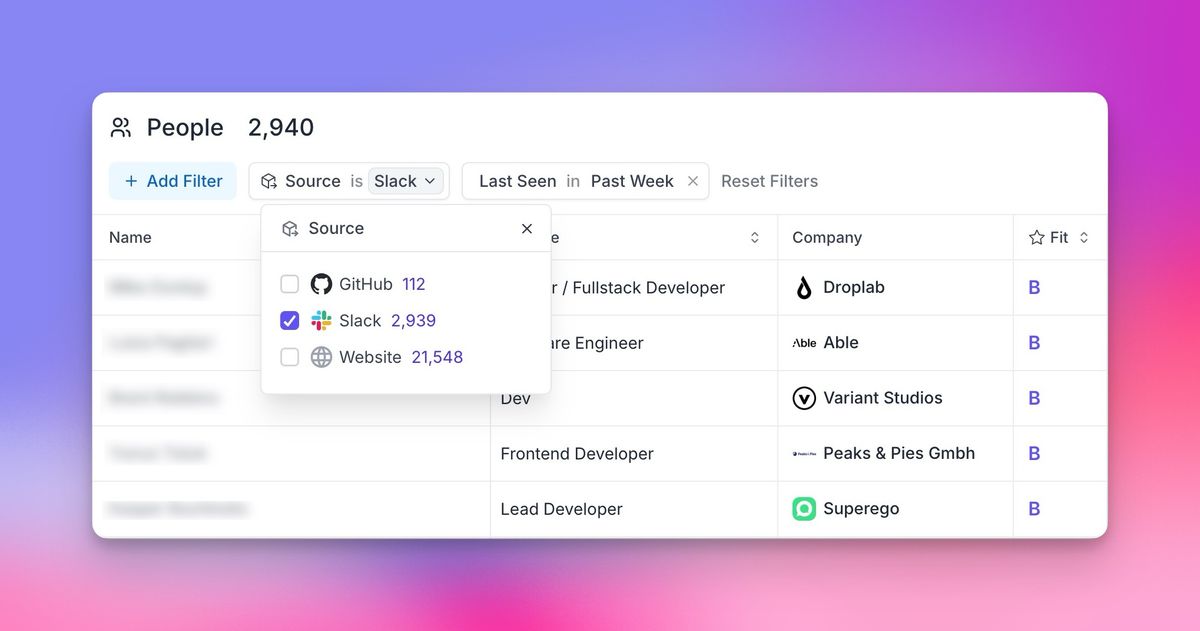
A new `Slack Community` section will appear in your filters menu, allowing you to view and filter Slack Community data.
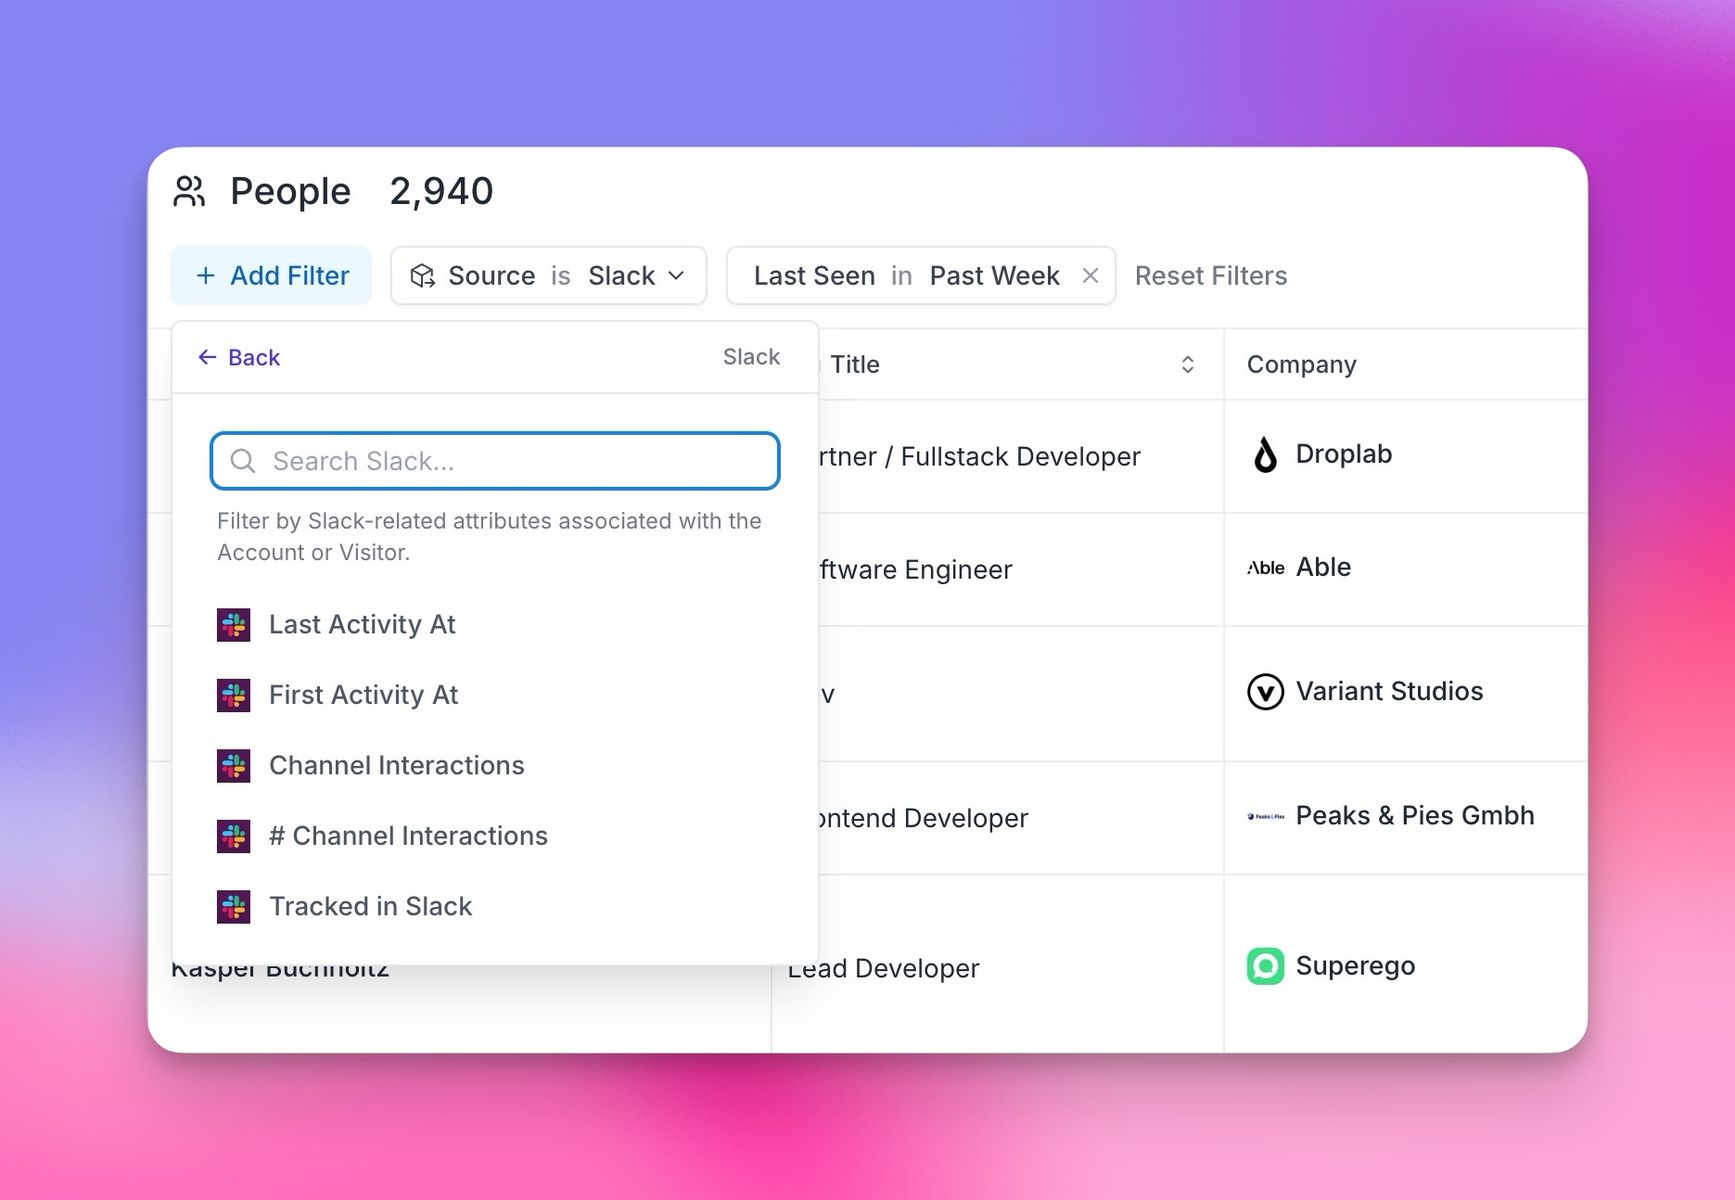
New Slack Community related columns will be available in your lists as custom columns.
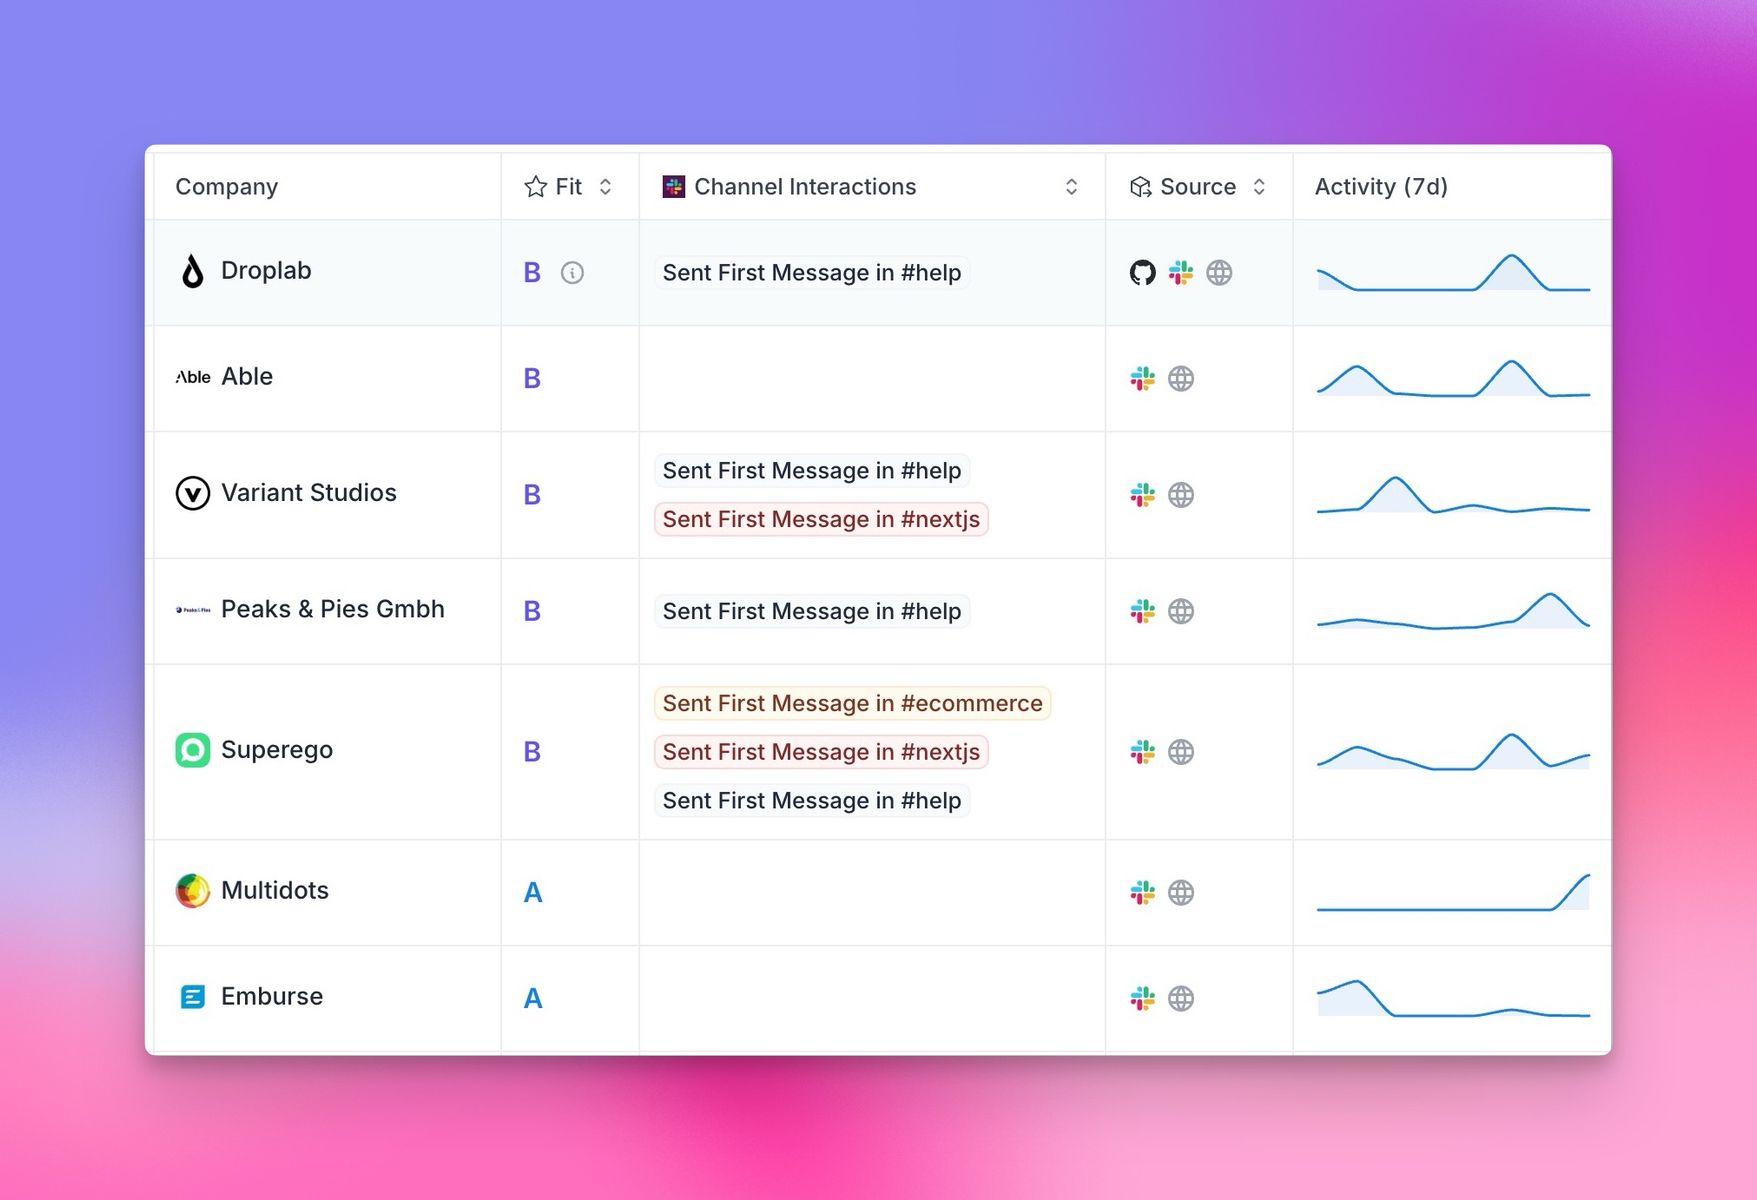
# Snowflake
Source: https://getkoala.com/docs/integrations/snowflake
Sync product, usage and event data directly from your data warehouse.
Koala can connect to your Snowflake account and sync data from any of your databases directly into your customer profiles, as well as enrich your customer profiles with data from your Snowflake databases.
## Connecting to Snowflake
First, you'll need to generate an RSA key pair and assign the public key to your Snowflake user.
### 1. Generate an RSA key pair:
* Open a terminal and run:
```
openssl genrsa 2048 | openssl pkcs8 -topk8 -nocrypt -inform PEM -out rsa_key.p8
```
* Generate the public key:
```
openssl rsa -in rsa_key.p8 -pubout -out rsa_key.pub
```
### 2. Assign the public key to your Snowflake user:
* Log in to your Snowflake account with admin privileges
* Copy the contents of the public key file (rsa\_key.pub)
```
openssl rsa -pubin -in rsa_key.pub -outform DER | openssl base64 -A
```
* Execute the following SQL command in Snowflake:
```
ALTER USER your_username SET RSA_PUBLIC_KEY='your_public_key_content';
```
<Note>
**Important**: Snowflake does not like the % character in the public key. If you have a # in your key, remove it before pasting it in.
</Note>
### 3. Enter the required information in the form above:
* Account URL: Your Snowflake account URL (e.g., [https://your\_account.snowflakecomputing.com](https://your_account.snowflakecomputing.com))
* Account: Your Snowflake account name
* Username: Your Snowflake username
* Warehouse: The default warehouse to use
* Database: The default database to use
* Organization: Your Snowflake organization name (if applicable)
* Private Key: The contents of your private key file (rsa\_key.p8)
* Open the rsa\_key.p8 file in a text editor
* Copy the entire contents, including the "BEGIN PRIVATE KEY" and "END PRIVATE KEY" lines
* Paste the copied content into the Private Key field in Koala
* Alternatively, if you're using macOS, you can use the following command to copy the content directly to your clipboard:
```
pbcopy < rsa_key.p8
```
### 4. Click "Save"
Your credentials will be stored securely in Koala.
## Setting up your Snowflake Source
Once you've connected your Snowflake account, you can create a new data model by clicking **Data Model Settings > Add New Model**.
This will allow you to write SQL to transform your data and load it into Koala.
### Profile Traits
Profile traits are any properties you want to associate with a user profile in Koala. You can load traits from your Snowflake database by writing a SQL query and selecting the columns you want to load.
1. Select **Profile** as the object type.
2. Select **Traits** as the data model type.
3. Enter a SQL query to load the traits you want to associate with a user profile:
* Your query should contain a column named `email` which contains the email address of the user you want to associate the traits with.
* Example query:
```sql
SELECT
email, -- Koala requires an email trait to match a user profile to a visitor in your app
first_name,
last_name,
last_login_at,
plan_name,
plan_type
FROM customers
```
* All columns you select in your query will be loaded as traits for the user profile. This is analogous to the [`identify`](/sdk/identify#setting-visitor-traits) call in the Koala JavaScript SDK.
### Account Traits
Account traits are any properties you want to associate with an account in Koala. This is similar to the [`account identify`](/sdk/identify#setting-account-traits) call in the Koala JavaScript SDK.
1. Select **Account** as the object type.
2. Select **Traits** as the data model type.
3. Enter a SQL query to load the traits you want to associate with an account:
* Your query should contain a column named `account_id` which contains the account ID of the account you want to associate the traits with.
* Example query:
```sql
SELECT
domain, -- Koala requires a domain trait to match an account to a visitor in your app
group_id, -- (optional) You can optionally associate an account to a group in Koala
account_name,
account_plan,
account_plan_type,
total_users
FROM accounts
```
* All columns you select in your query will be loaded as traits for the account.
### Profile Events
Profile events are any events you want to associate with a user profile in Koala. This is similar to the [`track`](/sdk/track) call in the Koala JavaScript SDK.
Koala will backfill events from the last 90 days by default on the first sync, and then sync new events incrementally as they come in.
1. Select **Profile** as the object type.
2. Select **Events** as the data model type.
3. Enter a SQL query to load the events you want to associate with a user profile:
* Your query should adhere to the following requirements:
* Each row must contain an `event_name` column to be used to identify the event.
* Each row must contain a `timestamp` column.
* The timestamp is used as a checkpoint between syncs to determine which events were sent after the last sync.
* Each row must contain an `email` column to identify the profile.
* (Optional) Each row can contain a `message_id` column to identify the event. Koala will use this key to deduplicate events.
* Otherwise Koala will compute a hash of the event\_name + properties + timestamp to identify the event.
* (Optional) Each row can contain a `properties` column to specify event properties.
* The properties object must either be of the JSON type, or contain a JSON string.
* (Optional) Each row can contain a `source` column to specify where the event was sent from.
* This is useful if you have multiple sources for events.
* Example query:
```sql
SELECT
email,
event_name,
timestamp,
message_id,
properties,
source
FROM my_analytics.events
```
* Events will be synced to Koala when the sync is run.
### Account Events
Account events are any events you want to associate with an account in Koala.
1. Select **Account** as the object type.
2. Select **Events** as the data model type.
3. Enter a SQL query to load the events you want to associate with an account:
* Your query should adhere to the following requirements:
* Each row must contain an `event_name` column to be used to identify the event.
* Each row must contain a `timestamp` column.
* The timestamp is used as a checkpoint between syncs to determine which events were sent after the last sync.
* Each row must contain an `domain` column to identify the account.
* (Optional) Each row can contain a `message_id` column to identify the event. Koala will use this key to deduplicate events.
* Otherwise Koala will compute a hash of the event\_name + properties + timestamp to identify the event.
* (Optional) Each row can contain a `properties` column to specify event properties.
* The properties object must either be of the JSON type, or contain a JSON string.
* (Optional) Each row can contain a `source` column to specify where the event was sent from.
* This is useful if you have multiple sources for events.
* Example query:
```sql
SELECT
domain,
event_name,
timestamp,
message_id,
properties,
source
FROM my_analytics.account_events
```
* Account events will be associated with the account in Koala when the sync is run.
## Sending data to Snowflake
Koala maintains an automated replication process that continuously syncs data from your Koala workspace to designated tables in your Snowflake instance. This ensures your Snowflake database always has the most current information from Koala.
### Available Data Exports
The following data sets can be automatically exported to your Snowflake instance:
* Raw feed of page views
* Raw feed of events
* Raw feed of form submissions
* Profile snapshots
* Account snapshots
* Account scores
Manage your Snowflake integration from the [Snowflake settings page](https://app.getkoala.com/goto/apps/snowflake).
# Storylane
Source: https://getkoala.com/docs/integrations/storylane
Capture events coming from Storylane interactive demos.
## Overview
[Storylane](https://storylane.io?ref=koala) is a tool to help you build killer demos to wow prospects and close deals faster.
## Automatic Setup
1. [Install the Koala snippet](/get-started/quick-start) on the site where you are also embedding the Arcade demo iframe.
2. Koala will automatically detect and capture events from Storylane:
* Demo Opened
* Demo Finished
* Lead Identified
* Step Viewed
* External URL Opened
* Checklist Item Viewed
* Flow Started
* Flow Ended
* Page Viewed
* Primary CTA Clicked
* Secondary CTA Clicked
* Convert CTA Clicked
## Turning off autotracking for Storylane
If you don't want all Storylane events captured, or need to control when it's turned on, you can disable autotracking for Storylane in the [Koala settings](https://app.getkoala.com/goto/settings/install).
# ZoomInfo
Source: https://getkoala.com/docs/integrations/zoominfo
Koala partners with ZoomInfo to power contact enrichment via API.
If you are already a ZoomInfo customer, you can connect Koala to your ZoomInfo account
via your secret key.
To find your ZoomInfo secret key:
* Log in to the ZoomInfo GUI using admin credentials with API access.
* Go to Admin Portal, then API and click Generate New Key. You are provided with a Client ID and a Private Key.
This integration can be used to enrich any contacts found in Koala via ZoomInfo.
# AI Agents
Source: https://getkoala.com/docs/product-manual/ai-agents
Learn how to use AI Agents in Koala to automatically research and qualify leads and accounts.
## What is an AI Agent?
Agents are a way to automate lead and account research for your sales team. You can use them to simply answer questions about people or companies, and can use them to automatically qualify leads and accounts based on their research.
There are a few ways of creating an agent:
* Research agents
* Qualification agents
* AI agents on settings page
Let's dive into each of these.
## Research agents
You can use AI agents to answer questions about a person or account. Then you can show in a few places:
* In the plays list
* In the composer
* On the people/account pages
<Note>
**Best Practice**: Design each research agent to answer one specific question. Instead of creating a single agent with multiple questions, create separate agents for each distinct data point you need. This produces more accurate and reliable results.
</Note>
### Displaying research in the plays list
You can add a research agent to the plays list by clicking on `Add AI Agent` in the top right corner of the plays list.
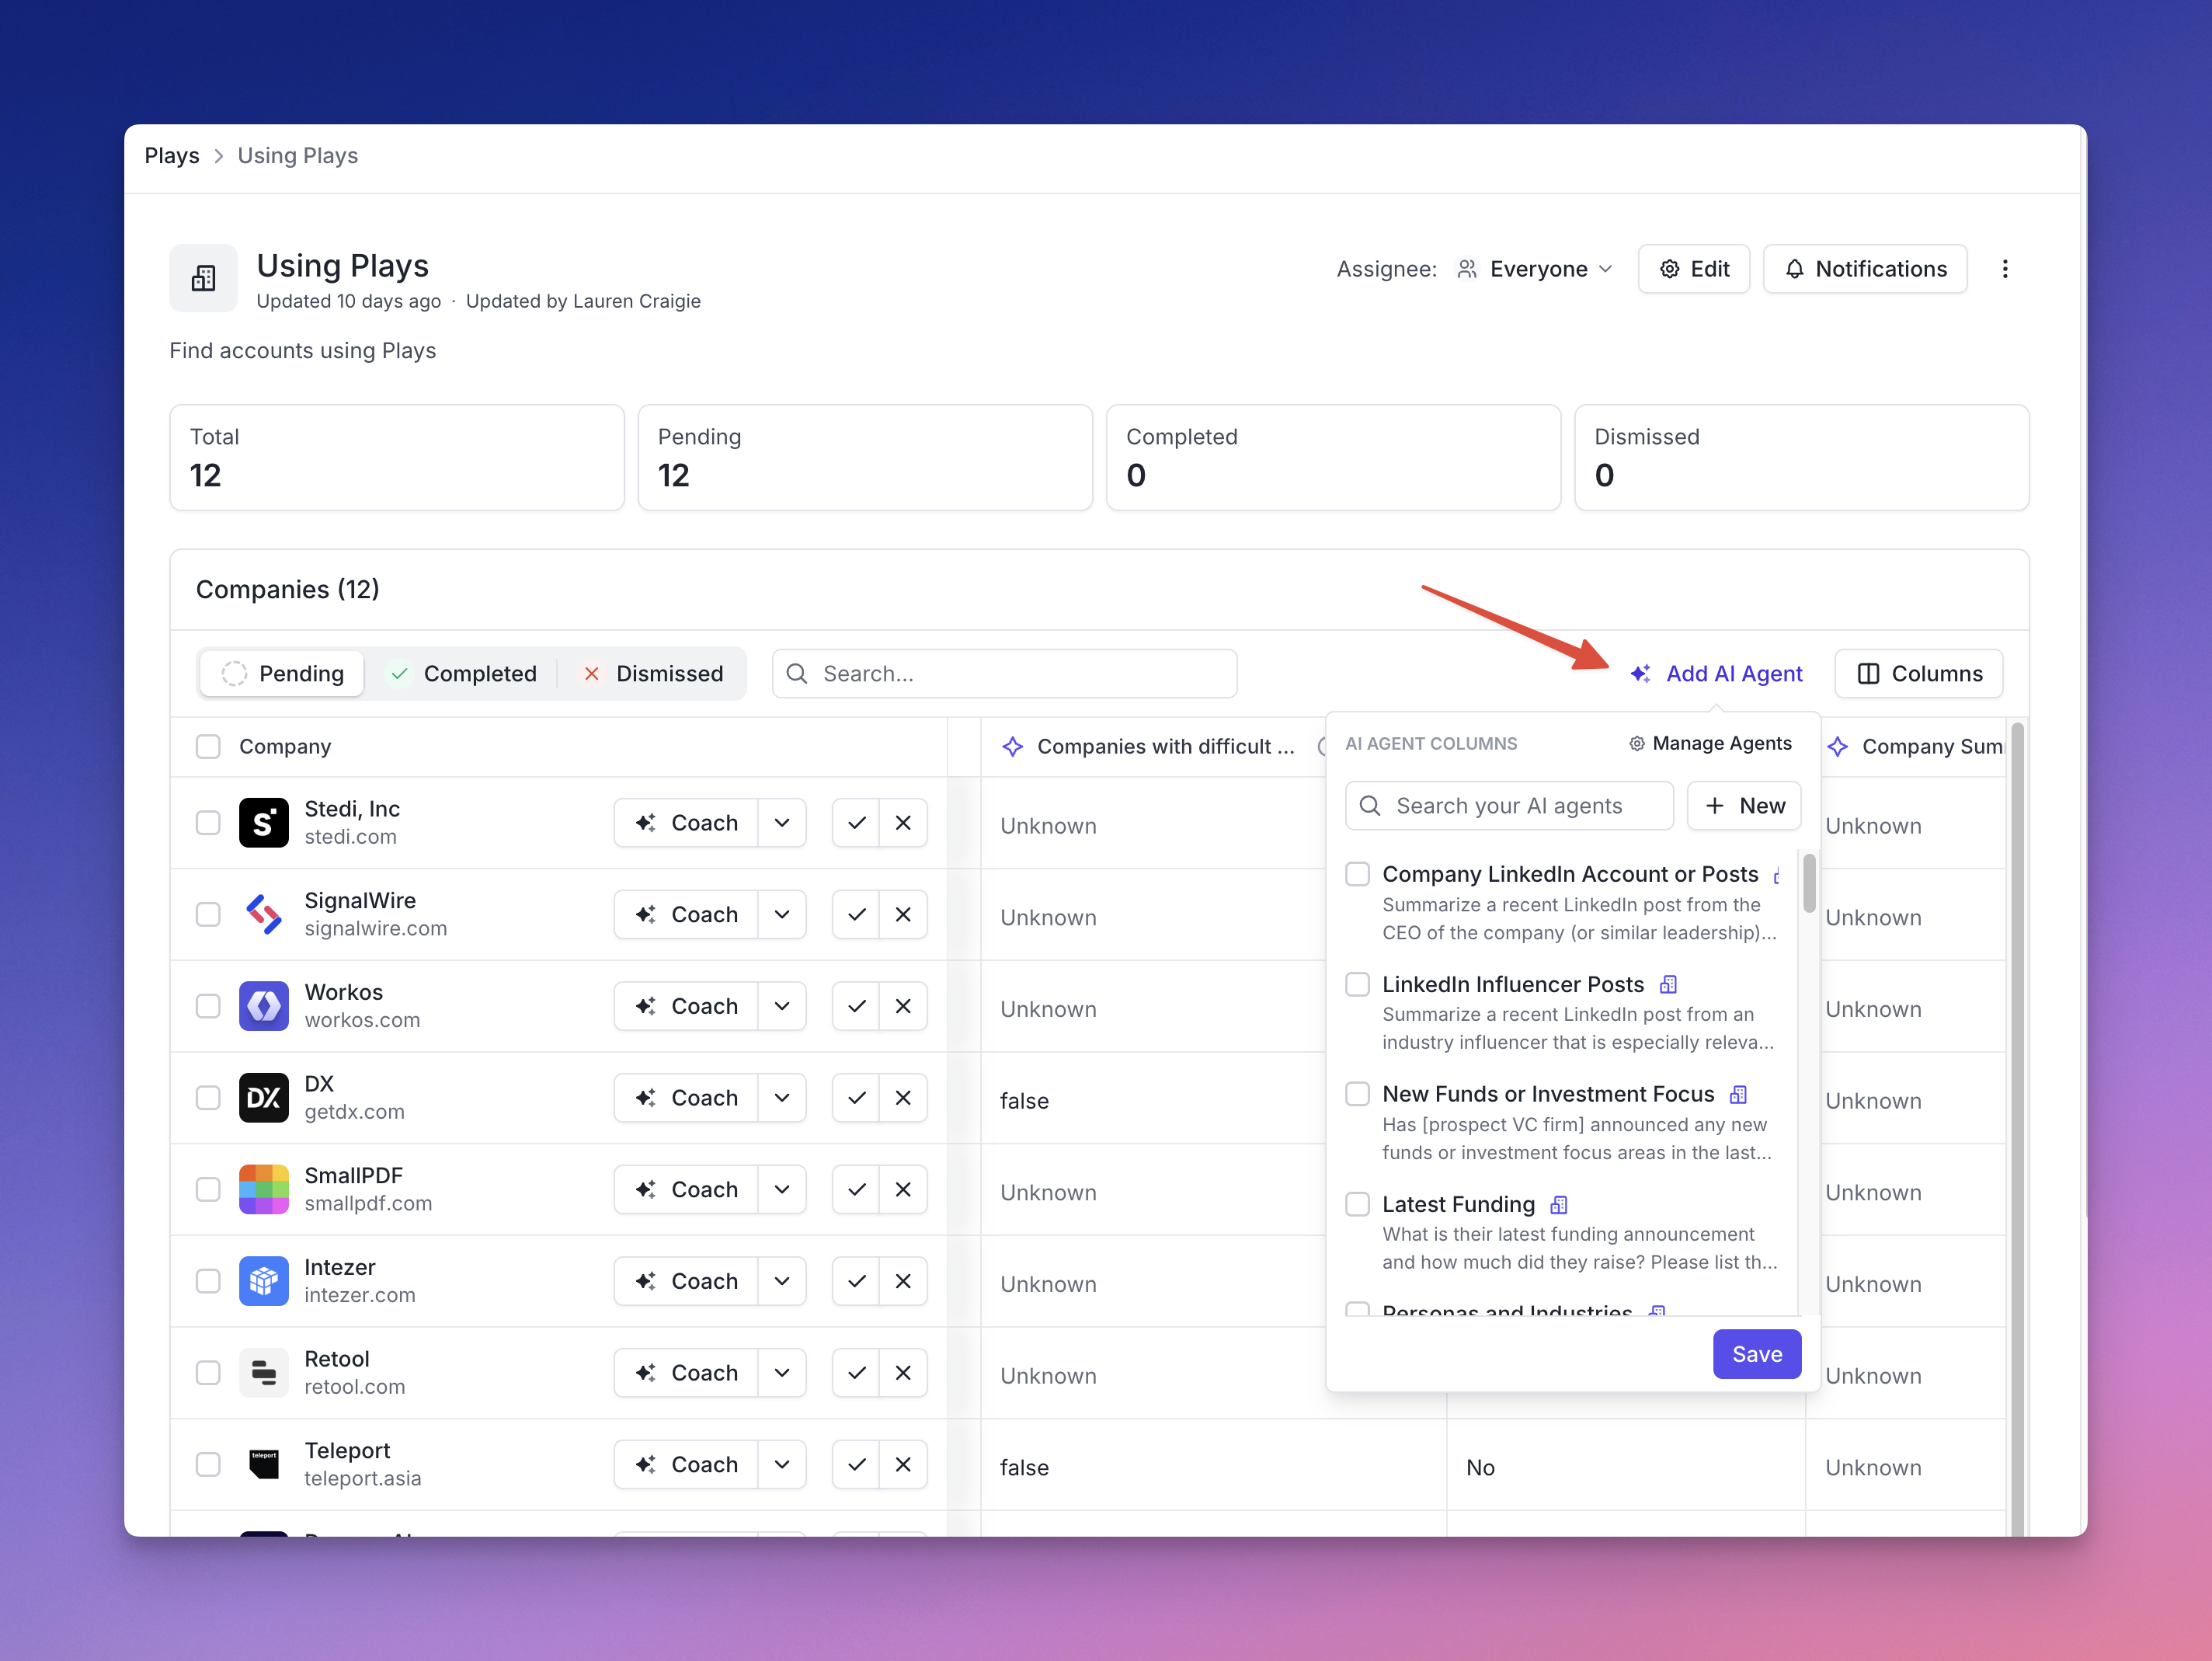
## Using AI Research Agents with Coach
After adding AI Research Agents to a Play, you can use them in Koala Coach. You can select the relevant research knowledge to write personalized emails, LinkedIn messages, and call scripts.
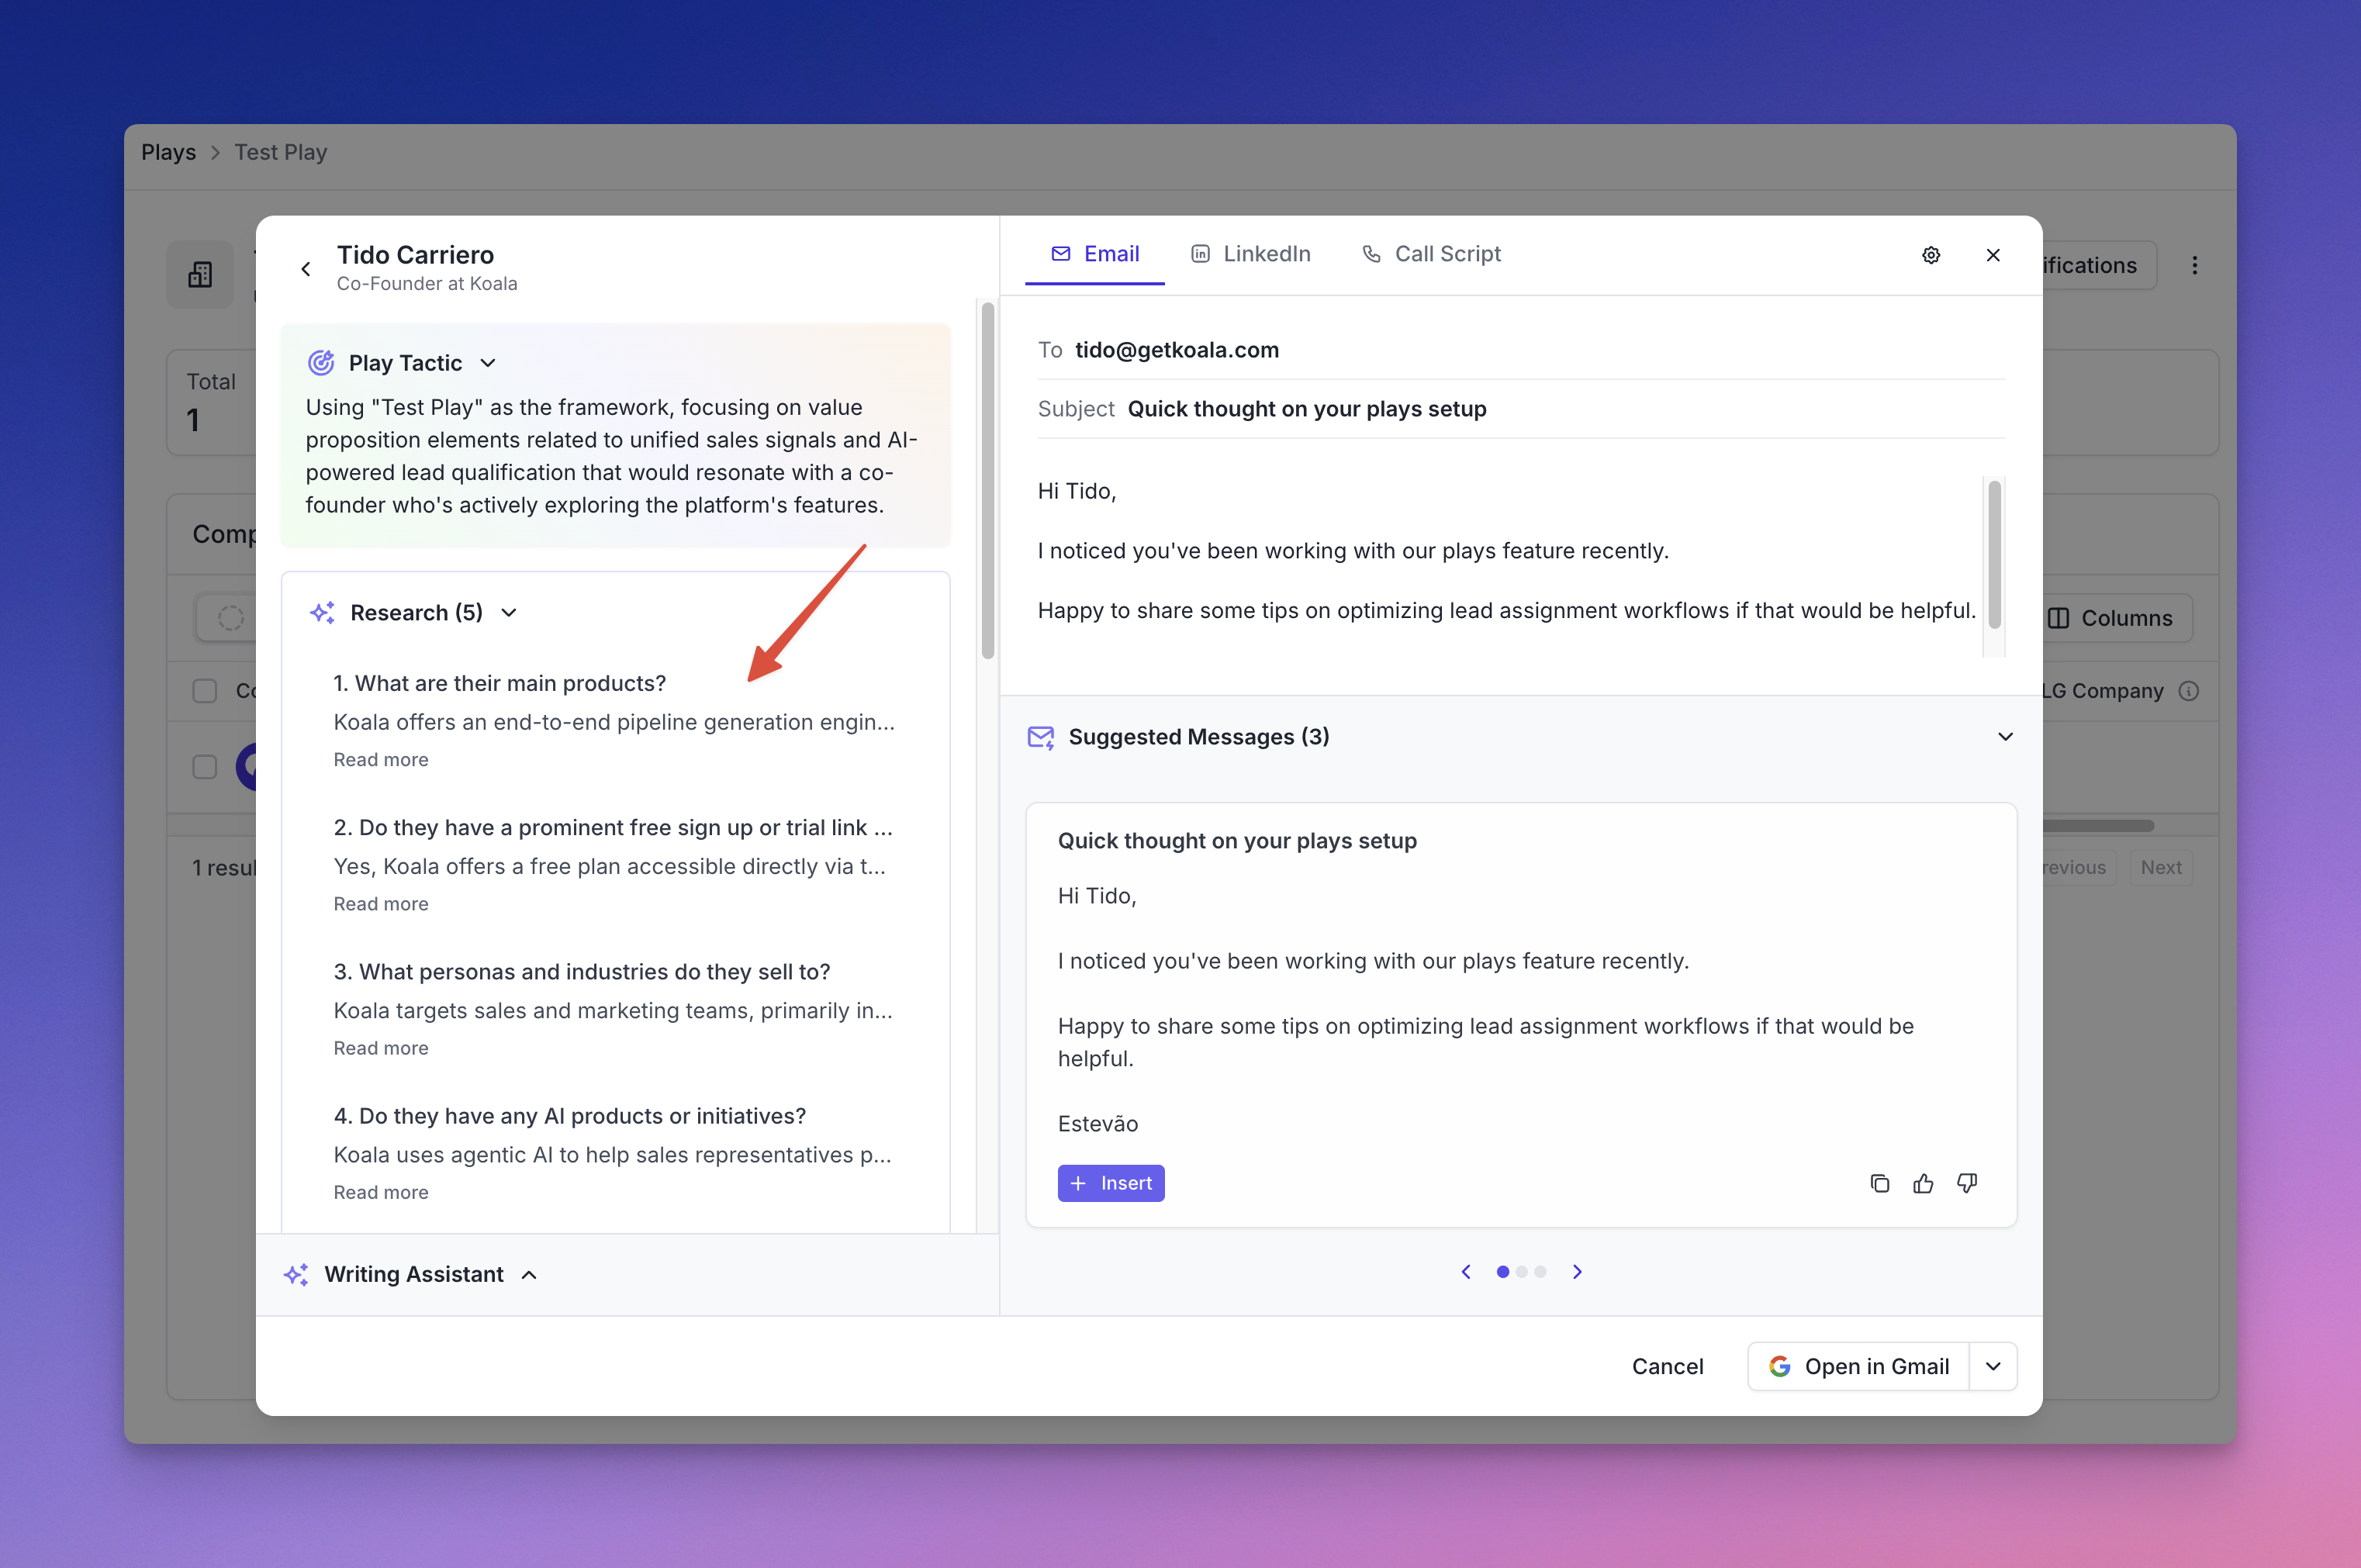
## Displaying research on people/account pages
Additionally, you can view research content on people and account pages.
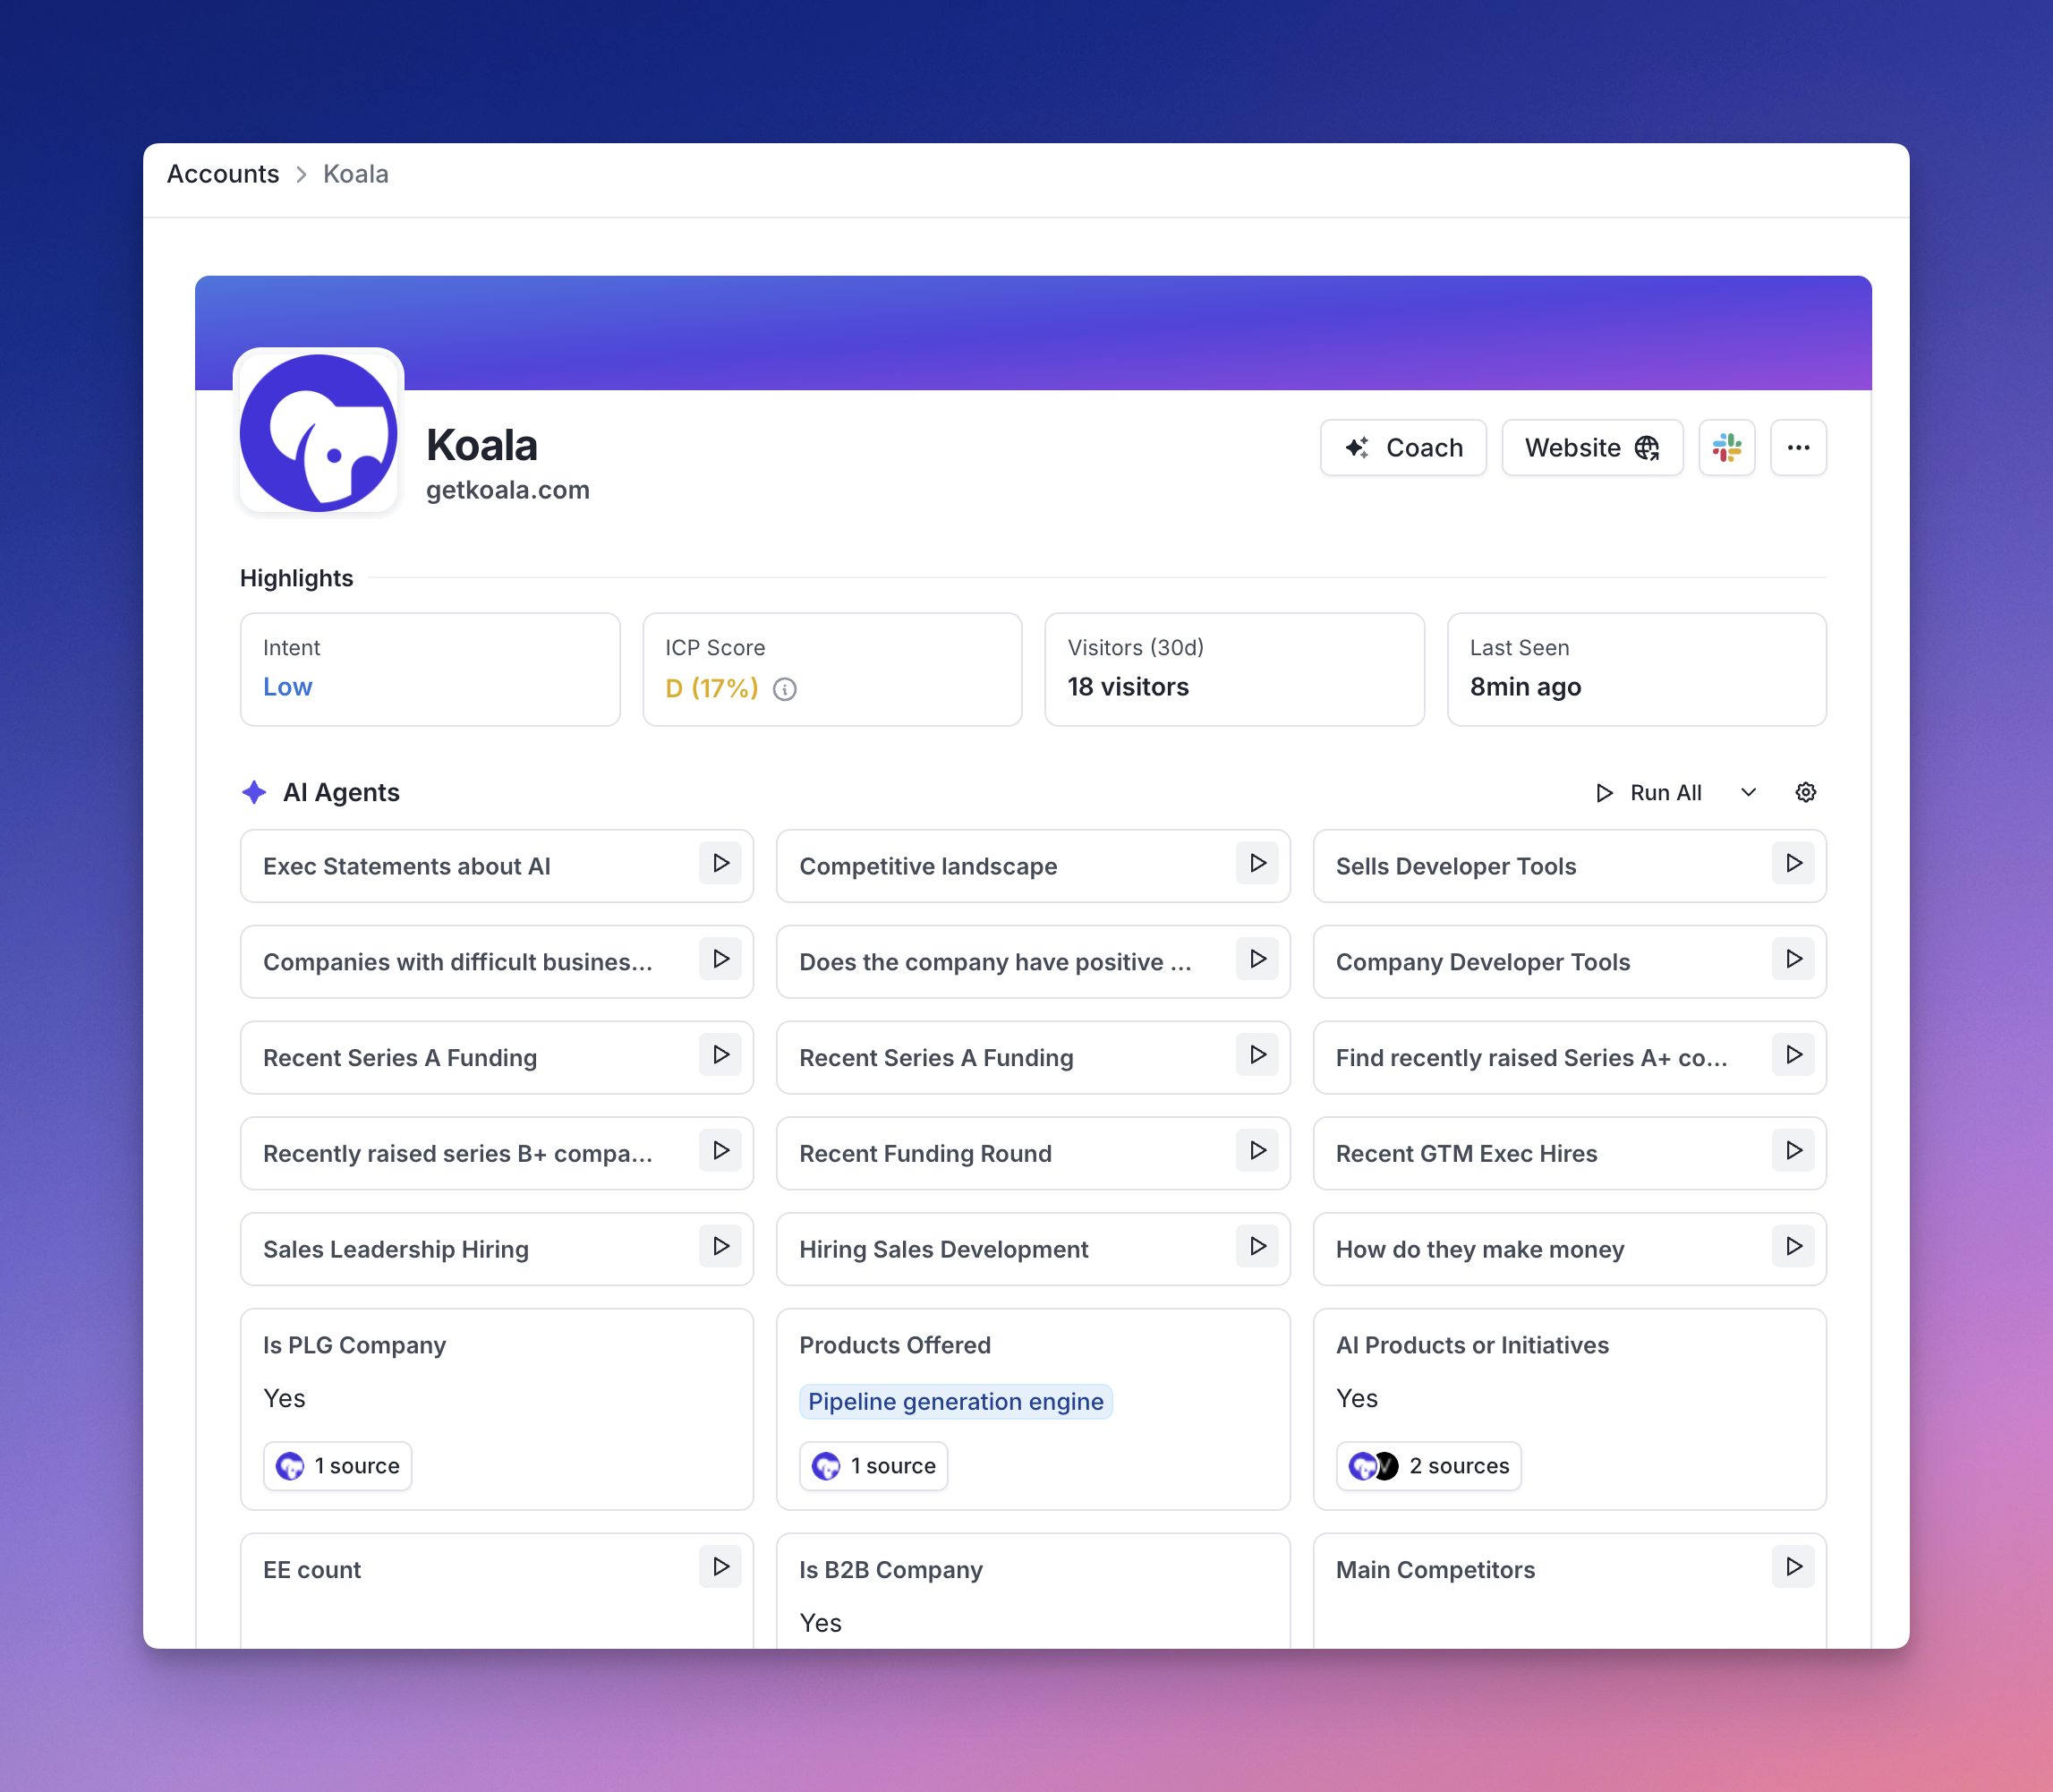
## Qualification agents
You can use a qualification agent to automatically qualify leads and accounts based on research.
<Note>
**Best Practice**: Design each qualification agent to answer one specific question. You can combine multiple qualification agents to create comprehensive qualification criteria, which produces better results than trying to ask too many things with a single agent.
</Note>
### Creating an agent
To create an agent you can use for qualification, select or create a new agent in the third step of the `Create New Play` flow:
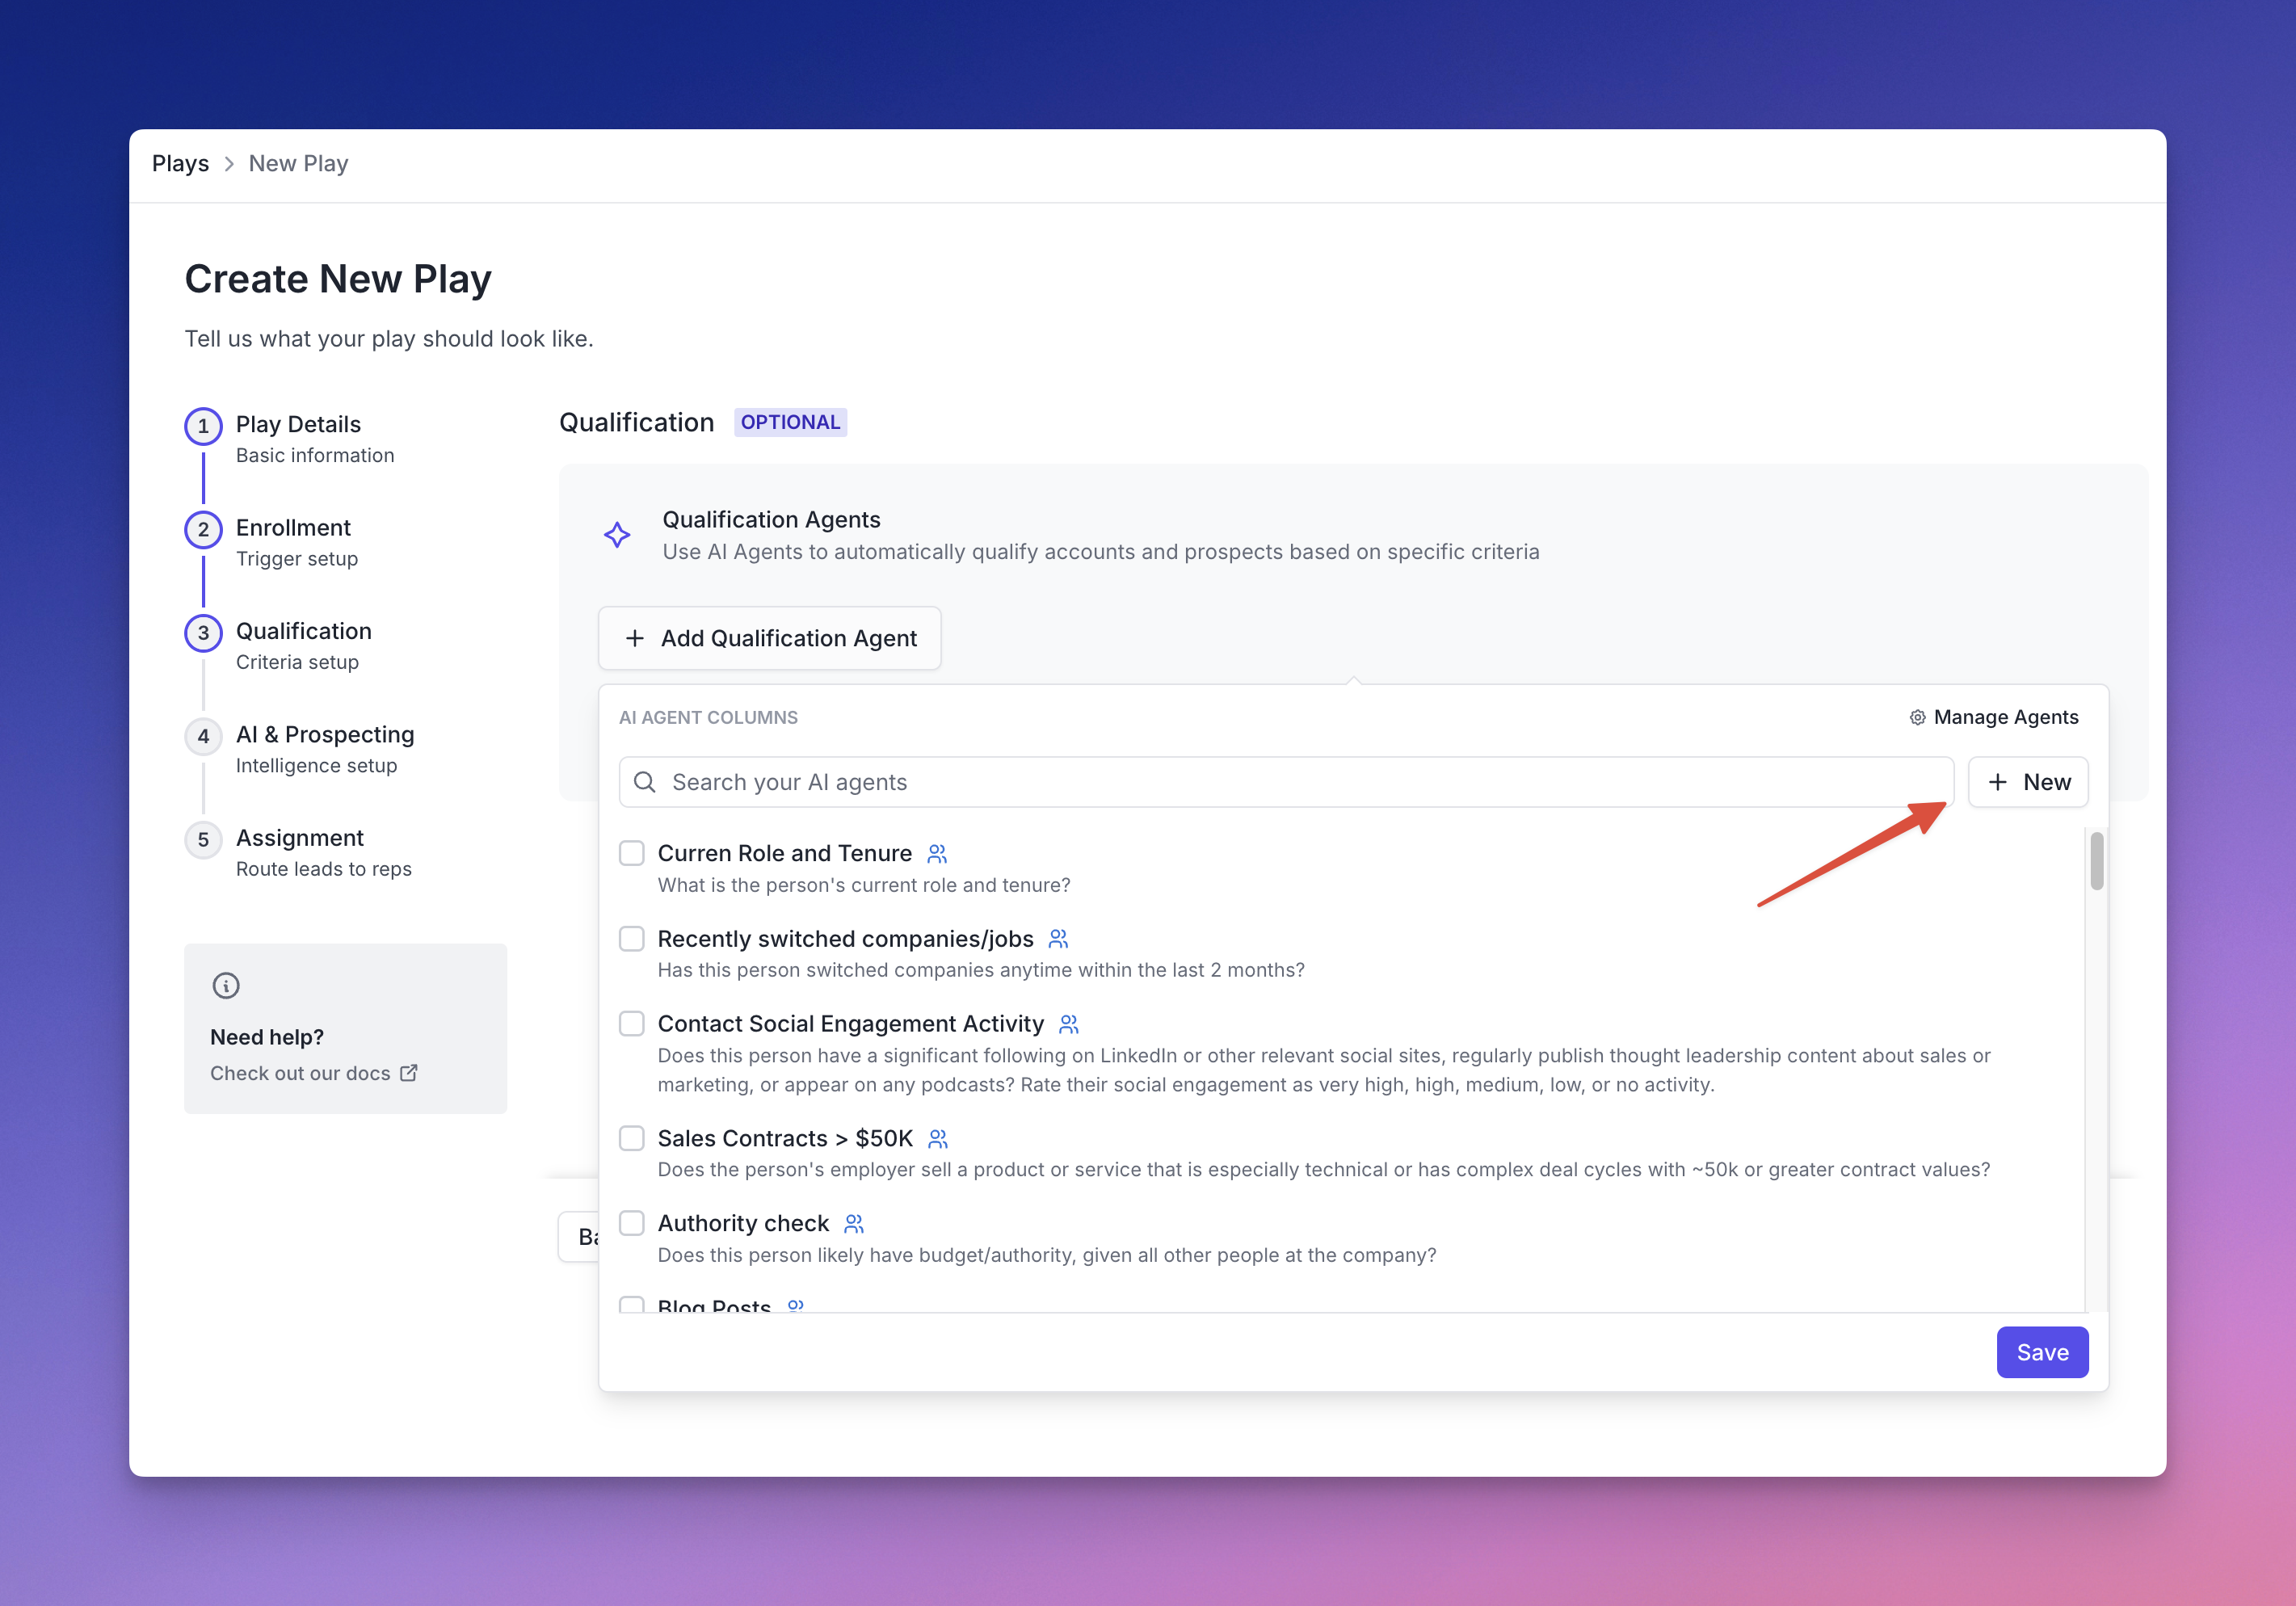
To create an AI agent, you'll need to:
1. **Agent goal** - Define the purpose of your agent (required)
2. **Question/Prompt** - Ask the specific question you want answered (required)
3. **Research type** - Choose between "Companies" or "People" (required)
4. **Research individual people** - Option for people-focused research
5. **Response Type** - Select how the AI should format its answer
6. **Advanced Options** - Additional configuration settings
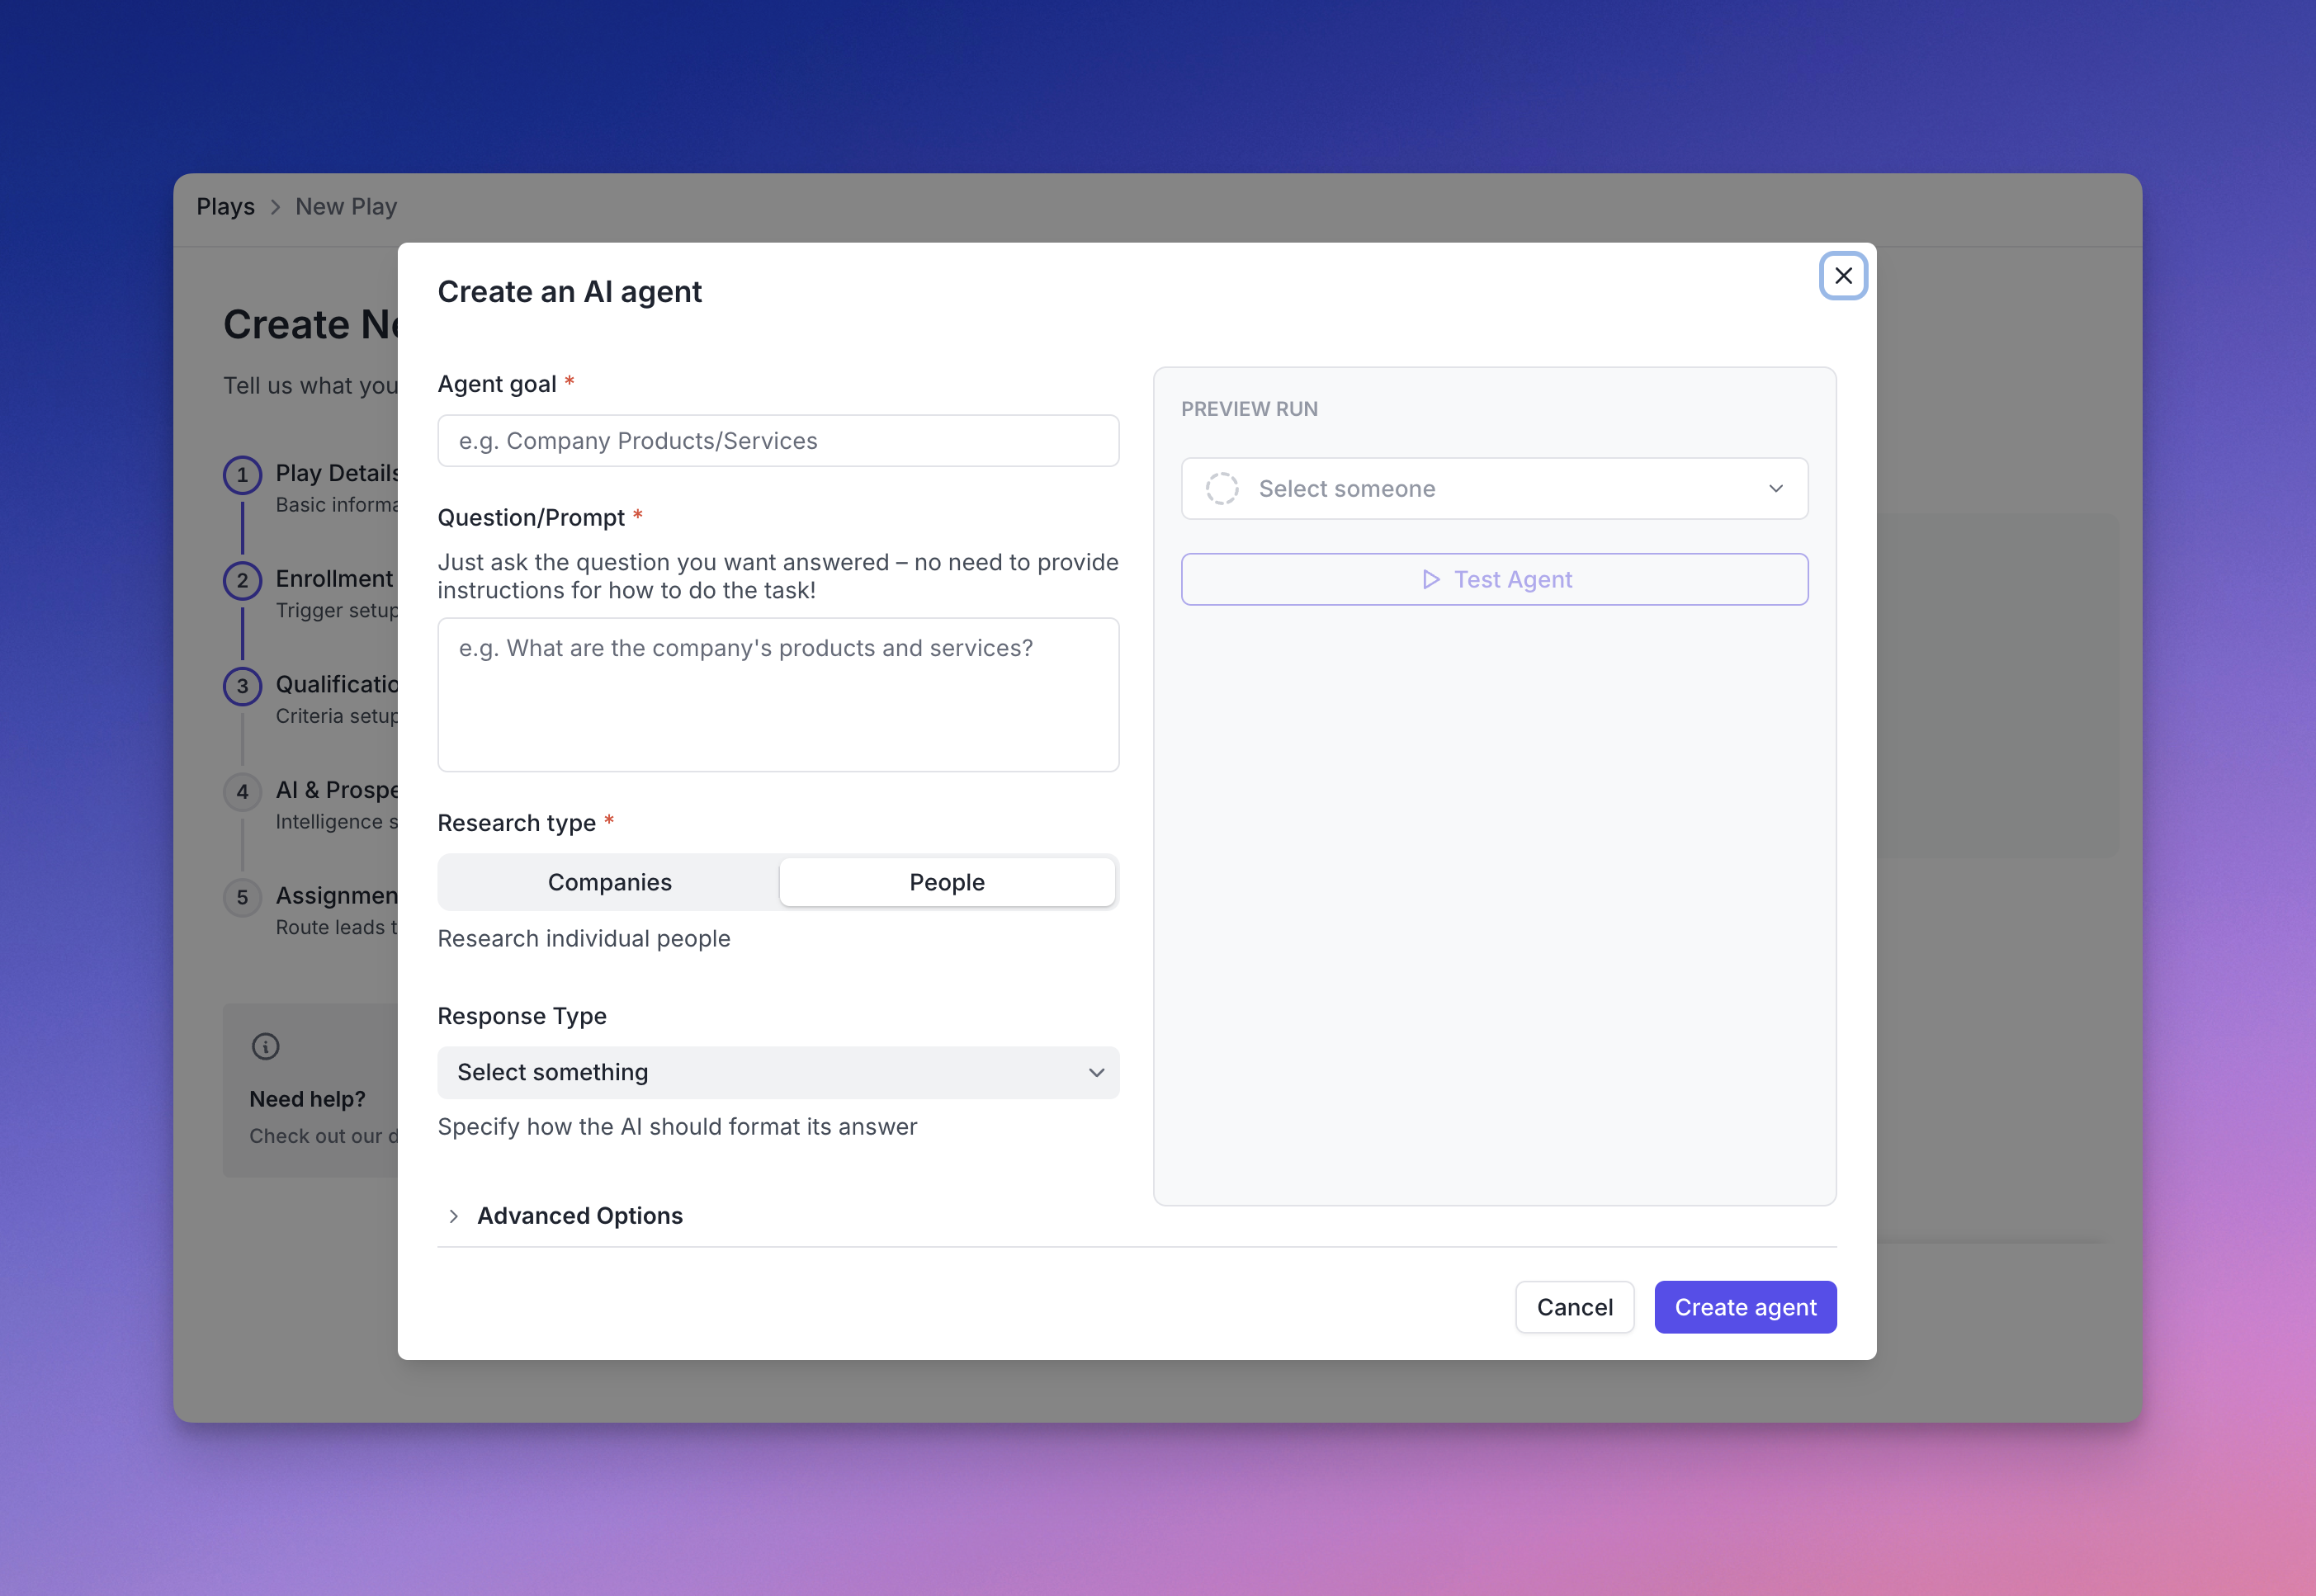
<Note>
For qualification agents, the **Response Type** is particularly important. Based on those you'll set up criteria for qualifying leads and accounts.
</Note>
<Tip>
It's highly recommended to use `Boolean`, `Number` or `Picklist` response types for qualification agents. This will make it easier to set up qualification criteria.
</Tip>
### Qualification criteria and response types
Take the following example:
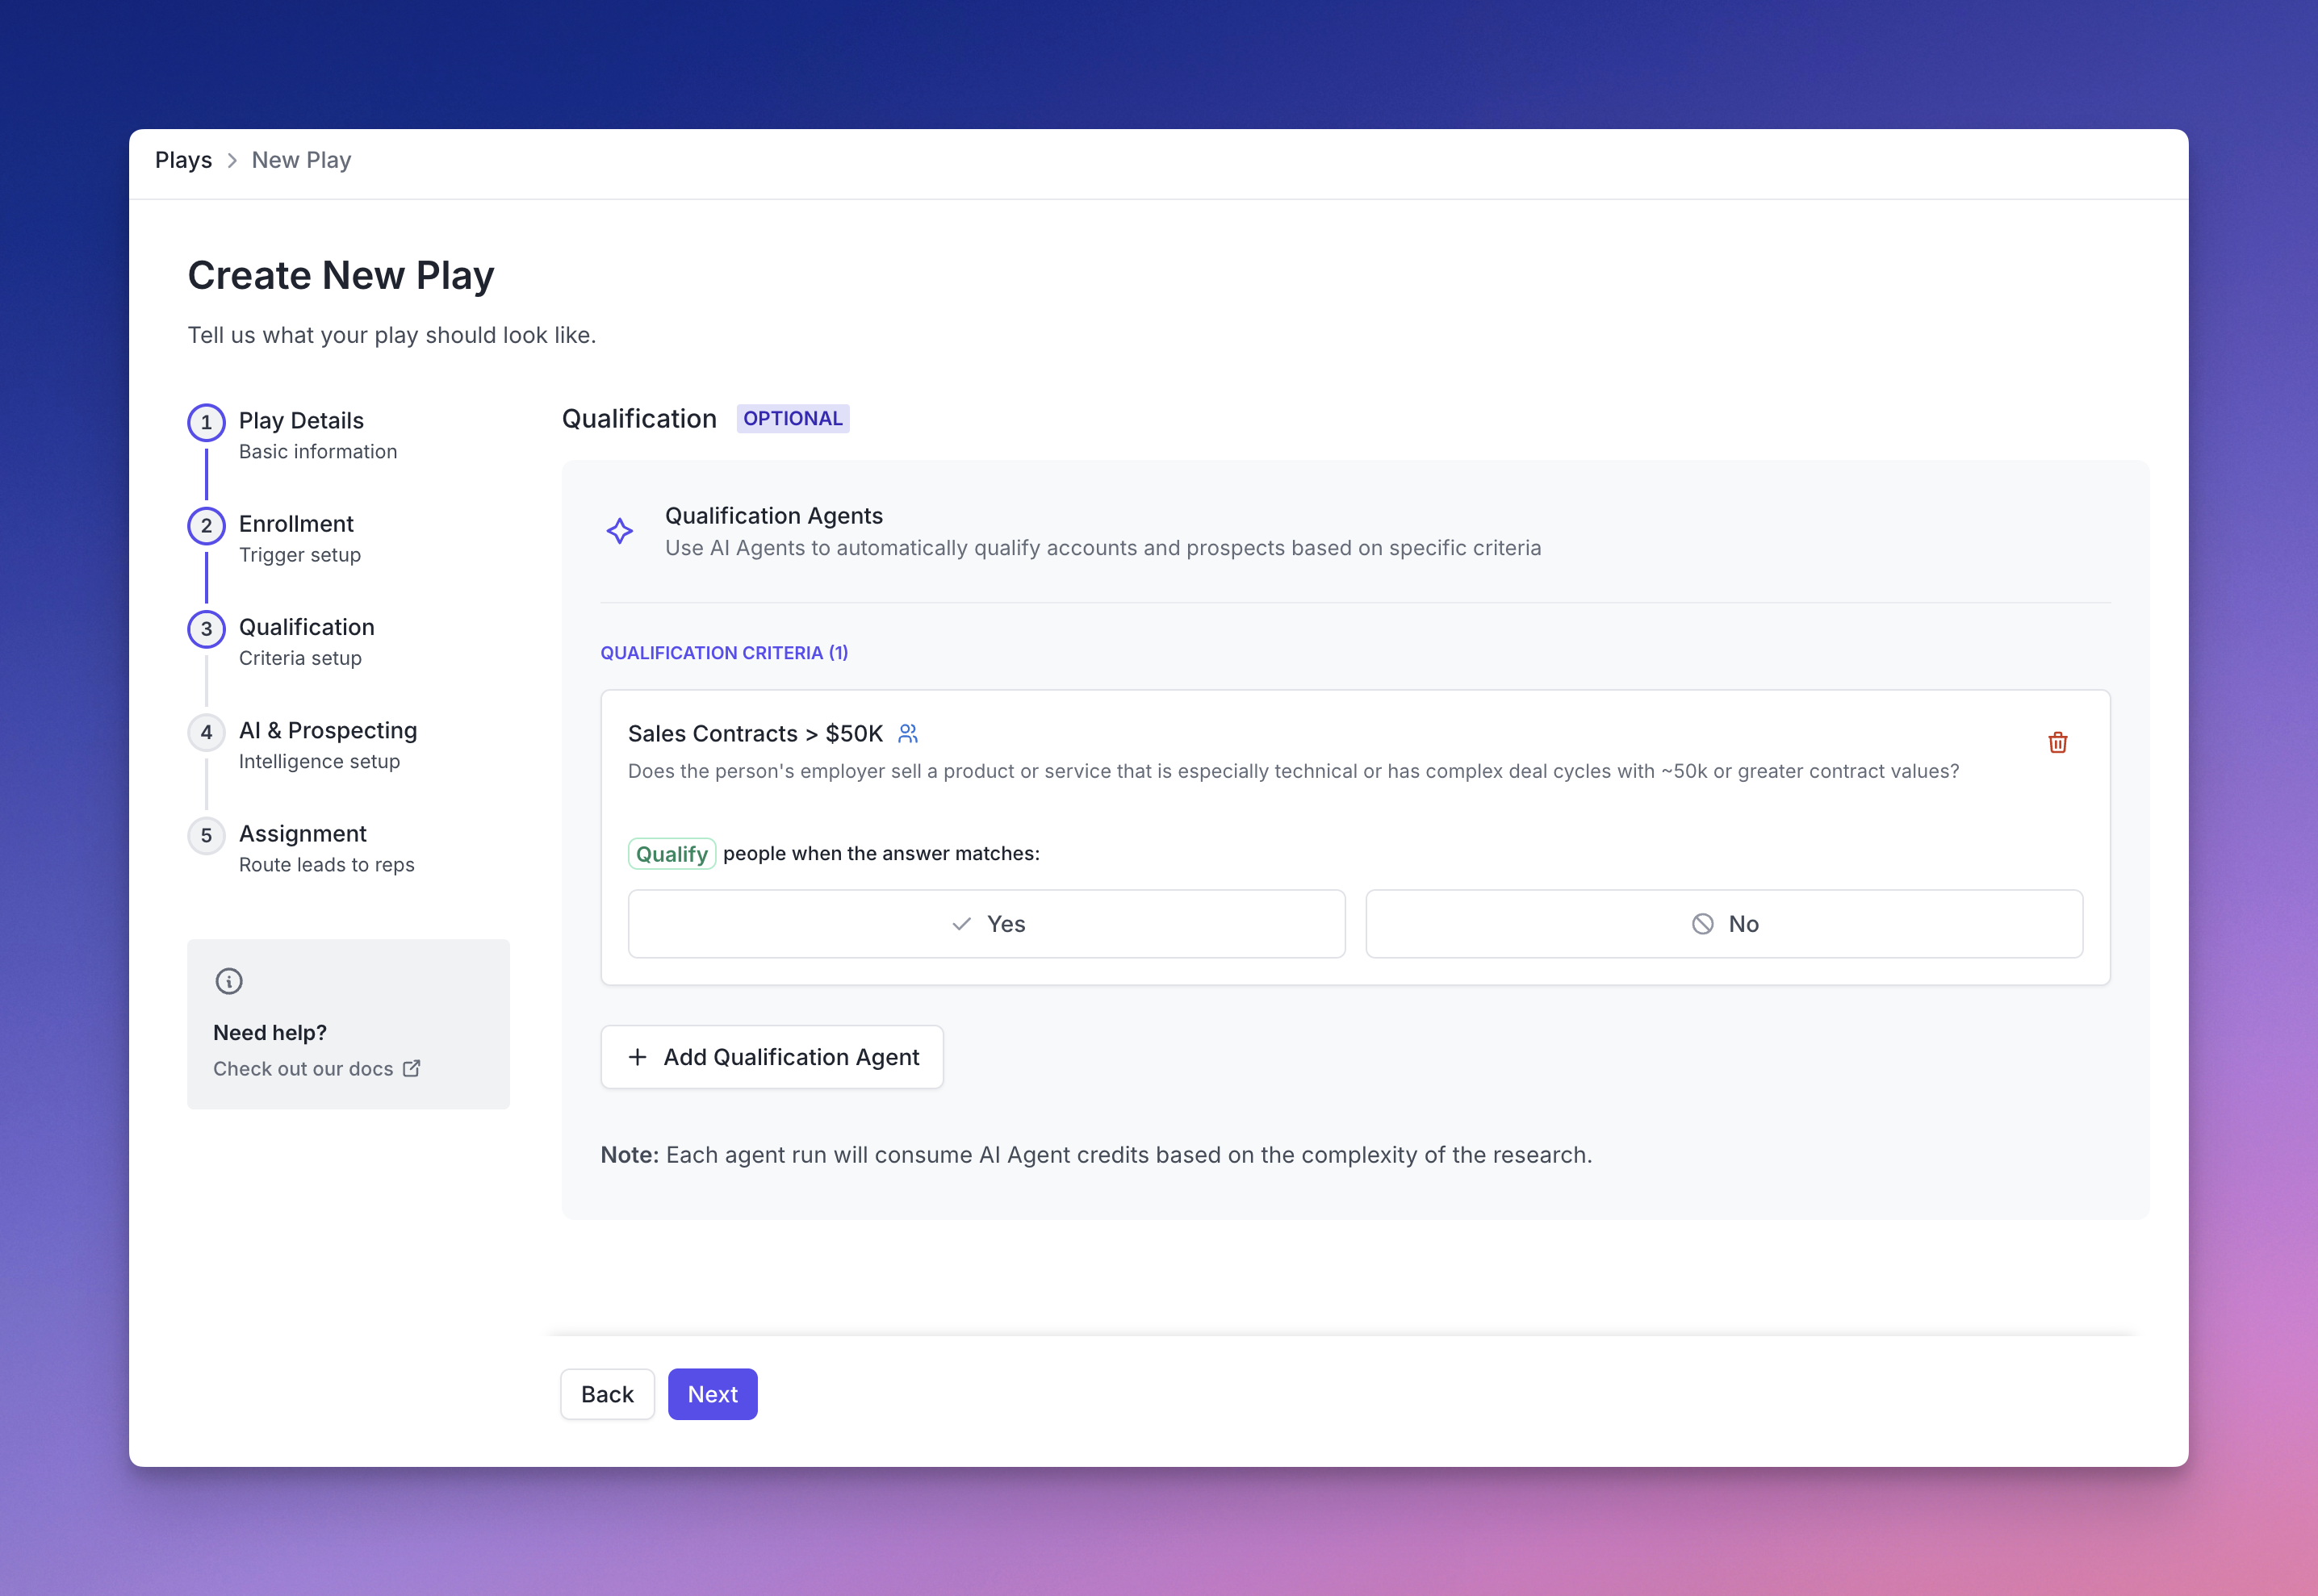
The agent named `Sales Contracts > $50k` has response type `Boolean`, which means that the agent will only return a `Yes` or `No` answer.
You can then set up a rule to qualify a lead or account based on that answer.
**Response types**
We currently support the following response types:
* **String**: A text response for open-ended answers
* **Number**: A numerical value without currency formatting
* **Currency**: A monetary amount with the appropriate currency symbol
* **Percent**: A percentage value
* **Boolean**: A Yes/No or True/False response
* **Date**: A calendar date
* **List**: Multiple items returned as a list
* **Picklist**: Selection from predefined options
Keep in mind that the response type will affect the criteria you can set up.
## AI Agent best practices
For the best results with your AI agents, follow these guidelines:
### Prompting best practices
1. **Be specific and concise**: Clearly state what information you need in simple language.
2. **Focus on one question**: Each agent should answer one specific question rather than multiple questions.
3. **Include context**: Provide relevant context about why you need this information.
4. **Use clear parameters**: Specify any constraints or requirements (e.g., "only companies with over 100 employees").
### Model selection
Koala supports multiple AI models, each with different strengths. Choose the right model based on your research needs and complexity requirements:
| Model | Suggested Use |
| -------------------------------------- | --------------------------------------------------------------------------------------------------------------------------------------- |
| **GPT-4o** | Complex tasks requiring nuanced research and better fact checking. Best for research that needs deeper reasoning. Use this if in doubt. |
| **GPT-4o-mini** | Great for most tasks - recommended for 90% of use cases. Delivers faster responses while maintaining quality. |
| **Claude 3.5 Sonnet** | Excellent for complex questions requiring sophisticated reasoning when searching the web. |
| **Claude 3.5 Haiku** | A well-balanced model suitable for most web search tasks, offering a good mix of speed and quality. |
| **Perplexity** | Provides fast, straightforward answers from web searches. Good for quick research needs. |
| **Perplexity Reasoning (DeepSeek R1)** | Latest Perplexity model backed by DeepSeek R1, providing more sources and reasoning. |
| **Perplexity Pro** | For complex questions requiring deeper research, offering more comprehensive sources and analysis. |
### Examples of effective agent questions:
* ✅ "Does this company have a sales team larger than 10 people?"
* ✅ "What is the company's annual revenue?"
* ✅ "Is this person a decision maker for purchasing software?"
* ❌ "Tell me about the company's revenue, sales team, tech stack, and recent news." (Too broad)
## Managing agents
You can manage your agents in the `Agents` section of the settings page.
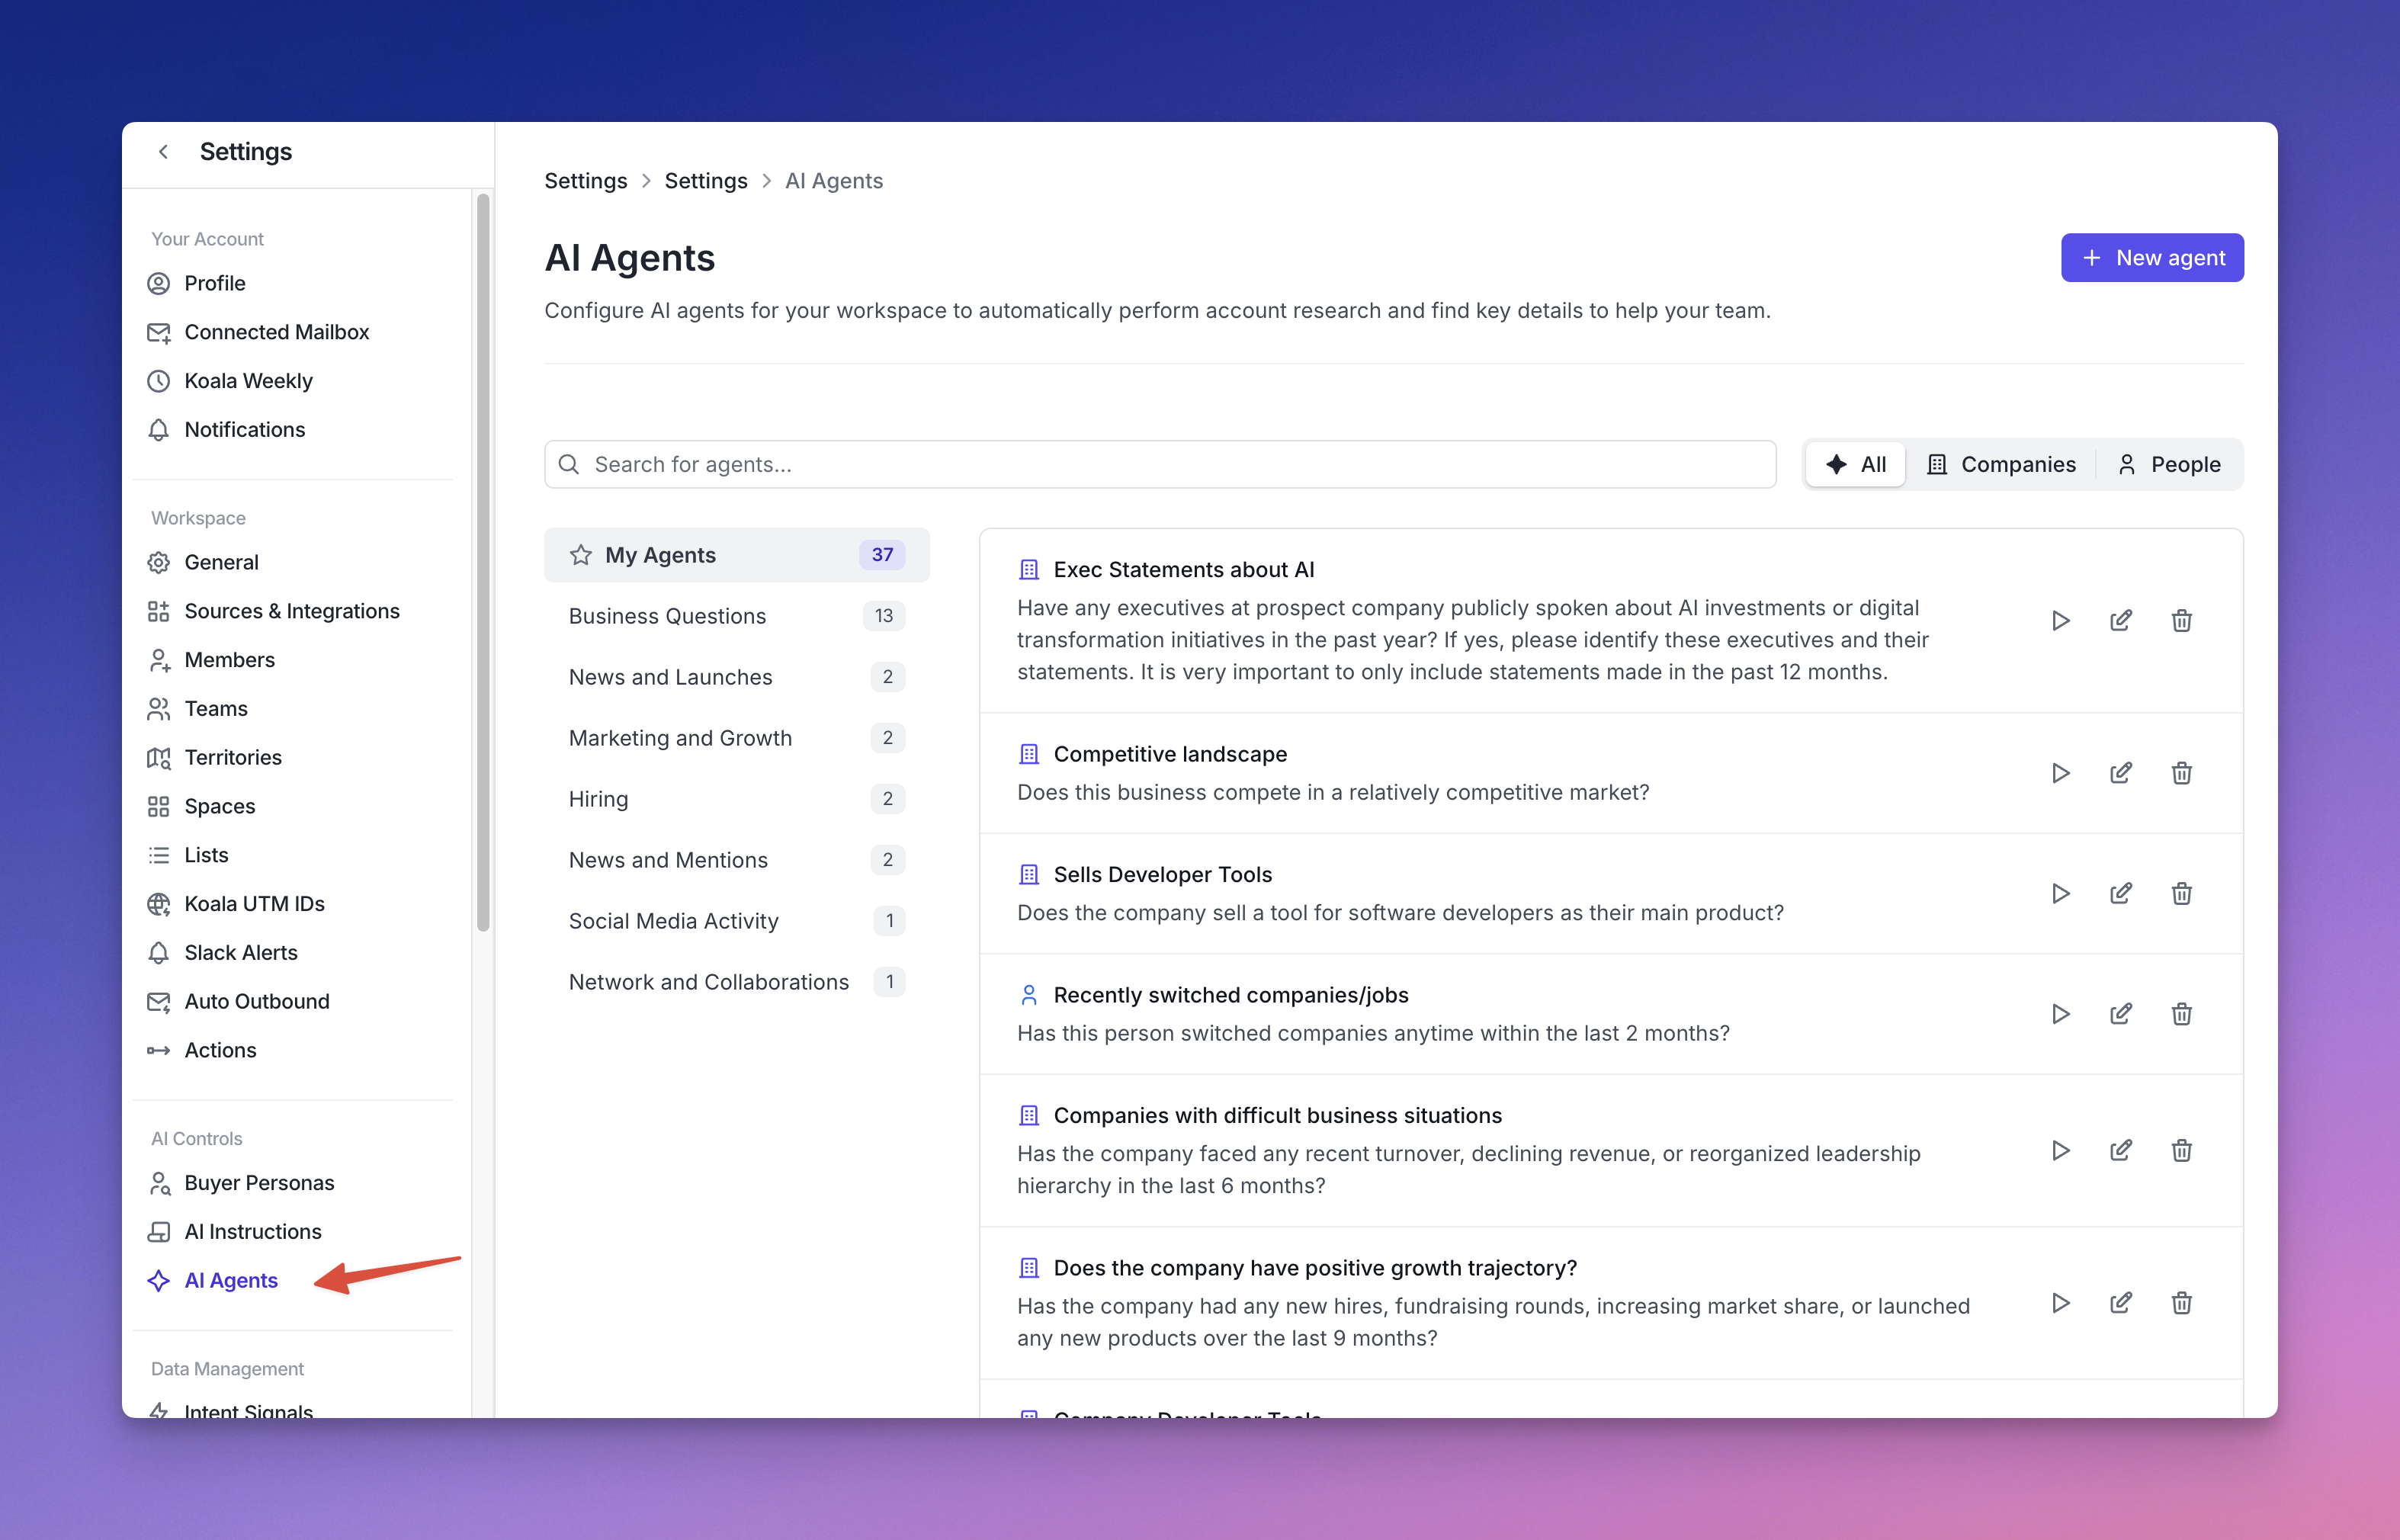
Here you can create, test, edit, and delete agents.
# Audiences
Source: https://getkoala.com/docs/product-manual/audiences
Segment your visitors and accounts by almost anything.
## What is an Audience?
An audience is a collection of visitors or accounts. To understand how to create an audience, it's important to first understand a bit about how Koala thinks about visitors and accounts.
## Accounts and visitors
An account is a company that is on your website (e.g., Koala). We uniquely identify each account using the company's domain (e.g., `getkoala.com`). For companies that have multiple domains (e.g., `getdropbox.com` and `dropbox.com`), we use enrichment data to merge duplicative domains into one company.
A visitor is a person that is on your website (e.g., Tido Carriero). We uniquely identify each visitor using their email address (e.g., `tido@getkoala.com`).
Note that a visitor can also be anonymous and still map to an account — that user will remain anonymous unless they ever provide an email address, at which point they will become a known user.
## Creating an audience
Koala automatically joins together several data sources, enabling you quite a bit of flexibility in terms of audience creation. An audience is a set of filters, and you can see what the filters look like here:
<img width="300" src="https://mintlify.s3.us-west-1.amazonaws.com/koala/images/product-manual/audiences/filters-1.png" />
And here's what they look like when being applied together:

## Details on filters
### Last Seen
In every audience you make there is an implicit filter — when the user or account was last seen. Koala only ever will show you people or accounts that have actively shown intent on your site at some point in the past. This is an important thing to realize — **every single person you see has come to your site and interacted with it in some way**!
### CRM Data
* Salesforce Account data (e.g., account owner)
* Salesforce Opportunity data (e.g., current stage name)
* Salesforce Contact data (e.g., title)
* HubSpot Account data (e.g., account owner)
* HubSpot Deal data (e.g., current stage name)
* HubSpot Contact data (e.g., title)
### Enrichment Data
* Clearbit Account data (e.g., # of employees, industry, etc.)
### Koala Data
* Fit grade (e.g., 'A' or 'D')
* Intent score (e.g., Very high)
* Have they visited a specific page? (e.g., /blog/us-vs-competitor-teardown)
* Have they done an intent signal? (e.g., Read blog)
* Have they spent a certain amount of time on the site? (e.g., 10+ minutes session time)
## Example audiences
Here are a few audience ideas to get you started:
* **Not in CRM**: believe it or not, even if you have a fairly developed CRM, you probably have 2-3x more accounts on your website than are in your CRM. Make sure you're staying on top of these accounts! (You may want to add in some other enrichment filters - e.g., filtering toward your ICP, since you will probably also have some accounts not in your ICP on your site.)
* **Known users not in your CRM**: you can create an audience of all known users on your site that are not contacts in your CRM. This gives you a sense of all the people actively engaging with your marketing materials and/or your app that you aren't currently thinking of contacts in Salesforce.
* **Unowned accounts in a particular Segment/territory**: if you're <a href="/docs/admin-guides/larger-sales-teams">setting up Koala for a larger sales team</a>, these types of audiences are going to be the bread and butter of your strategy. Make sure that each team in your org structure has a corresponding list of unowned accounts that they can work.
This is just scraping the surface — learning to use filters and create audiences is hard, but can lead to some incredibly powerful outcomes. Start simple, but keep iterating and don't settle for a view that has junk (there's always a filter that can help you get rid of the junk!).
## Audiences for Slack Alerts
Here's how audiences can be used to filter Slack Alerts:
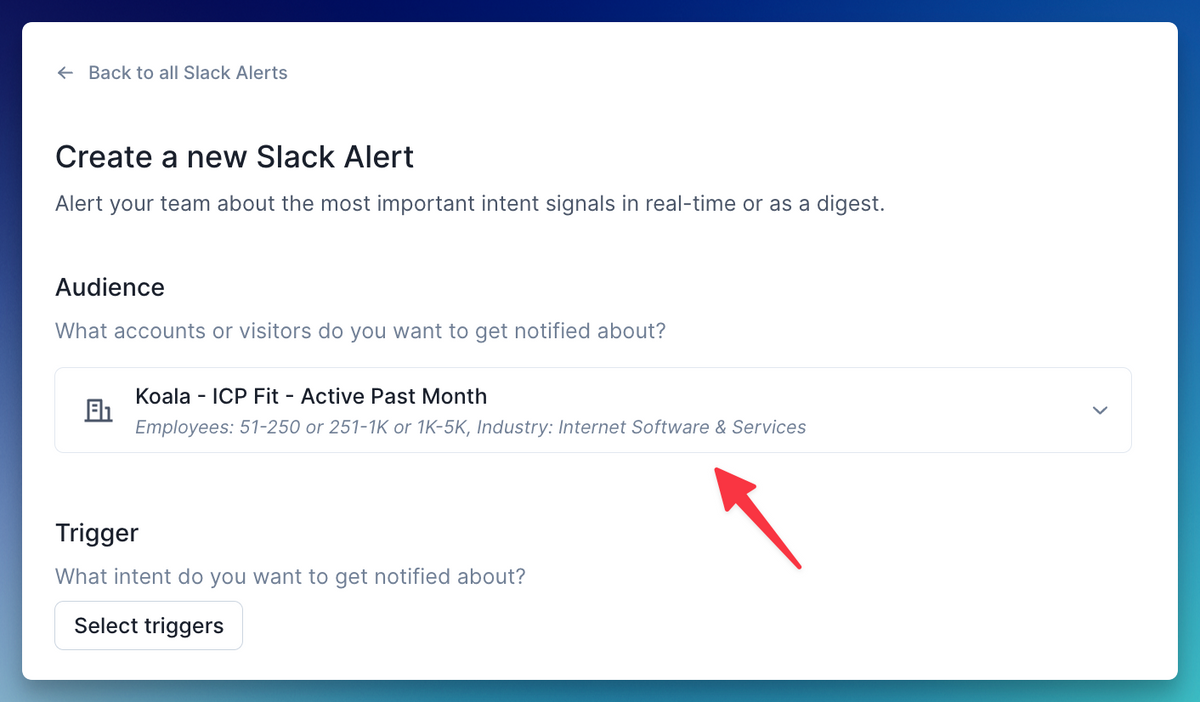
## Audiences and Koala Weekly
Here's what an audience looks like in Koala Weekly:
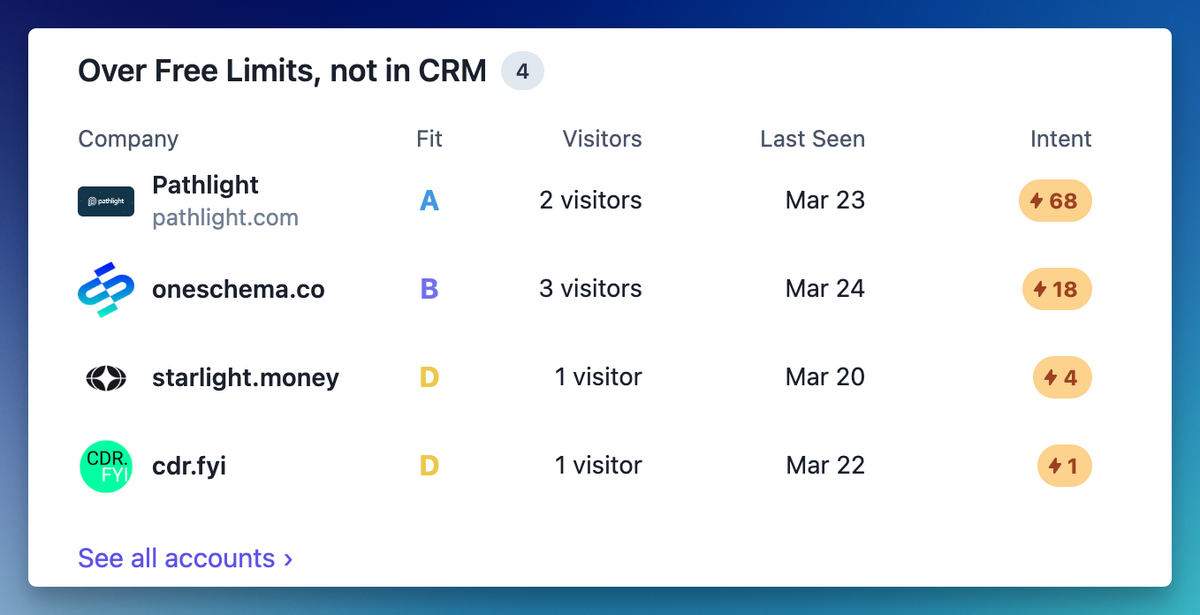
# Content Reports
Source: https://getkoala.com/docs/product-manual/content-reports
Understand what content converts the best
## What is a Content Report?
Content Reports help you analyze which page views, custom events, and form submissions lead to the conversion events you care about. A deep-dive of the purpose of Content Reports and how you might use them lives on the Koala blog: <a href="/blog/koala-content-reports-the-deep-dive">A deep-dive into Koala Content Reports</a>.
Note that typically Content Reports start to get a lot more interesting once Koala has observed over 100 conversions (whatever your definition of "conversion" is), so this is a feature that get smore interesting the longer Koala has been installed.
## What does a Content Report look like?
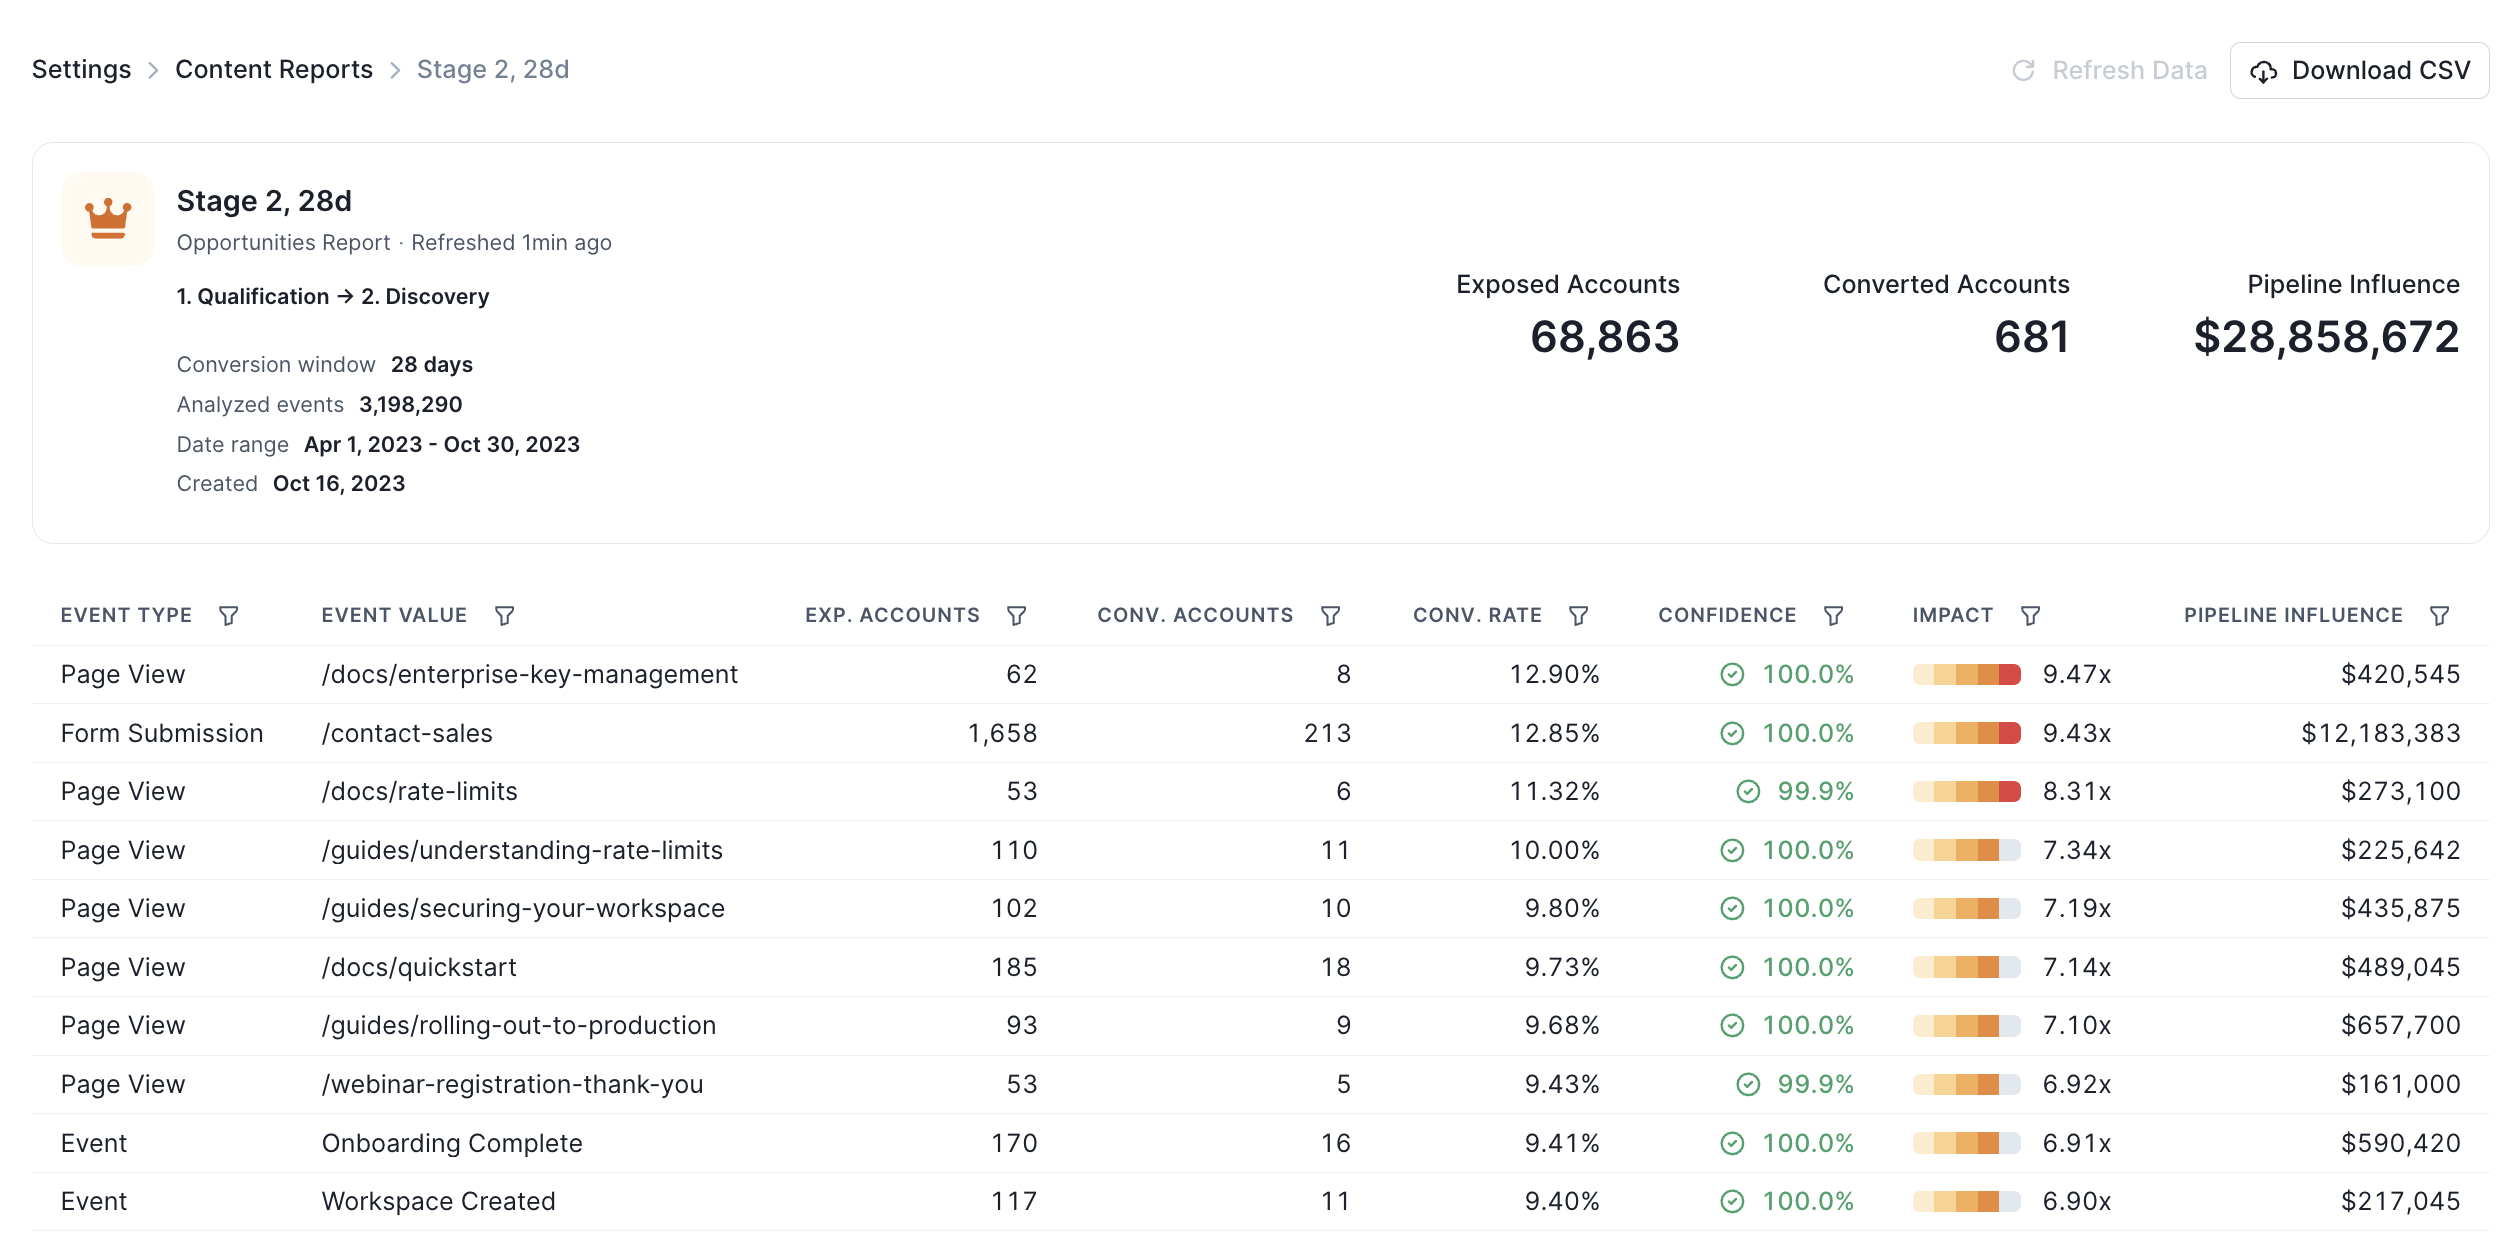
## Conversion Events
You can select any conversion event that you care about. Here are the most common conversion events we see customers using:
* An opportunity becomes "sales qualified" (typically a transition from Stage 1 -> Stage 2, but it depends on your CRM setup)
* A demo request comes inbound
* A trial is started for a paid plan
## Conversion Window
Conversion windows can be set to 7 days, 14 days, 28 days, or 90 days. If you're trying to determine which content shows someone is "sales-ready", we recommend starting with a shorter conversion window of 14 days. If you're trying to understand the performance of more top of funnel / awarness content (eg., a blog post), it may make sense to consider a longer conversion window of 90 days, since you wouldn't expect for that top of funnel content to immediately convert to a sales opportunity.
## Sorting & Filtering
You can sort by any column - for instance, if you wanted to see which pieces of content drove the most pipeline dollars, or which pieces of content drove the most opportunities.
You can also use advanced filtering - below are a few common uses of filtering:
* Only include content with a statistically significant conversion rate (ensures that you don't over-index on low-exposure content)
* Use event type filtering to compare similar actions against each other (eg., only marketing form-fills or only custom events that happen in the product)
* Use event value filtering to compare similar types of content against each other (eg., all technical docs, all blog posts, all case studies, etc.)
# Intent Signals
Source: https://getkoala.com/docs/product-manual/intent-signals
Highlight meaningful moments in the customer journey that signify buying intent and deeper product usage.
## What is an Intent Signal?
An Intent Signal is a moment in the customer journey that signifies buying intent. Koala reports on the raw data of every single visitor across every single account, which can be a lot of data to comb through. Intent Signals are "highlights" of this activity that are so important they (1) generate a real-time Slack Alert and (2) are highlighted on the profile page.
Intent Signals can be made from any action a vistor does:
* **page view** (e.g., /pricing viewed for 30+ seconds)
* **form fill** (e.g., /webinar-registration with a work email)
* **active session time threshold** (e.g., visitor crosses 10 minutes session time this month)
* **user trait change** (e.g., user goes from anonymous to known by submitting an email)
* **account trait change** (e.g., data starts flowing into a workspace)
* **custom event** (e.g., 'Invite User' event happens in your product)
## Intent Signals & Slack Alerts
Here is what it looks like to send Intent Signals to a Slack channel:
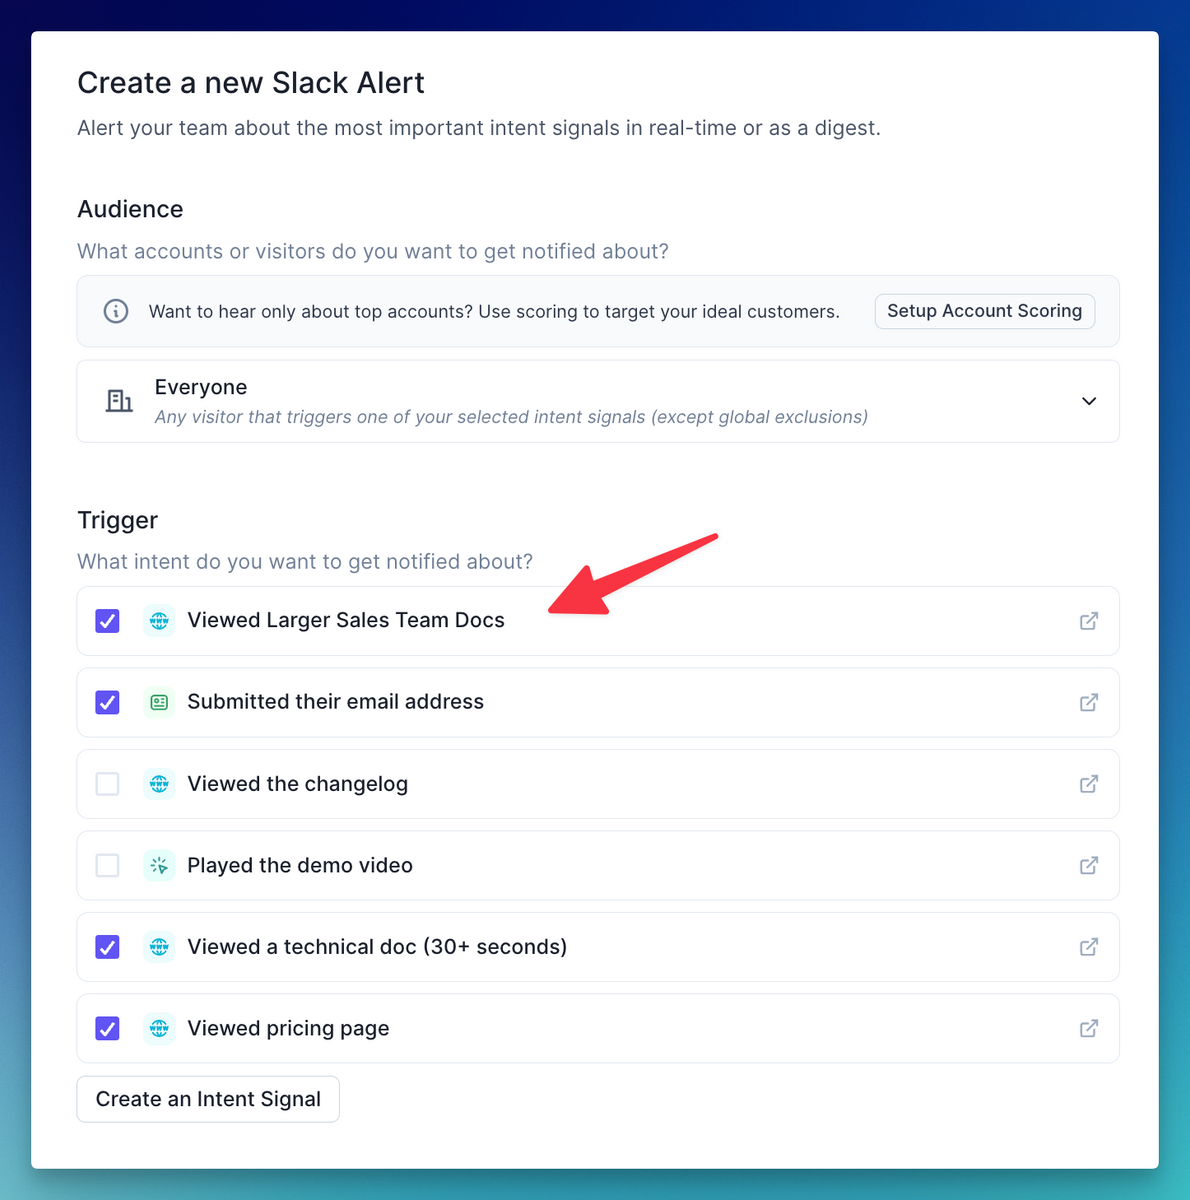
And here's what it looks like for a sales rep to receive an Intent Signal:
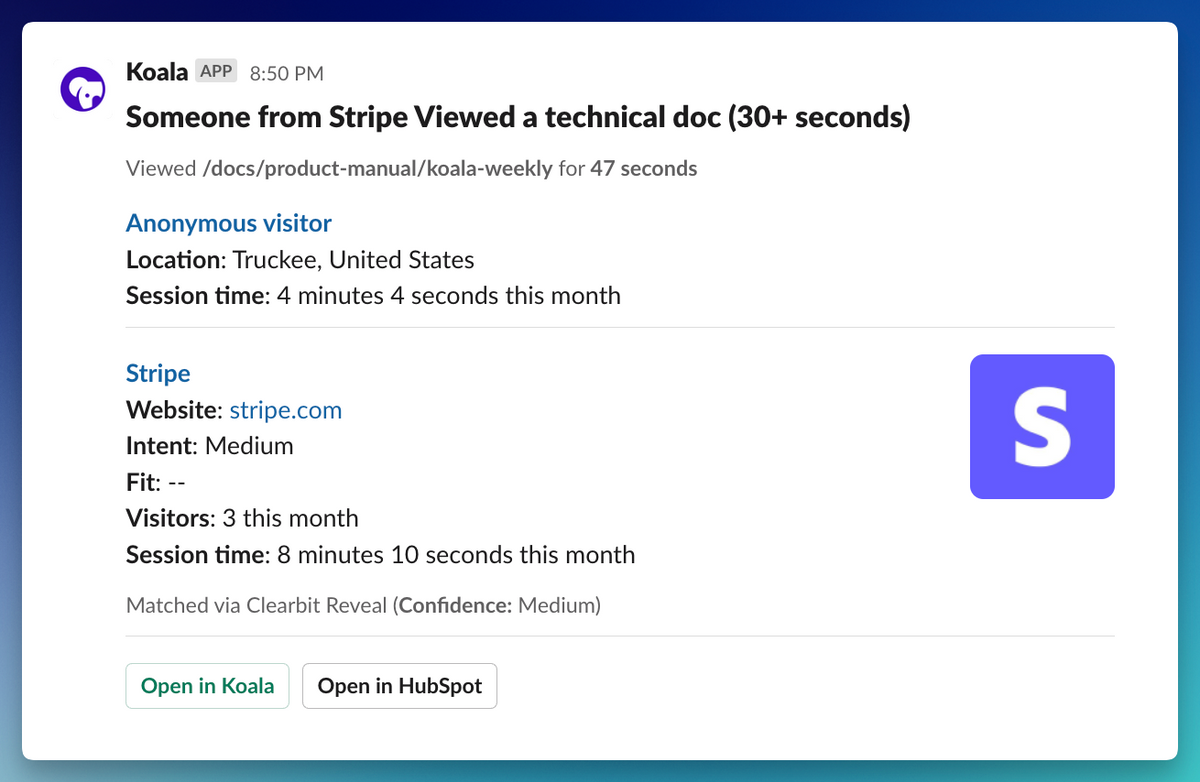
## Intent Signals on profiles
Here is what Intent Signals look like when you're doing account research on profiles:
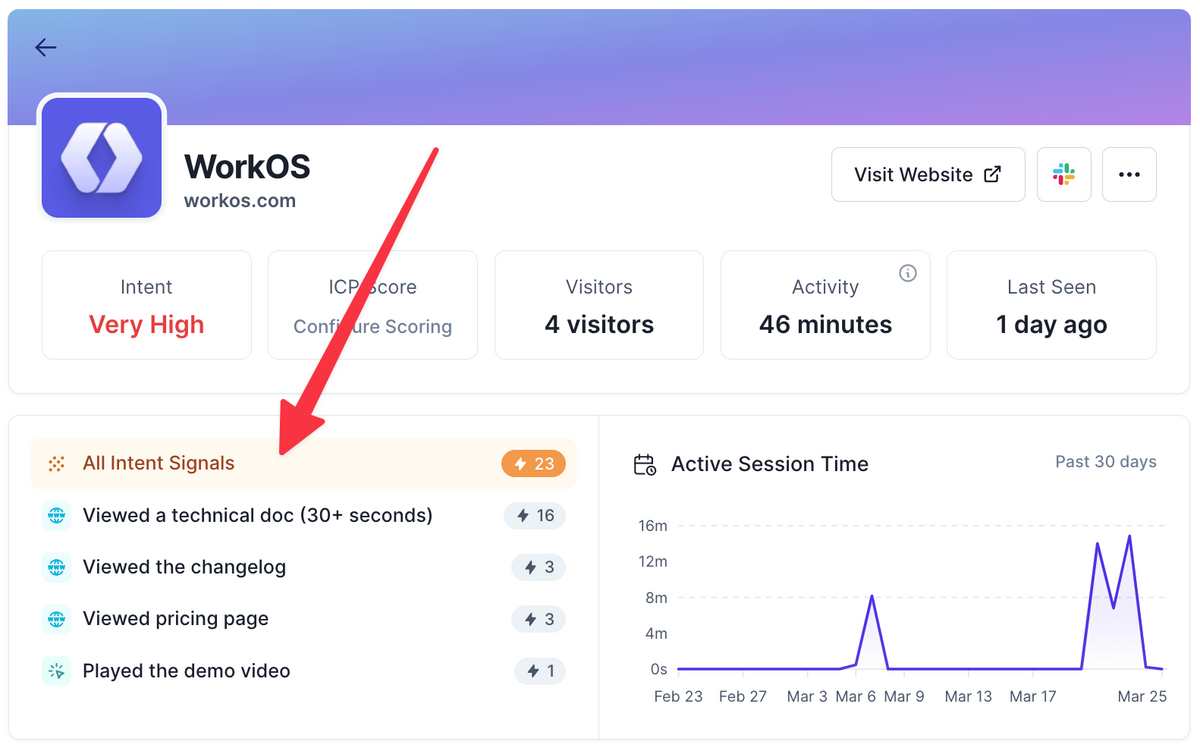
## Getting started with Intent Signals
Though it may sound like a simple concept, figuring out what Intent Signals to set up is at the core of your company's GTM strategy. We find that getting a few folks together — someone representing Demand Gen / Growth and someone representing the Sales Development team — often yields the best results. Koala makes it easy to iterate on Intent Signals — both trying new ones and discarding the ones that don't work.
To help you on this journey, we have two guides.
### First Intent Signals
<a href="/docs/admin-guides/first-intent-signals">First Intent Signals</a> contains best practices around setting up the first set of signals from your marketing site — think "visited the pricing page" or "visited our technical docs about SSO." These are simpler to instrument and are a blind spot in most organizations.
### Advanced Intent Signals
<a href="/docs/admin-guides/advanced-intent-signals">Advanced Intent Signals</a> contains some of the more powerful Intent Signals you should consider, especially if you have a free trial, PLG motion, or Proof of Concept in your Sales cycle.
# Plays
Source: https://getkoala.com/docs/product-manual/koala-plays
Encode a signal-based sales strategy and dole it out to the right reps on your team
## Building a play
Koala Plays let you encode a signal-based sales strategy and dole it out to the right reps on your team. Typically you’ll want to cover your highest converting signals and build a rep-in-the-loop workflow around engaging these priority leads when you want a more human touch (we can do an automated touch too, but we’ll be covering the UI experience here).
This could be tried-and-true / evergreen plays like Demo Form Abandoners or Pricing Visitors, one-off micro campaigns like working a list of webinar attendees with relevant follow-up outreach, or more novel/experimental plays you want to try out with a small team of reps.
### What do you need to create a play?
Plays are made up of a few core components:
* What – what’s the name, description or goal of the play? This includes what information you want to know about the leads/accounts (via AI Research + custom columns). All of these features will be used as additional context for Koala’s AI that helps extract key insights about the account, lead, deal, and why this play is relevant. It’ll also feed into the AI-suggested messaging.
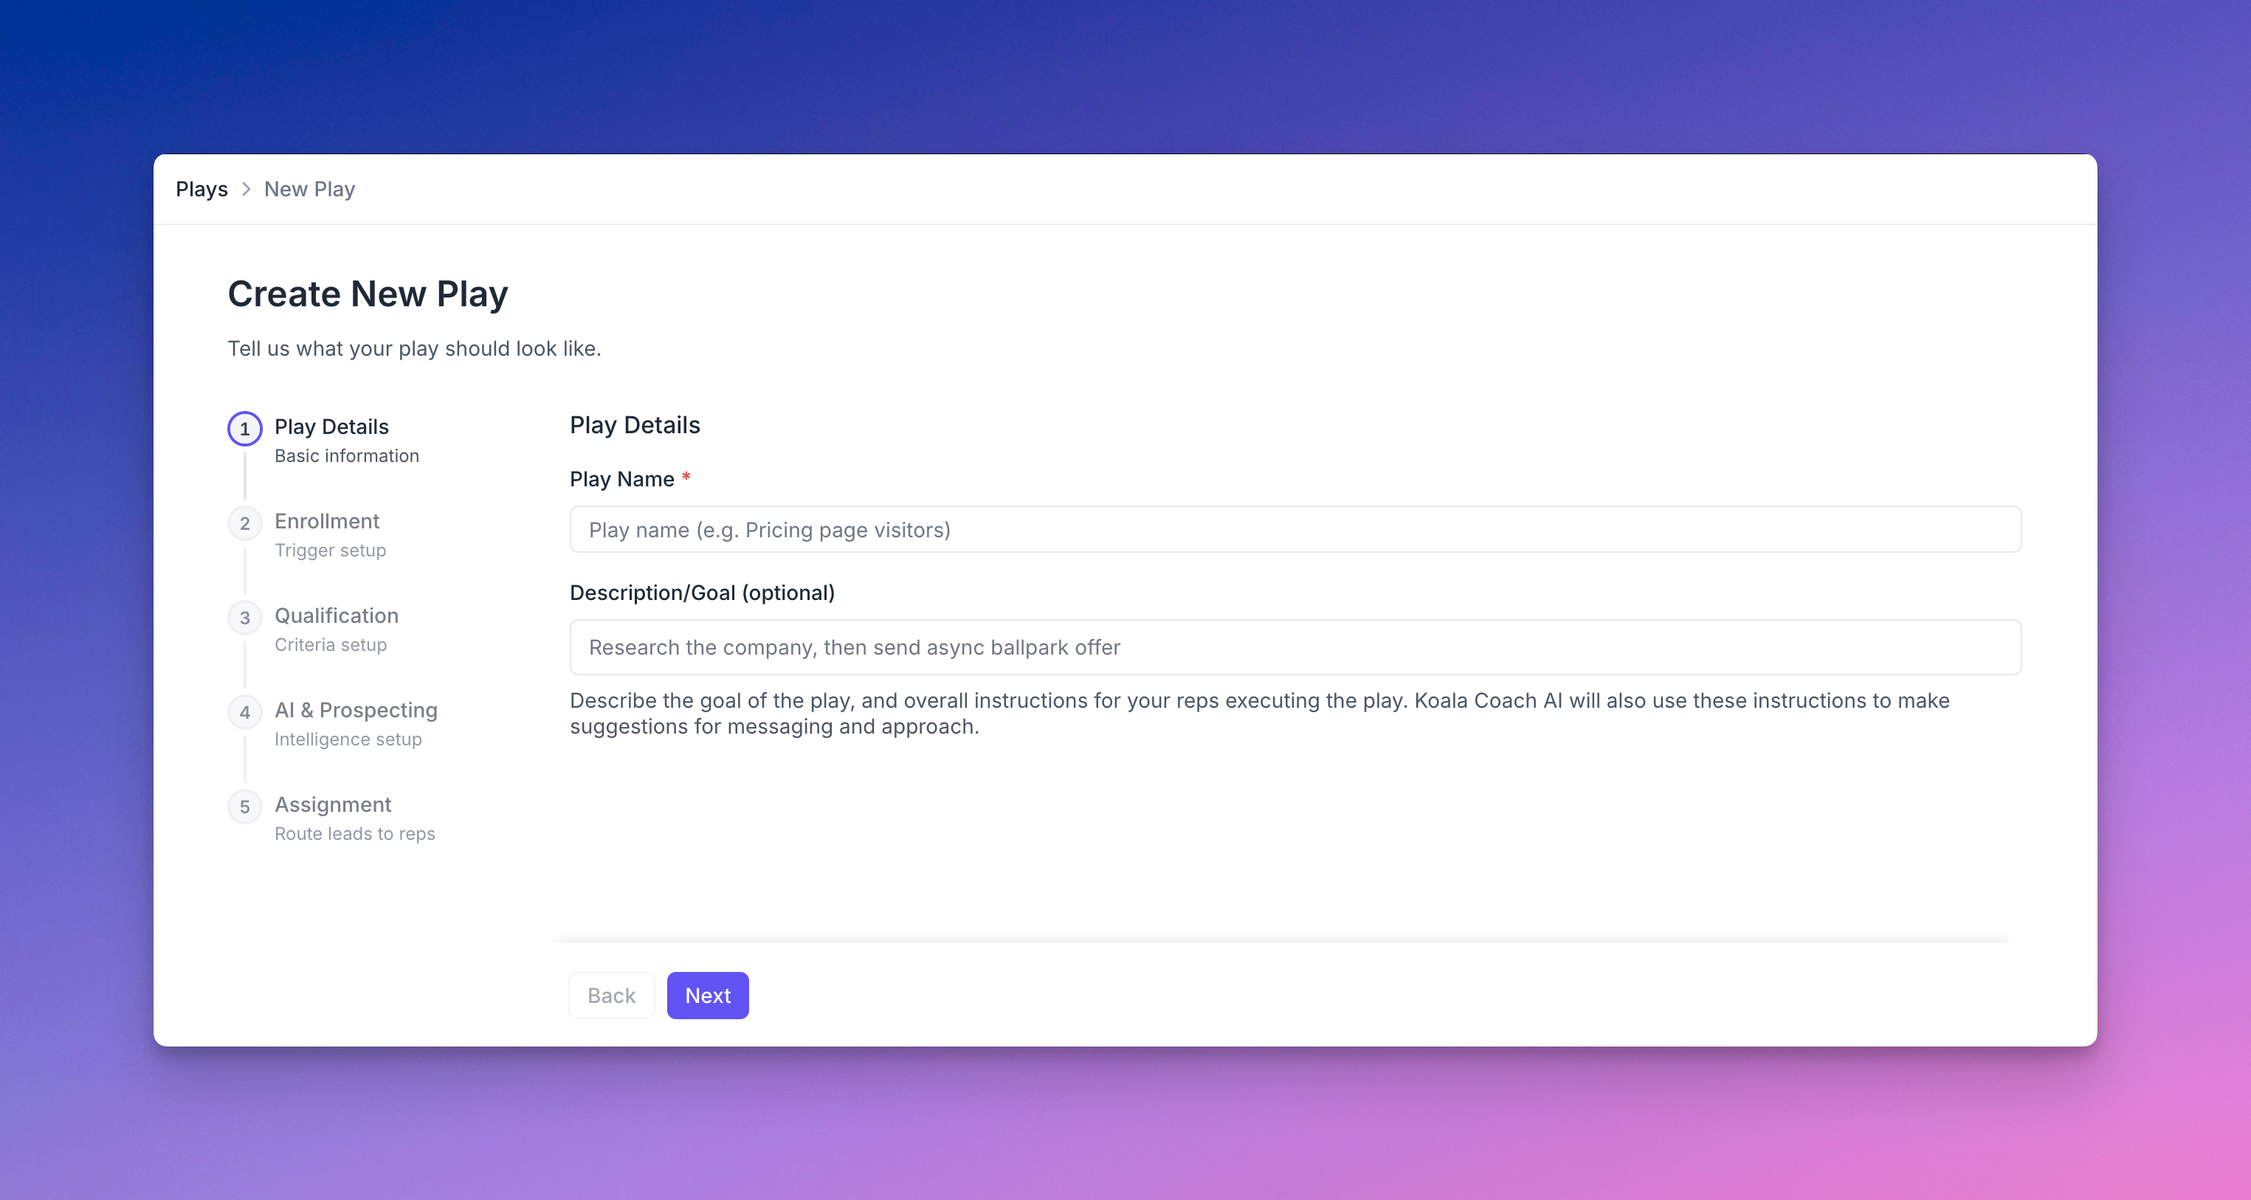
* Who – how do you want to define the audience of leads or accounts that you want to target? This can be configured to dynamically enroll leads based on specific criteria, or you can manually add leads to the play (via CSV upload, or manually selecting people/accounts). For dynamic enrollment you’ll typically want to specify some signals in addition to filter conditions. Here are all the ways you can enroll leads into a play today:
* Choose from an already-defined list. As new leads match that audience definition, they’ll be added to the play. Use this when you have an audience already defined that you’d like to reuse.
* Choose from a set of filter conditions. This is the same as choosing a list, but you don’t have to create/save a list first. Use this when you don’t necessarily want to define a reusable audience (”list”).
* Manually add people/companies from a CSV file. You can map columns from the CSV to attributes on the records, too.
* Choose from a Prospector search. You can specify company firmographic filters and person-level filters about their title or role to pick the right type of people from the right types of accounts you want to engage, and you’ll receive batches of new prospects that match your criteria every day.
* Choose GitHub repository interactions to automatically sync people who are interacting (forking, commenting, open pull requests, starring) with a given set of repos that are relevant. These could be repos that your company owns or cares about (like OSS projects related to your product), or competitor repos that are public to see what engineering teams may be in market for your product.
* Choose LinkedIn interactions to automatically sync people interacting with specific posts, specific profiles, or company pages. This isn’t limited to just your own profile or own company, so you can also track competitors and influencers that are in your space.
* Set up exclusion filters to automatically prevent certain leads from entering your play even if they match your enrollment criteria. This helps filter out paid customers, recently active leads, or visitors from non-target regions, ensuring your team only works the most relevant opportunities.

* How – do you want to automatically qualify and disqualify leads/accounts? do you want to set up auto-assignment to route leads to different reps on your team based on flexible rules? Do you want to subscribe to a Slack channel to see updates for all the new leads added to the play with AI insights and suggested messaging? Do you want to enhance your play with AI & Prospecting features like Waterfall Enrichment to gather contact information, AI Auto-Prospecting to discover additional prospects, and AI Agent Swarm to collect key account insights for coaching?
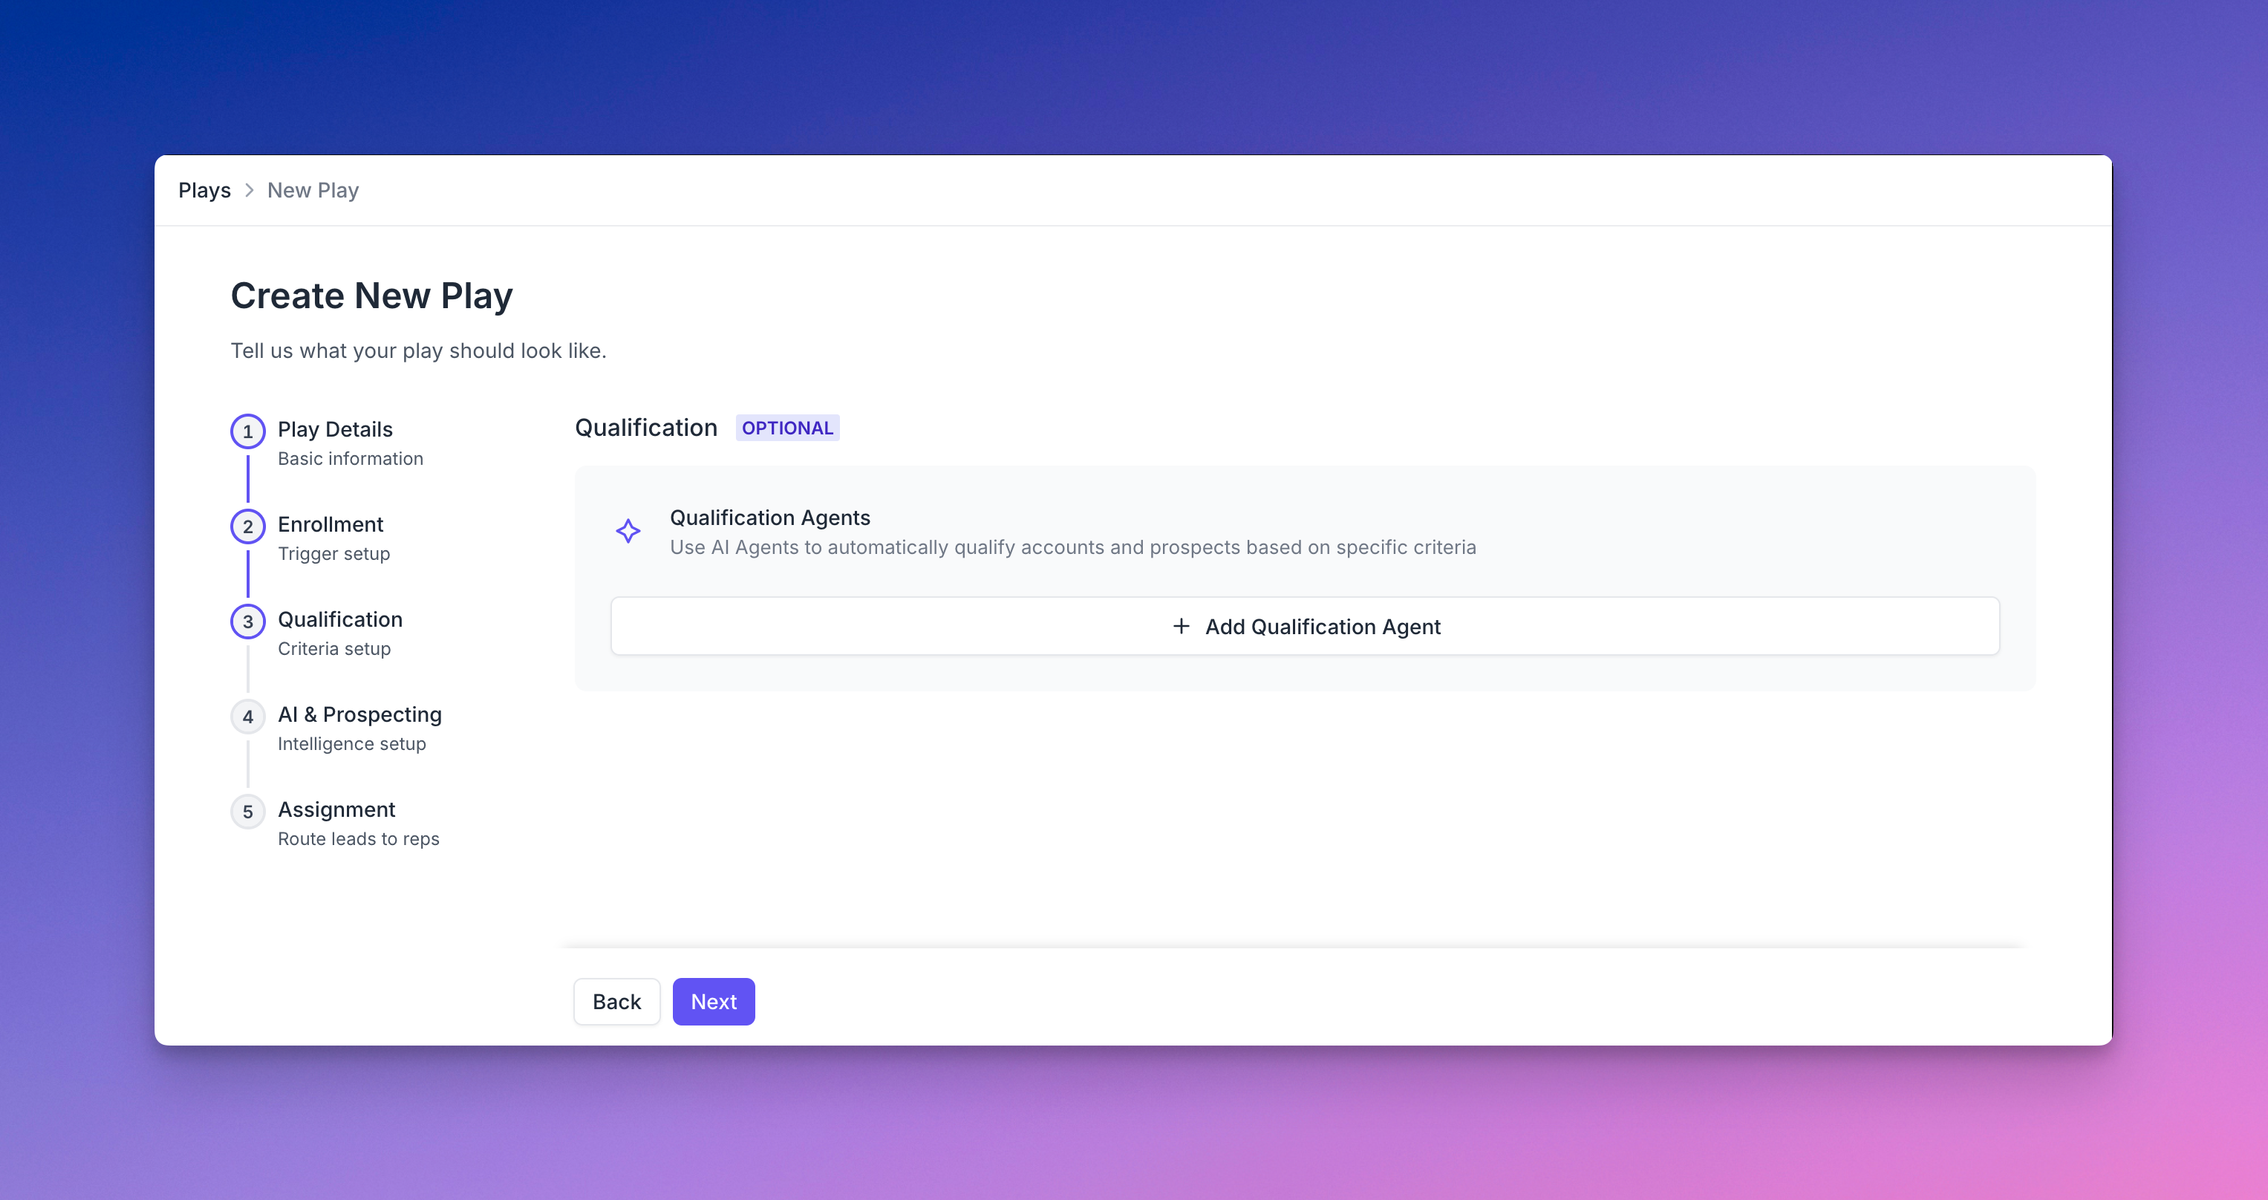
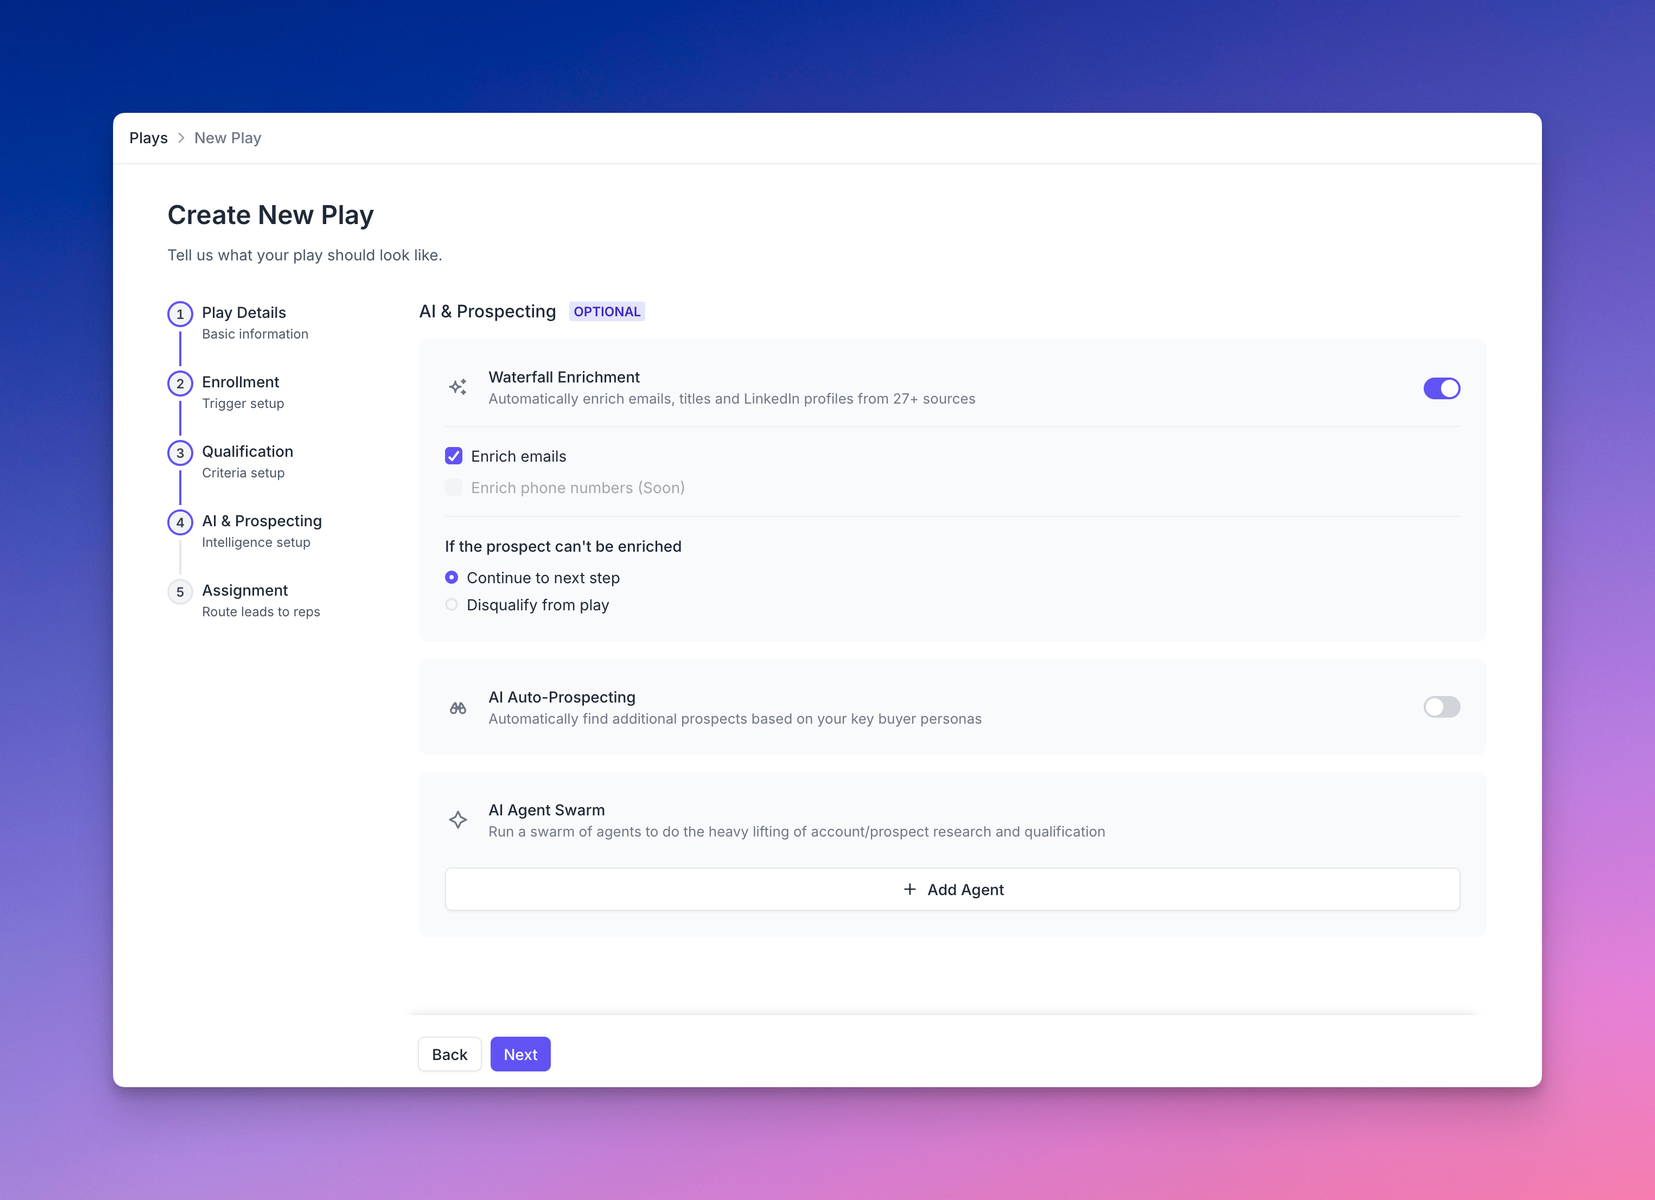
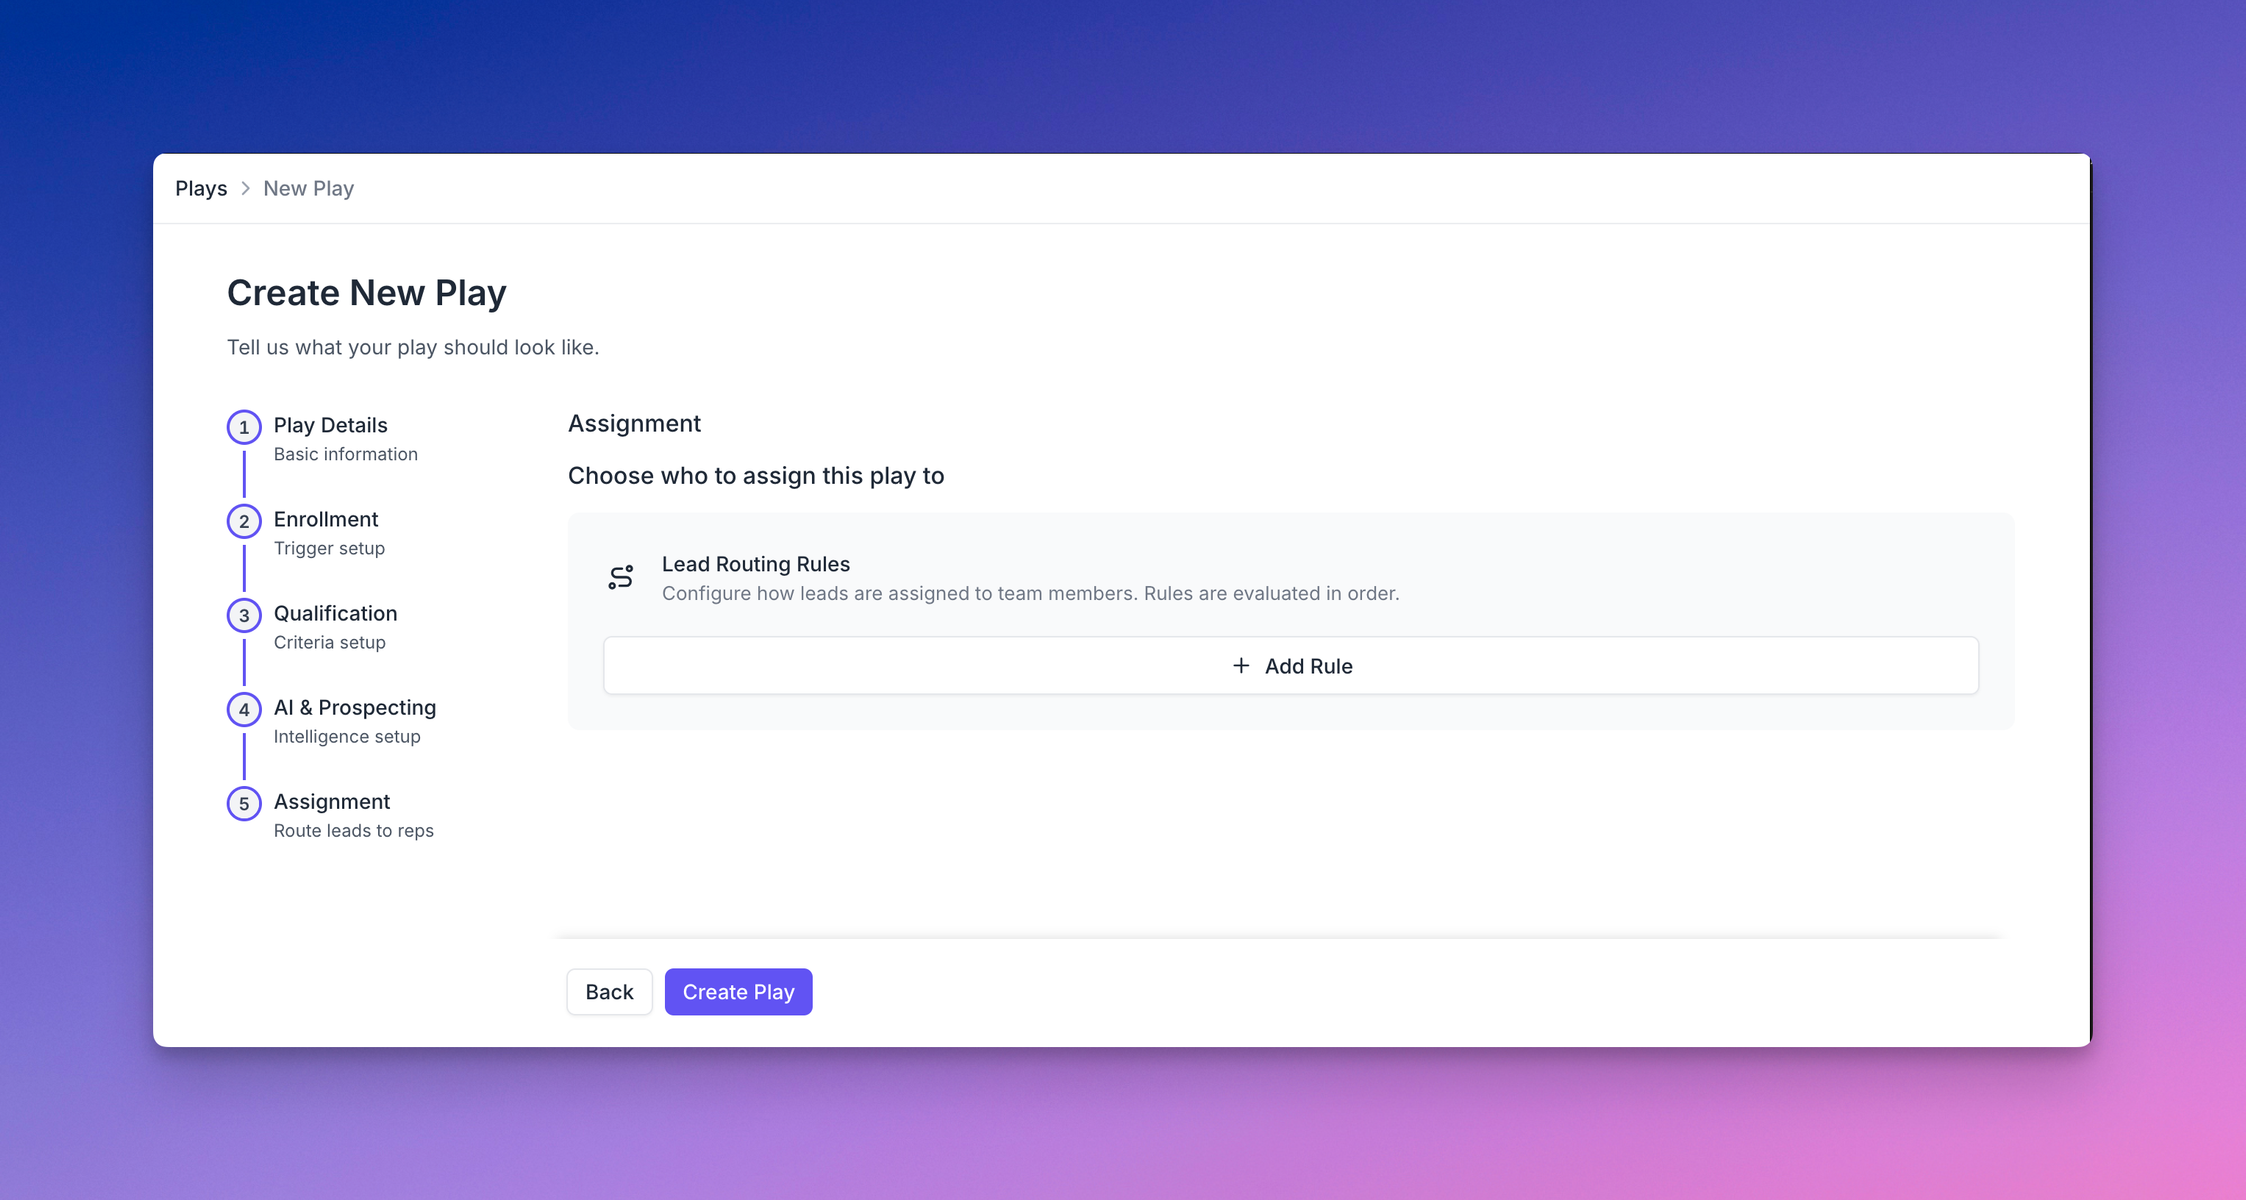
### How do I know what signals to use?
Koala’s [Content Reports](/docs/product-manual/content-reports) give you a lot of insight if you are unsure about what signals tend to lead to conversion. You can use multiple reports to see what events actually are relevant for different conversion goals, like net-new opportunities, booking meetings, or custom events like new user signups.
Typically you’ll have a few key signals that you may already have a hunch about, and the Content Report data can help confirm your hypothesis in a statistically significant way.
Some of the more surprising ones we’ve seen are legal pages, deeper technical docs showing interest in understanding how the product works, and lots of product usage data for companies that have a freemium or PLG motion.
We recommend starting with the most obvious things before diving into more nuanced signals.
## What happens after I create the play?
Once you’ve configured the required parts of a play, Koala will start finding recent leads/accounts that match your enrollment criteria. This only happens when you first set up the play source, as a way to backfill leads that you would have gotten had it already been running recently.
You can choose to set up auto-assignment with lead routing rules to dole out leads to the rest of your team, or you can leave leads unassigned. If they are unassigned, they’ll only show up in the Play (i.e. you’ll have to navigate to the Play to see them, assign them, or work them).
If you have assignment happening, reps will have 3 primary ways they can interact with the leads.
1. **In the app**: They will see a new Inbox item in their navigation menu, with a little red dot if they have any leads in their inbox to work.
2. **In their email**: If notifications are turned on they can receive emails of new assigned leads.
3. **In Slack**: If notifications are turned on they can receive Slack DMs about new assigned leads, and can join a shared channel for new leads as they get added to the play.
You can also enable notifications so you and your team know when there are new leads. We have two types of notifications you can configure in a couple clicks, today:
1. Enrollment notifications
2. Assignment notifications
### Enrollment notifications
You can subscribe to a Slack channel to see all new leads in the play that havent already been ack’d or completed or disqualified.
If you enable @ mentions, users who are assigned the lead will be invited to the channel (once only) with their name mentioned on the corresponding lead.
Koala will send alerts as new leads are added to the play with the most relevant data, AI research, and key insights automatically included in the Slack message.
You can take further action directly from Slack to see more insights, suggested messaging, as well as Claim, Assign, or Dismiss the lead, without having to leave Slack.
### Assignment notifications
You can subscribe to both *email and Slack DMs* for this notification. Whenever leads are assigned to you (either manually, or automatically) you’ll receive a DM in Slack or an email digest of new assigned leads.
Note: This is configured at the play level for all assignees, and cannot currently be configured per user.
## How do I take action on leads?
There are three places you can take action:
1. From the Play dashboard – you can see the full table view of all the leads or accounts added to the play and you can assign, dismiss, email or add to sequence.
2. From the Inbox – reps will get an inbox containing only the stuff assigned to them. Admins can see an Inbox Dashboard that shows you how leads are being enrolled, worked, or dismissed by user or by play, with some high level stats about daily/weekly trends.
3. From Slack – you can subscribe to notifications and do things like AI Research, assignment, and dismissing leads directly from Slack. However, actions like emailing or adding to a sequence still require navigating into the app first.
## Inbox
The Inbox is where reps go to take action on leads enrolled in plays. It provides a streamlined interface to manage assignments and engage with prospects effectively.
## How do reps work leads in their Inbox?
The Inbox is where reps go to see and take action on their assigned leads. When opening the Inbox, reps see a personalized greeting showing how many leads are waiting for review, along with a streak tracker displaying their activity throughout the week. Leads are organized into collapsible sections by play, with each section showing a count of included leads and a brief description of the play's purpose. Leads can also be filter for Today, Last Week, or All Time.
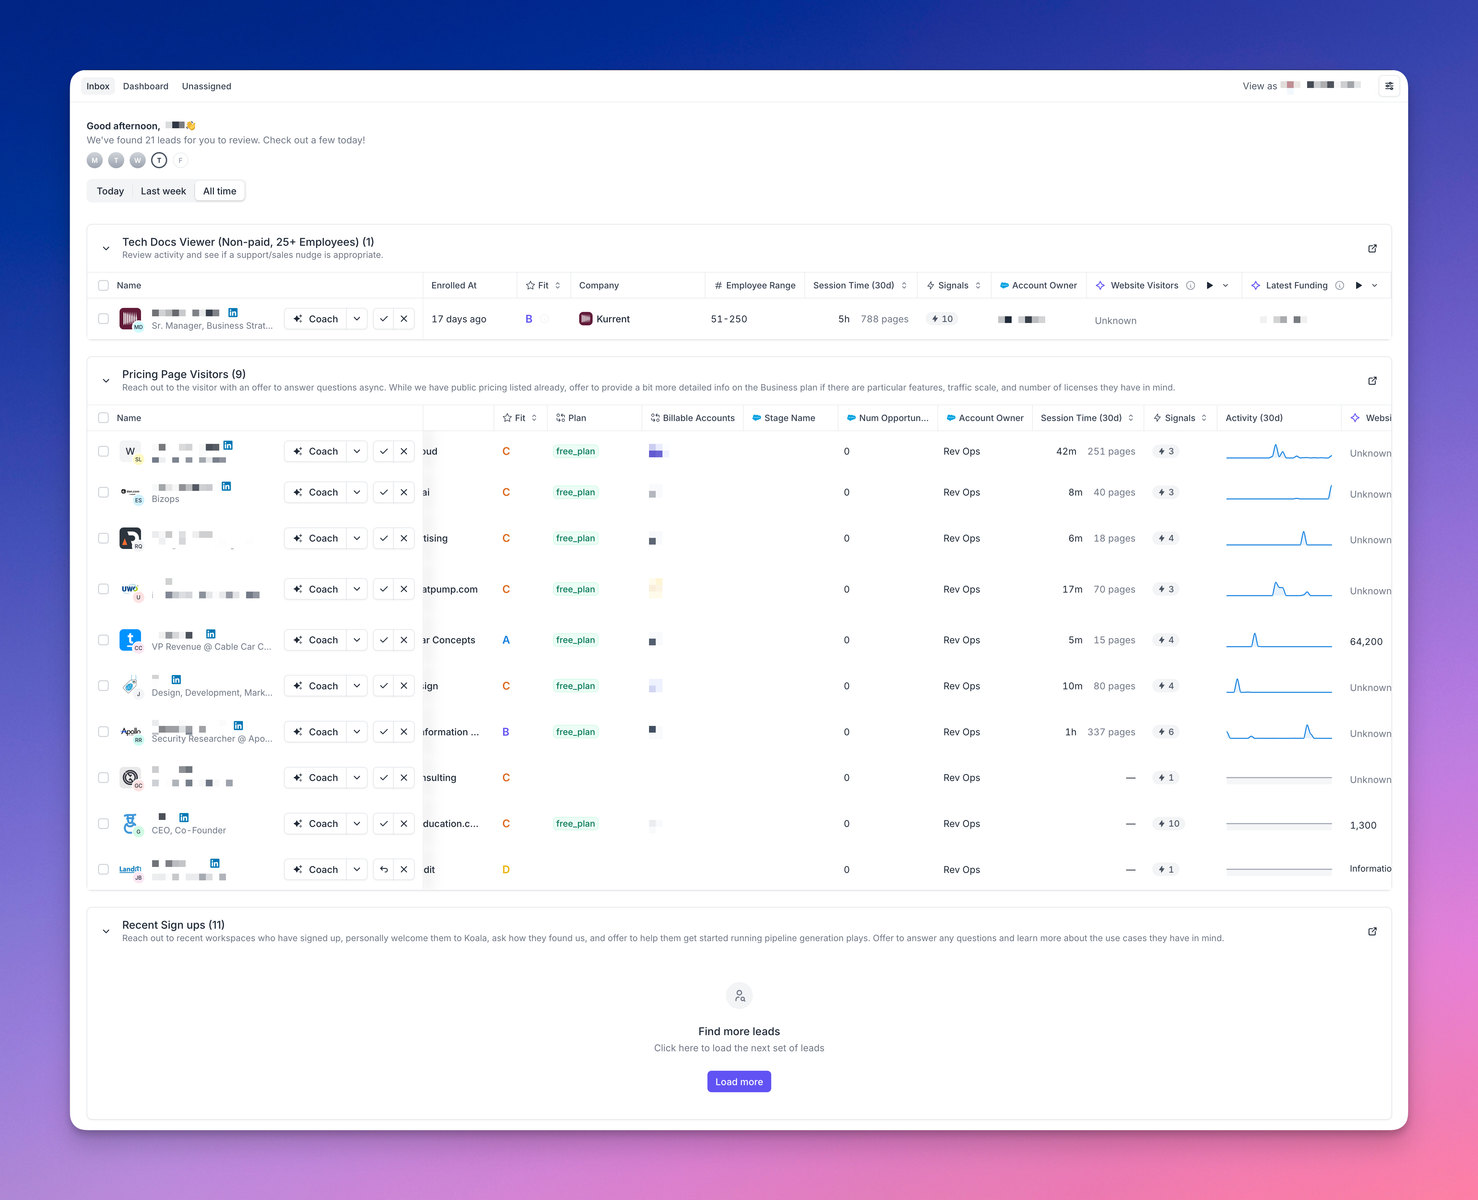
### What actions can reps take on leads?
Reps have several ways to engage with their assigned leads:
When clicking the "Coach" button on a lead, reps access the AI Coach which provides essential context including the Play Tactic (why this lead was enrolled), relevant Research data about the company, Key Information about engagement patterns, and strategic Email Approach recommendations.
From the Coach interface, reps can send emails through Gmail or sales tools like Outreach/Apollo, create LinkedIn messages, or access AI-generated call scripts. The system also alerts reps if a lead was contacted recently to prevent duplicate outreach.
For lead management, reps can Mark Complete when a lead has been worked, Dismiss leads that aren't relevant, Add to Sequence for automated follow-up, or Reassign leads to other team members. Multiple leads can be selected for bulk actions to improve efficiency.
### How do managers track team performance?
Team managers access the Inbox Dashboard to monitor lead status across the entire team. The dashboard displays leads by status (Pending, Qualified, Engaged, Dismissed) with trend visualizations and can be viewed by User or by Play. This lets managers quickly identify performance patterns and determine which team members might need additional coaching or support.
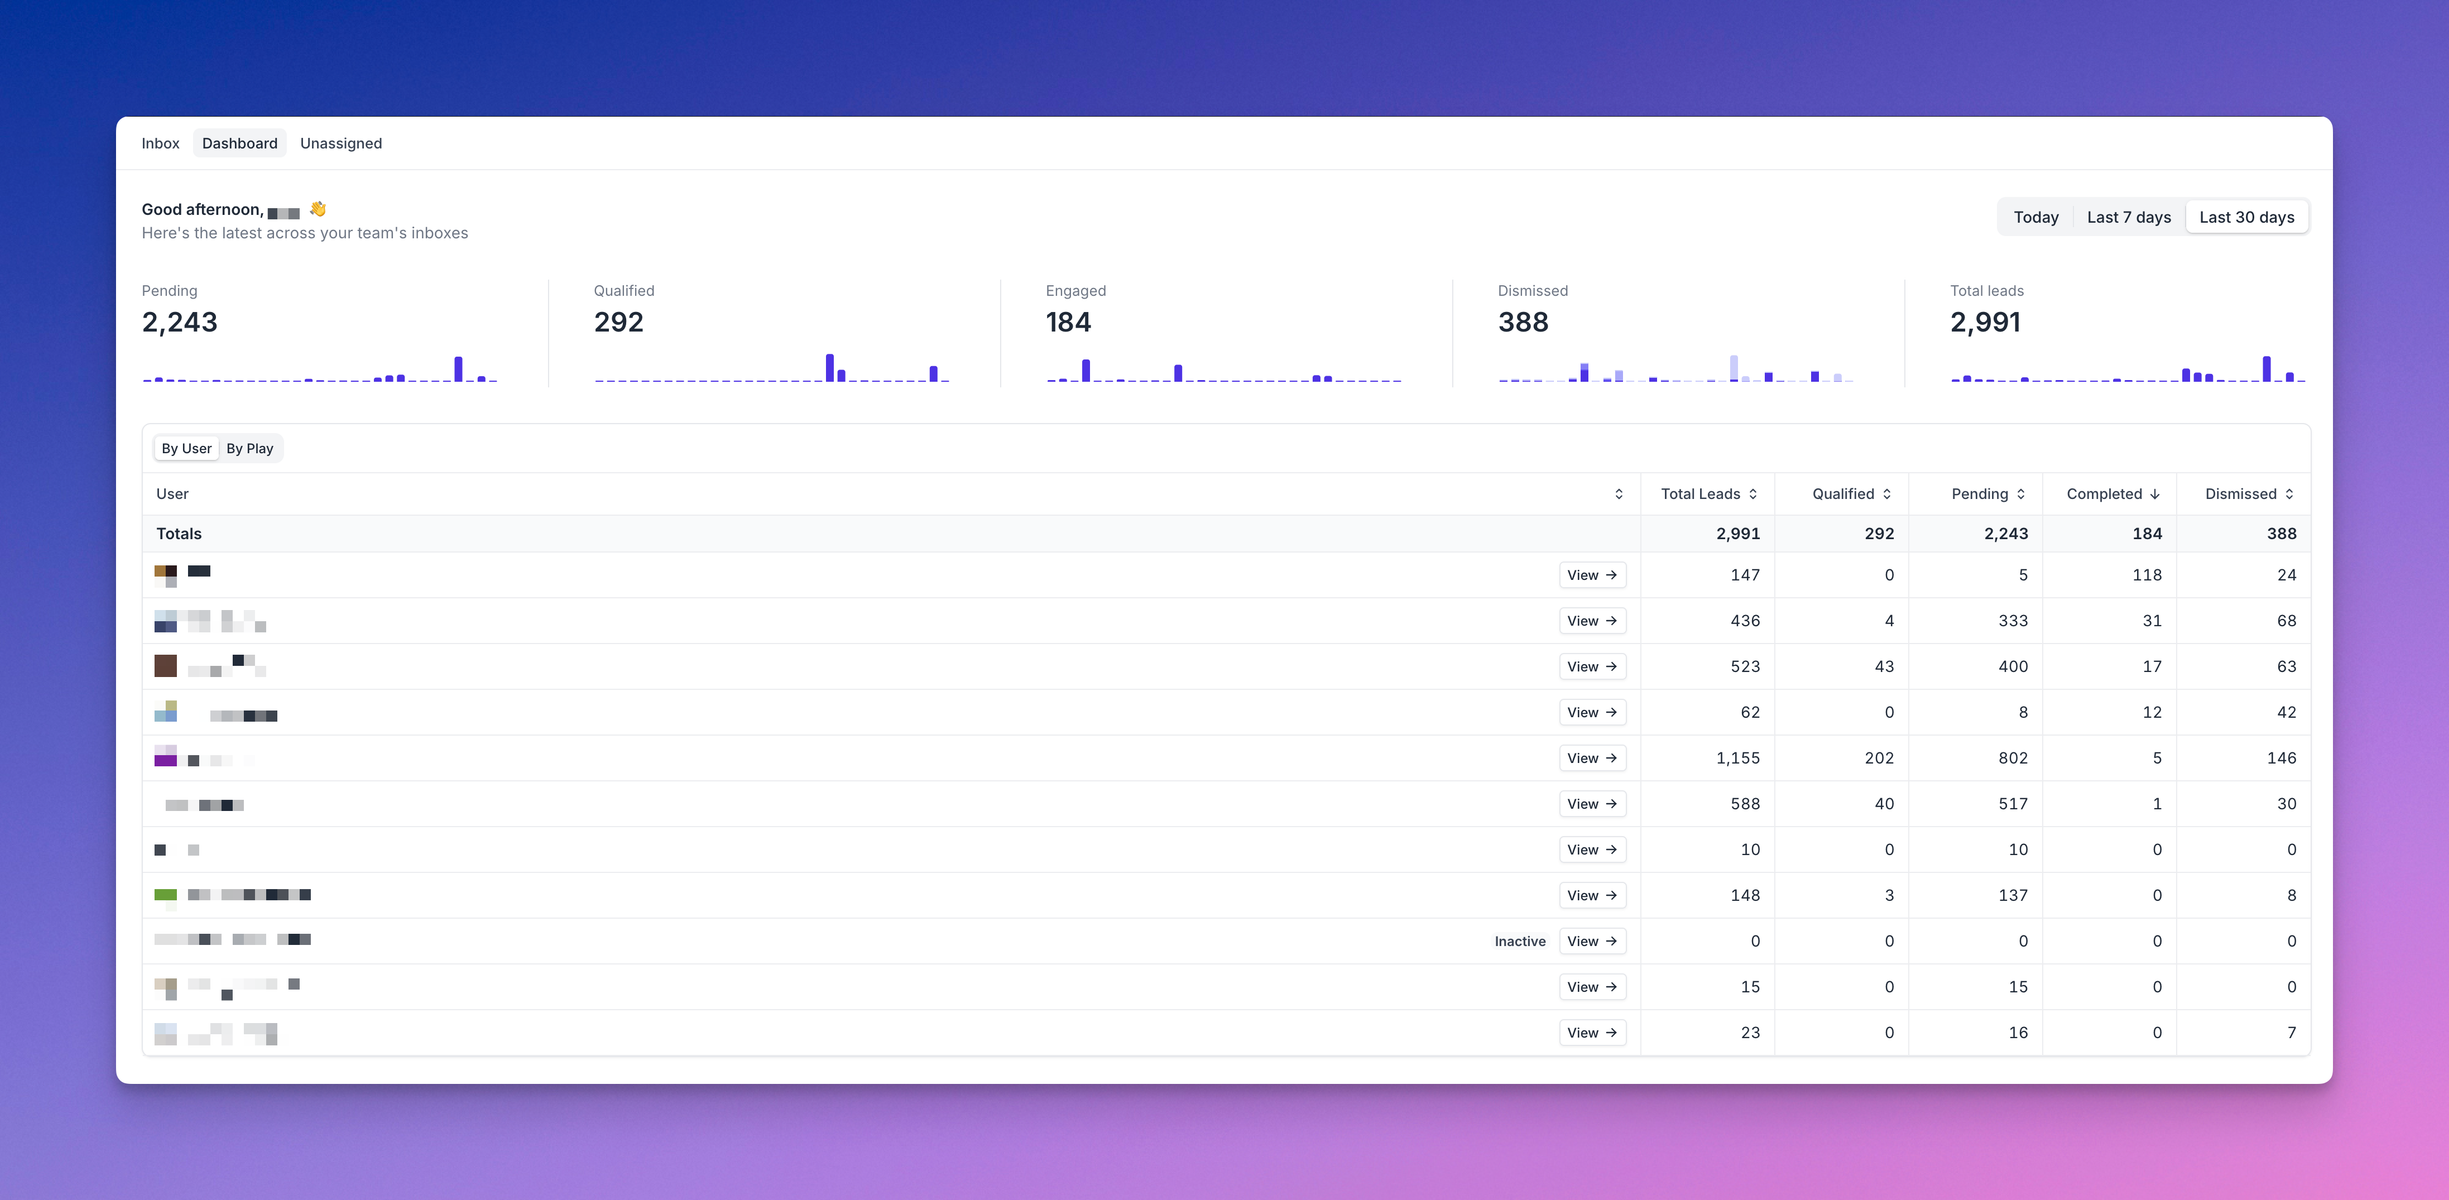
# Koala Weekly
Source: https://getkoala.com/docs/product-manual/koala-weekly
See the top accounts showing intent, delivered to your inbox every week.
## What is Koala Weekly?
Koala Weekly is a weekly email that goes out on Sunday at 4pm Pacific Time. Every rep can select exactly which audiences they'd like to receive updates on - by default, we'll send updates on all the accounts a rep owns, but we also encourage reps to subscribe to other interesting audiences, especially unowned accounts in their territory that might be showing interest.
<Note>
Read more about <a href="/docs/product-manual/audiences">audiences</a>.
</Note>
## How to use Koala Weekly?
Every week, you make an incredibly strategic decision: "Of the hundreds of accounts I could be prioritizing, where do I spend my time to maximize revenue?"
Koala Weekly is a personalized email showing you which of your accounts are showing active intent. It can help you improve your win rate, avoid wasting time, and find low-hanging fruit.
Accounts that are showing intent are much more likely to engage, so we recommend using this email for account prioritization. We select the most engaged accounts according to everything we know about them, so we suggest <a href="/docs/rep-guides/use-koala-for-research">doing account research</a> on the top 5-10 accounts and then <a href="/docs/rep-guides/send-great-sales-messages">sending some great messaging</a> on at least 3-5 accounts.
## What does it look like?
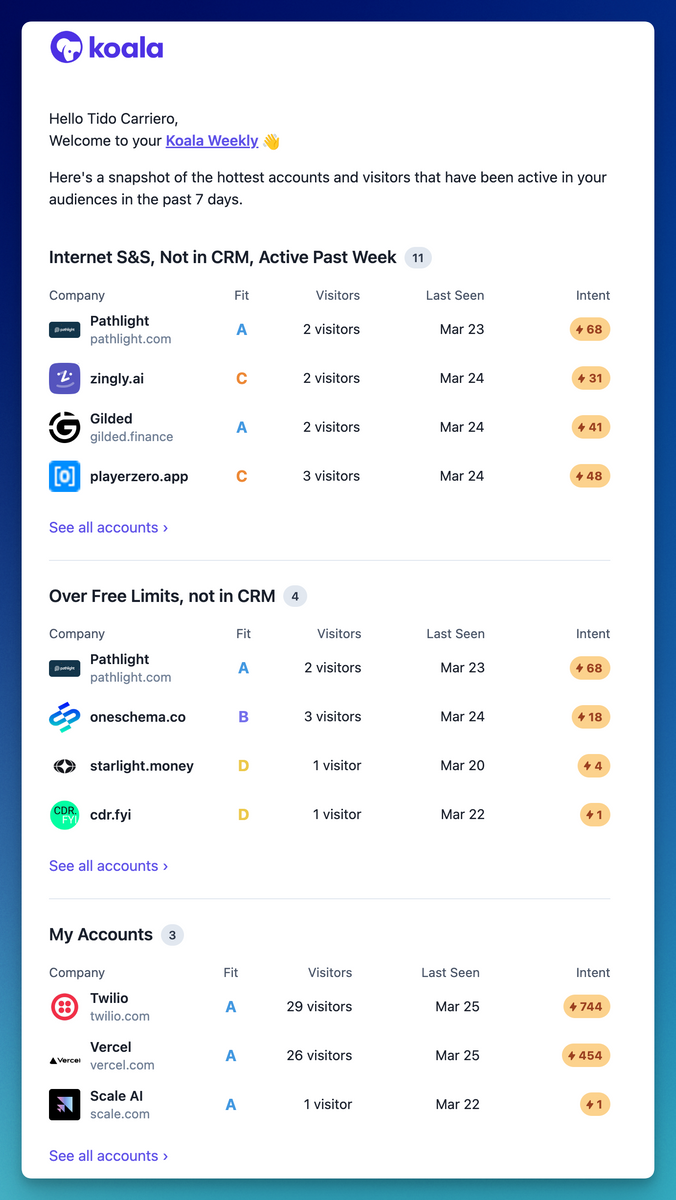
# Slack Alerts
Source: https://getkoala.com/docs/product-manual/slack-alerts
Set up real-time alerts when your prospects are showing buying intent, directly in Slack.
## What is a Slack Alert?
A Slack Alert sends one or more <a href="/docs/product-manual/intent-signals">Intent Signals</a> to a Slack channel. Each channel can also have an <a href="/docs/product-manual/audiences">Audience</a> as a filter, so that only updates about certain sets of visitors or accounts go to that Slack channel.
## What do the Slack messages reps receive look like?

*Note: there is quite a bit of message customizability, but the above is a "default" template.*
## How do I create, edit, and delete Slack Alerts?
<Note>
In order to use Slack Alerts, you'll first need to connect your Slack workspace to Koala. Read more about the <a href="/docs/integrations/slack">Slack integration</a>.
</Note>
### Intent Signal home
[https://app.getkoala.com/goto/signals](https://app.getkoala.com/goto/signals)
### Create an Intent Signal
...by clicking "New Intent Signal" in the upper right.
### Read/Edit an Intent Signal
...by clicking on the Intent Signal in the middle.
### Delete an Intent Signal
...by clicking the `...` menu within an Intent Signal.
# Explore KoalaU
Source: https://getkoala.com/docs/rep-guides/explore-koalau
Guides for sellers have moved to KoalaU
Check out KoalaU to learn strategies & tips on how to best leverage the platform from account research to value-add messaging. [Explore it here!](https://www.getkoala.com/university/koala-101)
# Autotracking
Source: https://getkoala.com/docs/sdk/autotracking
Learn about how the Koala pixel automatically tracks events.
# What is autotracking?
By default, Koala will *automatically track* certain events on your website. This includes:
* pageviews
* form submissions
* active session time
* presence (when a user is active on your site vs idle)
This means that you don't need to write any code to track these events. Koala will automatically track them for you. Whether you have a single page app or a traditional website.
## Disabling autotracking
You can disable autotracking entirely by setting the `autocapture` option to `false` when you initialize the Koala pixel.
When loading from the CDN/script tag, add this before your script:
```javascript
window.koalaSettings = {
sdk_settings: {
autocapture: false,
},
};
```
When using the NPM package, add this to your initialization:
```javascript
import * as KoalaSDK from "@getkoala/browser";
let ko = null;
// returns a promise containing the ko namespace object
KoalaSDK.load({
// add your project's public key here
project: "pk_...",
sdk_settings: {
autocapture: false,
},
}).then((koalaSDK) => {
ko = koalaSDK;
});
```
This will fully disable all autotracking of pageviews, form submissions, active session time, and presence.
## Manually/programmatically enabling or disabling autotracking at runtime
You may want to enable or disable autotracking temporarily on some pages, for instance, if you are using Koala in a SPA that navigates seamlessly across your marketing site and product dashboard.
You can do this by calling `ko.startAutocapture()` and `ko.stopAutocapture()`.
```javascript
// start autocapture
ko.startAutocapture();
// now,
// pageviews will automatically be tracked (including the current page immediately)
// form submissions will be tracked
// active session time will be tracked
// presence will be tracked
```
```javascript
// stop autocapture
ko.stopAutocapture();
// now,
// pageviews will not be automatically tracked
// form submissions will not be tracked
// active session time will not be tracked
// presence will not be tracked
```
# Identify visitors
Source: https://getkoala.com/docs/sdk/identify
Learn how to identify visitors with the Koala SDK.
Koala allows you to identify your visitors with their email. This enables Koala to associate the visitor with a specific company, track them on different platforms, and connect events from before and after they log in.
Identifying visitors can be done with the `identify` method in Koala's JavaScript SDK. By using this method, you can enhance your ability to understand visitor and company intent throughout Koala.
## Anonymous visitors
Every visitor to your website is automatically assigned a unique anonymous ID by the Koala JavaScript SDK. You can use the `identify` method to provide additional properties about the visitor even before you know their email address. This information can help you better understand traits about your visitors.
In order to track visitors across different devices, use the `identify` method to associate events with a logged-in user instead of just the device they are using.
## Identifying a visitor
When a visitor signs up for your product for the first time, or logs in again, you can use the `identify` method to associate their email address with their anonymous ID. This allows Koala to associate events from before and after they log in and Koala can associate the visitor with a specific company.
You should use the `identify` method whenever a visitor:
* Signs up for your product
* Logs in
* Provides their email address in a form
* Loads a page as a logged-in user
```js
ko.identify('jane.doe@example.com')
```
<Note>
Using Google Sign In or other login methods? Check out more details below: [Identifying with Google Sign In](#identifying-with-google-sign-in-passwordless-magic-links-or-others)
</Note>
## Setting visitor traits
You can use the `traits` (2nd parameter) to supply additional details about the anonymous or known visitor. This can include any relevant information that helps you understand your visitors better. You can use this data to filter and segment your visitors in Koala. Some examples of visitor traits are:
* `name`: The visitor's full name
* `title`: The visitor's job title
* `role`: The visitor's role
* and whatever else is important to your business
Here is an example of using the `identify` method to set visitor traits:
```js
ko.identify('jane.doe@example.com', {
name: 'Jane Doe',
title: 'Product Manager'
})
```
We recommend sending traits along with every `identify` call to make sure your visitor's profile is up to date.
## Setting account traits
In addition to capturing visitor traits, you can also specify *account-level* traits. This is any data about the company or organization you want Koala to know about. You can use account traits to set up filters and lists in Koala.
Here is an example of using the `identify` method to set account traits:
```js
ko.identify('jane.doe@example.com', {
$account: {
name: 'Acme Inc.',
domain: 'example.com',
plan: 'Enterprise'
}
})
```
When you specify the `$account.domain`, Koala will automatically associate that company with the visitor, if not already associated.
If `domain` is not a unique value for your account-level data, for instance if you have multiple Teams or Workspaces that all link back to the same `domain`, you can specify the `group_id` to distinguish them. It's recommended to always include a `group_id` that is a unique id for the group of data.
<Info>You can pass account traits as camelCase or snake\_case. Koala will treat them the same. Use whatever is most comfortable or familiar for your environment/language.</Info>
```js
ko.identify('jane.doe@example.com', {
$account: {
group_id: '<replace-with-unique-id-for-acme-inc>',
name: 'Acme Inc.',
domain: 'example.com',
plan: 'Enterprise'
}
})
```
You can link multiple sets of `group_id` traits to the same domain, but you cannot do it in a single `identify` call:
```js
// ✅ Allowed
ko.identify('jane.doe@example.com', {
$account: {
group_id: 'acme-production-id',
name: 'Acme Inc.',
domain: 'example.com',
plan: 'Enterprise'
}
})
ko.identify('jane.doe@example.com', {
$account: {
group_id: 'acme-test-environment-id',
name: 'Acme Inc.',
domain: 'example.com',
plan: 'Free'
}
})
```
Unlike some product analytics tools that have a `group` concept, we do not support capturing `group_id`s for events/pageviews. Instead, they are only used for collecting sets of traits you want to associate with a given account (company/domain).
## Identifying with Google Sign In, Passwordless Magic Links (or others)
Typically, the Koala pixel automatically captures emails from form submissions, which works great for traditional login forms. However, for more advanced login methods, like Google Sign-In, GitHub Sign-In, or Single Sign-On (SSO), manual intervention is required.
If you use these types of sign-in methods, you'll need to manually call `ko.identify` *after* the user has successfully logged in. We recommend installing the Koala pixel on the landing page of your logged-in site, and then calling `ko.identify` from there with the user's email. You can also provide any other relevant traits you want to see or use in Koala.
```js
ko.identify('jane.doe@example.com', {
name: 'Jane Doe',
title: 'Product Manager'
})
```
<Note>
If you cannot manually call `ko.identify` from the client-side of your logged-in site (after successful login/signup), it is possible to identify users server-side, but a bit more complex. We strongly recommend installing the Koala pixel and calling `ko.identify` on page load of your logged-in site, but if this is not possible you can read more about [Identifying server-side](/developer-guides/server-side#identifying-visitors).
</Note>
## Reset after logout
When a user logs out on your frontend, you should call `ko.reset()`. This will prevent future events from that device from being linked with that user. This is especially important when a device is shared by multiple users.
# Install Koala
Source: https://getkoala.com/docs/sdk/installation
Learn how to install the Koala JavaScript SDK.
See [the Quick Start](/get-started/quick-start#copy-the-snippet) for general installation instructions.
## FAQ
### Does Koala work across different subdomains? (eg., example.com, app.example.com, docs.example.com)
Yes, if you intall the pixel in all places, we'll seamlessly track the entire user journey across all subdomains with no additional configuration.
### What happens with Koala installed on different top-level domains? (eg., vercel.com, nextjs.org)
You can install the pixel in both places, but the same user will show up as two different users. This is not a Koala limitation per se, but rather a design choice browsers have made to not let different top-level domains share cookies. If the users identify themselves, we'll automatically merge them into one profile, but they will show up as different profiles until the identification happens.
## Troubleshooting
### Using a strict Content Security Policy
Koala asynchronously loads different parts of the library as needed. If your site uses a strict Content Security Policy (CSP) that specifies which locations can download JavaScript or use Websockets, then you'll need to update the CSP to handle those pieces used for Koala.
<Note>
You may see client-side errors about a "Content Security Policy" directive if
you are using a strict CSP and Koala has not be added to it.
</Note>
Depending on your CSP configuration, you may need various CSP directives like `connect-src` or `script-src` to allow Koala to work properly.
If you have a strict `connect-src`, add these endpoints to it:
* `https://*.getkoala.com`
* `wss://*.getkoala.com`
If you have a strict `script-src`, add this endpoint to it:
* `https://*.getkoala.com`
If you have a strict `script-src-elem`, add this endpoint to it:
* `https://*.getkoala.com`
It's likely you can find it in your codebase if you do a case-insensitive search for `script-src`, but if you need to learn more about it, use this resource to learn more: [https://content-security-policy.com](https://content-security-policy.com)
### Installing the library under a custom global namespace
When you load Koala through snippet code, by default, the SDK installs on `window.ko` global variable. If this causes a conflict with another library or code on your site, you can change the global variable used by Koala.
Change the global variable in the beginning of your snippet code as shown below. In this case, Koala uses `window.custom_key` to load instead of `window.ko`.
```diff
- !function(){var k="ko", ...
+ !function(){var k="custom_key", ...
```
Alternatively, you can use the `window.globalKoalaKey` to set the global variable.
```html
<script>
// Koala will use this global key instead of window.ko, in this case window.custom_key
window.globalKoalaKey = "custom_key";
</script>
<script>
// paste your Koala snippet here
</script>
```
# Send events
Source: https://getkoala.com/docs/sdk/track
Learn how to capture key events with the Koala JavaScript SDK.
You can capture events that signify important actions in your product or marketing site. For example, you could send an event when a user clicks a certain call-to-action button or when a user signs up for your product.
```js
ko.track('Signed Up', {
plan: 'Team Plan',
frequency: 'monthly',
source: 'Pricing Page'
})
```
If you are using Segment, Koala can be configured to automatically hook into Segment events without any code.
You can use custom events like this to define [Intent Signals](/product-manual/intent-signals) and send real-time [Slack Alert](/product-manual/slack-alerts).
<Tip>
When enabled, Koala's SDK will autotrack most form submissions. You can often model Intent Signals without sending custom events for things like demo requests or registrations unless Koala is not able to see those forms. In those cases, it's recommended to send custom events in lieu of the autotracked form submission.
</Tip>
```js
ko.track('Requested Demo', {
team_size: '10-50',
how_did_you_hear_about_us: 'Google Search'
})
```
# 3rd Party Sources
Source: https://getkoala.com/docs/sources/index
Sources for enriching customer profiles
In addition to website tracking, Koala supports integrating with other sources of data that can be used to enrich your customer profiles with activity or traits data.
Koala will automatically track activity from the new sources you add, as well as enrich your customer profiles with the data.
## Web & Product Data
* [Segment](/integrations/segment)
* [BigQuery](/integrations/bigquery)
* [Snowflake](/integrations/snowflake)
* [RB2B](/integrations/rb2b)
* [Mintlify](/integrations/mintlify)
* [Readme](/integrations/readme)
## Social / Community
* [Chrome Extension for LinkedIn](/integrations/linkedin-chrome-extension)
* [GitHub](/integrations/github)
* [Slack Community](/integrations/slack-community)
* [Discord Community](/integrations/discord)
* [G2](/integrations/g2)
* [Discourse](/integrations/discourse)